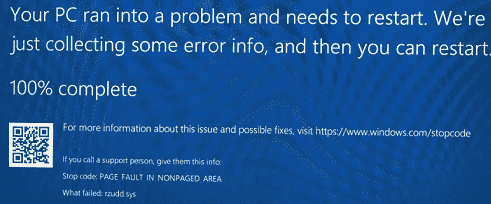
Today, we will discuss all the possible workarounds to resolve PAGE FAULT IN NONPAGED AREA, another Blue Screen of Death error in Windows 10. The Stop code indicates a failure in rzudd.sys. Basically, “rzudd.sys” is a Razer Rzudd Engine driver, a part of Razer Synapse software which crashed down and leads to the BSOD screen. Experts are with a view that this issue is triggered when Driver Verifier is enabled.
However, as per some other techies, PAGE FAULT IN NONPAGED AREA (rzudd.sys) may also occur because of memory corruption. So, if you get the same rzudd.sys Blue Screen issue, then you should perform certain troubleshooting methods. The Razer Support team suggests to disable and enable Driver Verifier to get rid of the problem. Furthermore, you should also check the memory as well as disk, remove third-party antivirus, or update drivers to fix the issue.
PAGE FAULT IN NONPAGED AREA (rzudd.sys) –
PAGE FAULT IN NONPAGED AREA (rzudd.sys) Blue Screen Error Windows 10 Solutions
Here is how to fix PAGE FAULT IN NONPAGED AREA (rzudd.sys) Blue Screen Error Windows 10.
When BSOD error appears on your PC, you cannot access the login screen. It becomes difficult to perform any of the fixes, therefore, you must Boot into Safe Mode then try the solutions.
To begin with, you need to disconnect all external devices. Then insert “Windows 10 installation media”. You can use DVD or USB into the respective port of the device and restart the system.
Simultaneously make a hit on any of the function keys such as Esc, Delete, F2, F8, F10, F12 or Backspace repeatedly. The function key completely depends upon your PC’s model. Continuously pressing it will open your system into boot mode.
Henceforth select a preferred language and hit Next.
Click on Repair your computer option which appears on the bottom left of the screen.
Now, navigate to Troubleshoot => Advanced Options => Startup Settings.
Finally, select Enable Safe Mode from the list of options that show up on the following screen. Click Restart and wait until the PC enters the Safe Mode.
Perform a Disk and Memory Check
The BSOD error is caused due to the fault in the disk drive or associated components such as RAM or NTFS volume. So you should check the system files to avert the PAGE FAULT IN NONPAGED AREA issue.
Here are the steps-
Step-1: Go to the Start Menu and type cmd. Here right click on Command Prompt and select Run as administrator option.
Step-2: Click Yes to give authentication to the UAC prompt.
Step-3: Now on the elevated Command Prompt copy-paste or type the following syntax and hit Enter to execute it.
chkdsk /f /r
The structure of this code is like chkdsk [Drive:] [parameters] where f denotes to avoid the issue found on the volume. In a similar way, r catch the fault from poor sections on the volume and retrieve the readable data.
Step 4: Since your PC is busy to complete other processes, press Y key to schedule this task after rebooting.
Step-5: Press Win logo & R hotkeys altogether and write mdsched.exe in the Run dialog box and hit Enter.
Step-6: Now, make a click on the first option Restart now and check for problems (recommended) to instantly restart Windows 10 PC.
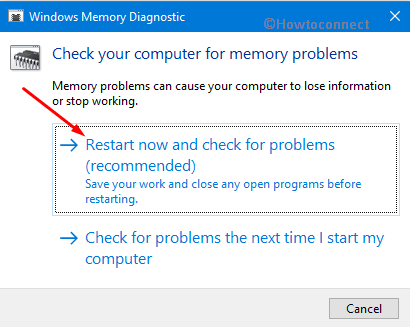
Step-7: This process will take approx. 15 minutes to complete the task, therefore, wait patiently.
Once you finish the process, hopefully, the issue rzudd.sys will disappear from the system. If you still face it, follow the next workaround.
Uninstall and Reinstall Driver Verifier
The Driver Verifier is the Microsoft’s app generated for Windows user to distinguish between original and third party driver installed on your PC. It also helps to recognize the faulty and missing hardware driver inside the system. Razer Stargazer’s camera driver crashes when Driver Verifier is enabled which eventually leads to PAGE FAULT IN NONPAGED AREA (rzudd.sys) Blue Screen Error Windows 10.
See our article on How to Identify if a Driver is Causing Issues in Windows 10 with Verifier.
As per the several users’ report, you can uninstall and re-install this software to avert the issue in your computer. Here is the process to follow –
Disable Driver verifier
As you are unable to access the desktop, you need to insert Windows 10 installation media. Start your PC after inserting the media.
Choose the Language preferences on the subsequent screen and click Next. On the Setup dialog, click Repair your computer.
Click on Troubleshoot and henceforth perform a hit on Advanced options.
Thereafter in the “Advanced Options”, click on the Startup Settings.
Now, move the cursor down and make a click on Restart button.
Finally, select “Disable driver signature enforcement” from the list of options.
Enable Driver verifier
Press “Windows and R” hotkeys and type cmd then hit Enter to access the Command Prompt.
On prompt area type verifier then hit Enter. Keep patience until the Operation is completed successfully message appears.
Once the verifier code is completed, open this app and activate the checkbox Create custom settings (for code developers).
Move down and click on Next button.
On the following screen, check the below-given options.
- I/O Verification
- Force pending I/O requests
- IRP logging
Then again make a click on Next.
Moving on, choose the option Select driver names from the list and hit Next.
Go ahead and tap the Provider header. It will sort the driver providers name alphabetically. Here select all the drivers which don’t have the provider name as Microsoft Corporation.
Finally, reboot the system and you will notice that the Driver Verifier is enabled on your computer. Now check the issue PAGE FAULT IN NONPAGED AREA has been resolved on your PC.
Undo Recent Changes
The apps or device which you have recently installed on your PC might be one of the reasons for the occurrence of PAGE FAULT IN NONPAGED AREA error. Thus you need to identify the changes which have been performed. If it is an installation of a software, then uninstall it right away and check for the issue. Or if any hardware modification is done, then try to revert back the changes. If this fix does not help you to resolve the rzudd.sys then follow below methods.
Remove antivirus program if installed
Antivirus software is a security program used to protect your PC from unwanted threats. However, the anti-malware app prevents the working of some system files which could be the culprit behind BSOD rzudd.sys issue. Hence uninstall any third-party antivirus program. Here is how to proceed:
Press Windows and I keys jointly to open Windows Settings and click the Apps category.
Under Apps and features menu go to the right pane and scroll down the cursor to locate third-party software.
When you find the app, click on the same and hit the Uninstall button.
Finally, close the windows and try to login on your PC in normal mode.
Note: You can use Windows Security (the built app) instead of other third-party programs for a safe and secure purpose.
Disable Automatic Paging File Size Management
Paging file size is a memory management scheme to adjust the memory size when you have logged into your computer. The less extent might cause the rzudd.sys error with BSOD. So adjust the paging management by following these steps.
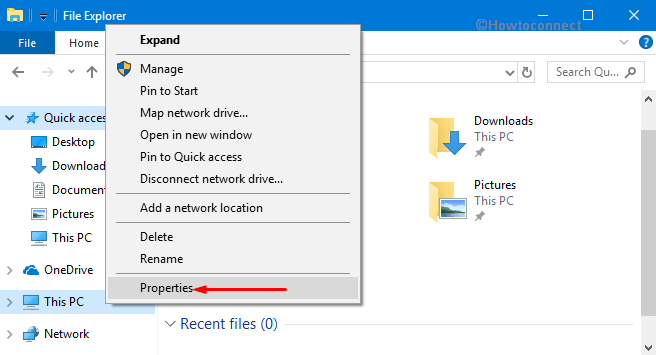
Go to the Taskbar and click on the File Explorer icon. If you are unable to locate the icon then press Windows and E keys jointly to open the same.
In the left pane, perform a right click on This PC option and select Properties from the context menu.
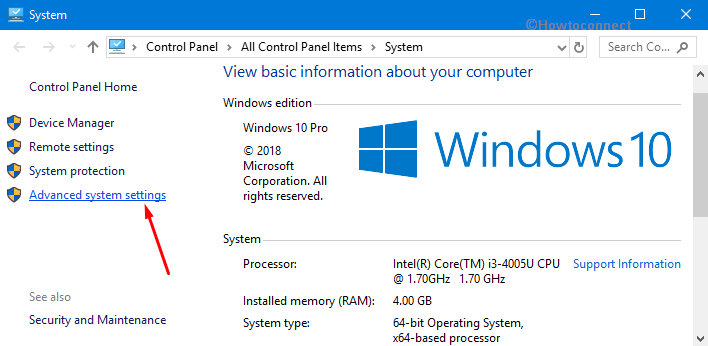
Succeeding this, hit Advanced system settings in the new window.
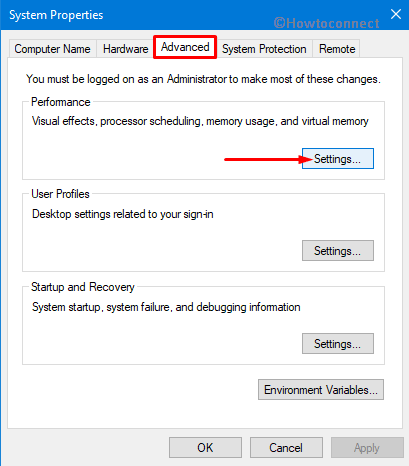
While proceeding ahead, in the Advanced tab, under the “Performance” section click on the Settings button.
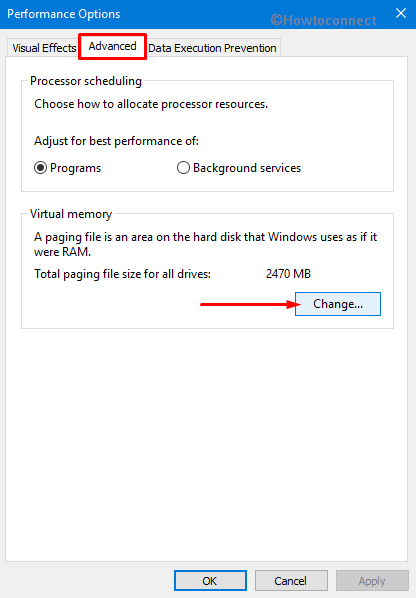
This will prompt up Performance Options dialog. Switch to the Advanced tab and click on Change.
Here you have to make sure the first option “Automatically manage paging file size for all drives” is unchecked. Click OK to implement the modifications on the Paging File.
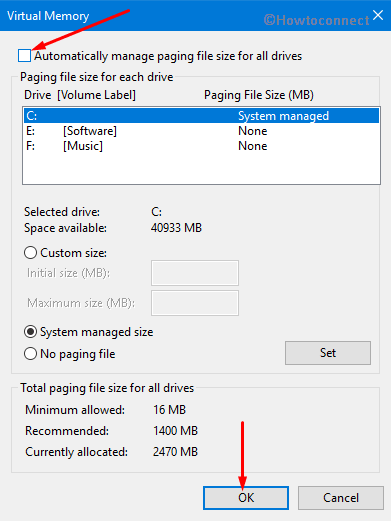
Lastly, Reboot the device and check whether the issue PAGE FAULT IN NONPAGED AREA is rectified or continue to persist.
Update device drivers
The faulty and missing device drivers in the computer also lead to several types of issues which also includes PAGE FAULT IN NONPAGED AREA error. Thus identify the corrupt drivers and try to update them according to your system model.
Do a right-click on Start icon and click “Device Manager” from the Win+X Menu.
Here, expand each category and see which device displays a yellow exclamation mark. Right-click on that specific device and choose “Update driver“.
On the following wizard, choose the option namely “Search automatically for updated driver software” and go through the guidelines to finish the update.
Hopefully, you will be able to bypass PAGE FAULT IN NONPAGED AREA (rzudd.sys) Blue Screen Error in Windows 10.
That’s all