Black Bird Registry Cleaner is a freeware to improve the performance of your PC by deleting needless entries from Registry Editor. This tool cleans all the residue from your computer in simply one or two clicks. The Ukrainian company has developed this utility. Read a guide about another tool from the same company – Use Black Bird Cleaner to Clean and Improve Windows PC Performance.
The Black Bird Registry Cleaner will trace out the non-existent applications that are still present in your Registry Editor. In addition, the application also fixes corrupted and invalid entries of Registry. Once you clean Windows Registry using Black Bird Registry Cleaner, you will not receive any error messages. Also, this will make your computer boot faster than earlier. You may also like to know How to use Kaspersky Cleaner on Windows 10. So, let us head towards the steps and see how to boost up your PC’s performance using this utility.
How to Use Black Bird Registry Cleaner on Windows
Download Black Bird Registry Cleaner and Install
Step 1 – Visit Black Bird Registry Cleaner page and make a click on Free Download button. This will immediately start downloading the unique tool.
Step 2 – Now go to the Downloads folder and double-click the file BlackBirdRegistryCleaner.exe.
Step 3 – This may evoke a UAC prompt on your PC screen, click Yes button to start the installation. Follow the guidelines of the Registry Cleaner to complete the installation of the program.
Step 4 – Lastly, click Finish button to successfully install Black Bird Registry Cleaner.
Use Black Bird Registry Cleaner
Step 1 – Now, after the installation, click Black Bird Registry Cleaner icon that shows up on the Desktop. This may again open UAC prompt, so, click Yes.
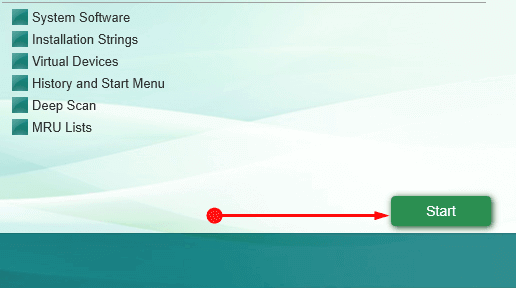
Step 2 – Black Bird Registry Cleaner will open up on the PC screen, click Start button and you will notice the scanning progress.
Step 3 – Once the scan gets over, the program will display the number of entries it scanned. So, go through the items and select the entries you wish to remove from Registry. Well, you can also select Select All button to delete all the scanned entries from Windows Registry.
Step 4 – After selecting the items click Remove Selected. A System Restore dialog will come into view, click Yes.
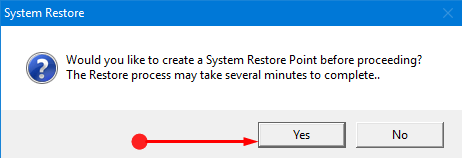
Step 5 – Registry Cleaner will start creating a System Restore Snapshot. However, this may take a few minutes to finish creating the restore point. In the end, you will see a note Cleaning is complete. Click OK and you are done!
For reference, follow How to Create Restore Point on Windows 10 Using PowerShell.
Conclusion
You may know that Windows Registry stores various information on the OS and installed components. Even if you uninstall software, its components will still remain intact in the Registry. So, when you use Registry Cleaner, all the non-existent components, corrupted entries will be removed from Registry. Hence, use this awesome utility and enhance the performance of your PC by removing corrupted or non-existent entries from Registry.