In this short article, we will share you the way to Control Running Services on Android. After Phone unboxing, you find a lucrative, full of energy, enough battery life, and super smooth device. With the days pass by, you install bulk of applications and notice it running slow.
So, you will need to restrict unnecessary apps from functioning to make the phone perform adequately. You can easily View and control them through services on Android.
How to View and Control Running Services on Android
Enable Developer option
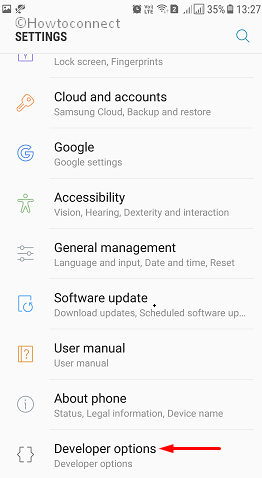
Most of the phones having latest Android versions conceal the Developer option in Settings. To see the apps running, you must activate the Developer option first. To do so,
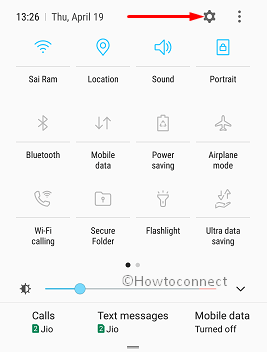
Step-1: Swipe the top screen down and make a tap on the Settings cog.
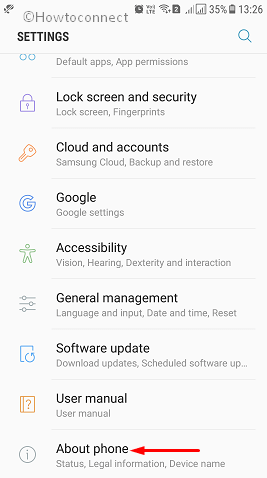
Step-2: Once the Settings page rolls down to the screen, scroll down to bottom and do a touch on the About phone.
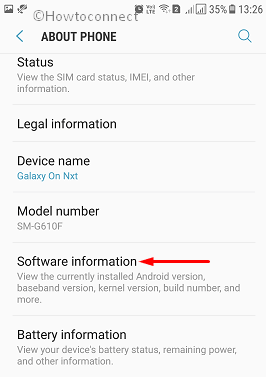
Step-3: When shifted to a new page, reach out to Software information and perform a tap on it.
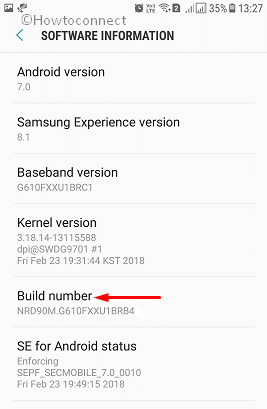
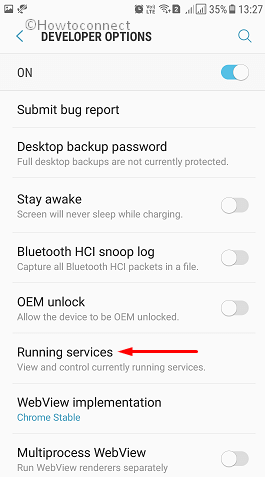
Step-4: After the new screen comes into view, you will see Build number option. Do 3-4 cumulative taps on it until you see a message “Developer option enabled“.
Therefore, the Developer option is now available in Settings for your device. Now, to view the running processes, you need to follow the given instructions.
Procedure to View Running Services on Android
1. Open Settings by swiping down the notification bar and tapping the cog icon.
2. Move down to the screen and put a tap on Developer options.
3. Once the system takes you to the next page, look for Running services option and choose it once you find it.
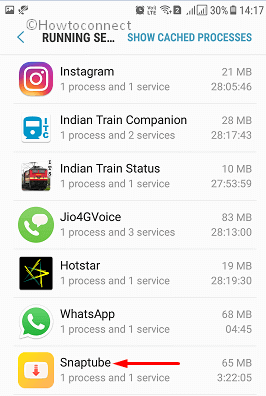
4. You will now see the Running programs moreover their RAM usage on this page.
All of these services are not always necessary to run in the background. Hence, you can restrict them using the following ways.
Methods to Control Running Services on Android
Way-1: Stop from Running Services
a) Open the Running Services from the previous method and tap the service you want to stop from the list.
b) Choose the STOP button to continue.
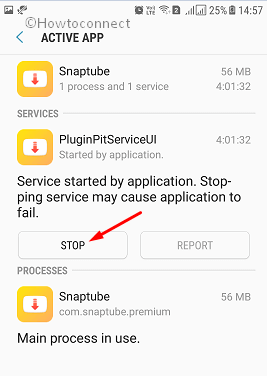
c) Once the System prompts for your permission sending a warning dialog, select Ok to stop the service.
Note – Before proceeding to Stop a service, check it carefully. Once you Stop and you need to Run it again, you have to Power Shut down the device and switch the Service On.
Way-2: Force Stop or Uninstall an App
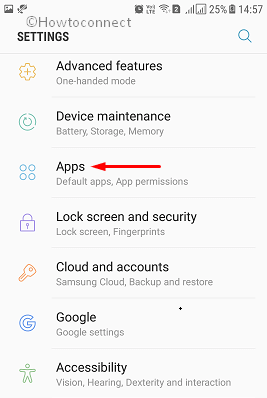
i. Pull down the screen and do a touch on the Gear icon from top right corner to launch Settings.
ii. Head to Apps and make a tap on it.
iii. Once the list of applications is visible, choose the one you like to stop forcibly.
iv. Upon proceeding to the APP INFO page, hit the FORCE STOP button to continue with restricting the app.
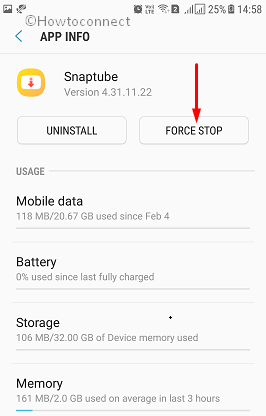
The system might prompt you for permission, choose FORCE STOP option to proceed.
Note – Do not Stop any System apps to avoid making any trouble for the device. To see the system apps,
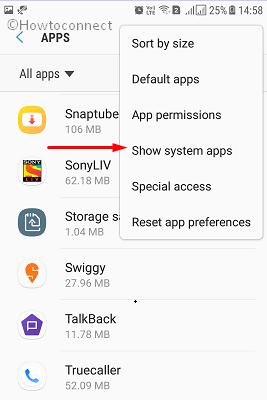
• Follow the instructions as discussed before to open Apps.
• Once the page opens, put a tap on the 3 dots menu and select Show system apps.
This is all about How to View and Control Running Services on Android. Hence, go through the steps minutely to avoid any problem with your Smartphone.