Ways to Remove Items From C:\Windows\SoftwareDistribution\Download on Windows 10. The Windows update files by default assemble in the download folder of Software distribution directory.
Whenever the update gets stuck you require the deletion of the stuff in this folder in abundant cases.
How to Remove Items From C:\Windows\SoftwareDistribution\Download Windows 10
Way 1 – Manually Delete Windows Update Cache
First of all, make sure that no updates are in action, otherwise, you will land up in a pool of troubles.
Stop the Update Services
Step 1 – Begin the procedure by wide-spreading an elevated Command Prompt. You can do this in various ways. However, the easy one is, right-click on Start. Then on the popped-up menu, tap the choice named Command Prompt (Admin).
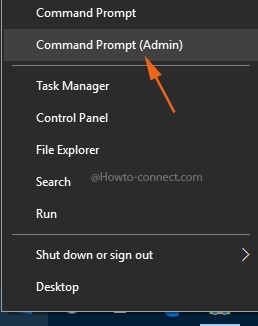
Step 2 – Go ahead with hitting Yes button on the UAC confirmation pop up.
Step 3 – Now, write these pieces of codes one by one and hit Enter on the expanded elevated Command Prompt.
net stop wuauserv
net stop bits
Note – The code available in the first line functions to cease the Windows Update Service. Likewise, the other command is to end another service entitled Background Intelligent Transfer Service aka BITS.
Finally, After termination of the above-outlined two services, it is time to dispose of the Windows Update cache. To do so, observe the subsequent steps –
Step 1 – With the combination of Win & E keys outspread File Explorer. Once the File Explorer is visible on the screen, travel through this path accurately C:\Windows\SoftwareDistribution\Download
Unhide the Files
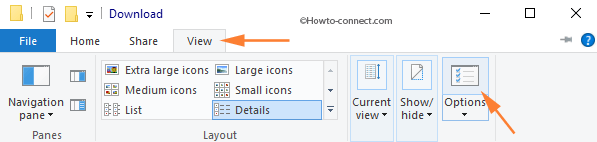
Step 2 – Click or hit the View tab, located on the menu bar.
Step 3 – On the dropped ribbon, click or hit Options box, visible at the extreme right end of the ribbon.
Step 4 – A box labeled Folder Options will arrive. Here also, move to the View tab.
Step 5 – Place a tick mark on the tiny round cell labeled as Show hidden files and folders and drives. Next, clear out mark from the square cell entitled Hide protected operating system files.
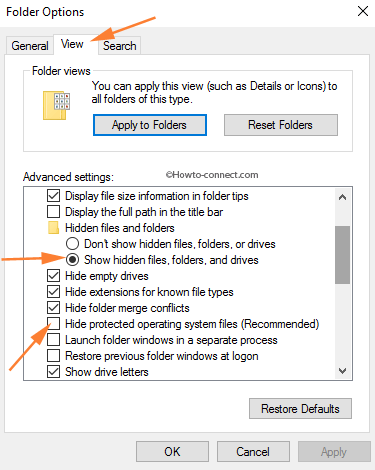
Step 6 – Click Apply and successively Ok.
Delete the Items
Step 7 – Now, all the files or folders will become visible. Use Ctrl & A sequence of keys and select all the contents of the Download folder.
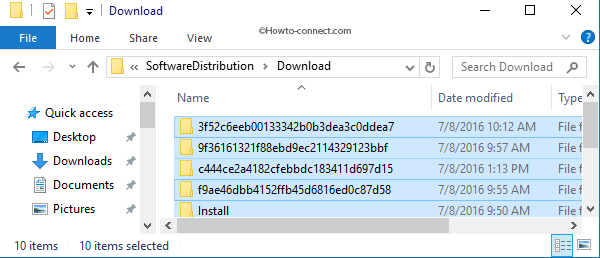
Step 8 – Finally, to Remove Items From C:\Windows\SoftwareDistribution\Download Hit or tap the Delete key.
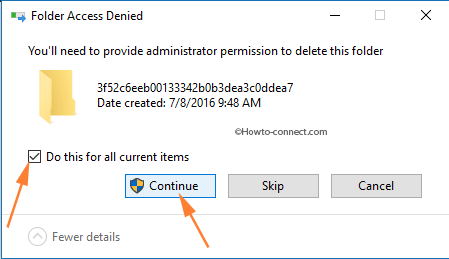
Step 9 – You will see an overlapped box labeled Folder Access Denied. Tick mark the box of Do this for all current items followed by a hit on Continue button.
Now, it is time to restart those two services that you have terminated earlier
Step 1 – Another time outspread the elevated Command Prompt by observing the procedure outlined earlier.
Step 2 – Write down these lines of codes one at a time and then hit Enter.
net start wuauserv
net start bits
Way 2 – Use Comand Prompt to Delete Windows Update Cache
Step 1 – Launch elevated command prompt with the above extant process.
Step 2 – Write down these three lines of codes, one at a time, and hit Enter.
net stop wuauserv
del c:\windows\SoftwareDistribution /q /s
net start wuauserv
Way 3 – A Batch File to Delete Windows Update Cache
Another interesting technique to terminate the items of Windows Update Cache is generating a batch file.
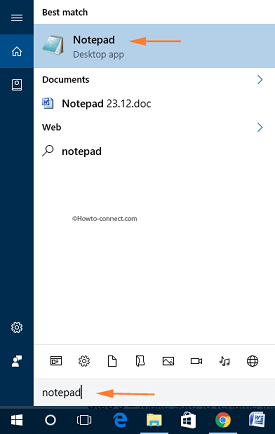
Step 1 – To generate a batch file, first of all, outspread Notepad. Do this by writing Notepad in the search field and hit the same name that appears on the top.
Step 2 – Write out or copy/paste these four codes on the expanded Notepad.
CD\
CD %Windir%
CD SoftwareDistribution
DEL /F /S /Q Download
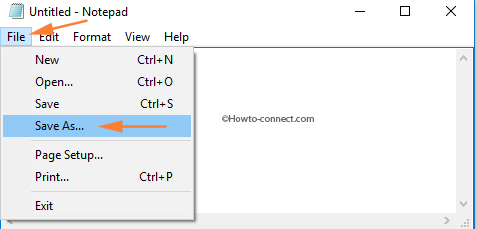
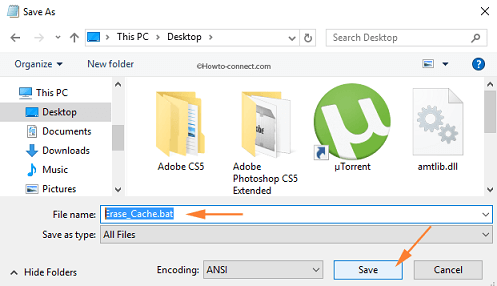
Step 3 – Now, click or hit the File on the menu bar. From the dropped menu, click or hit Save as.
Step 4 – Pick up Desktop, the location to store the file. While storing, click or hit the Save as type drop-down and pick up All Files.
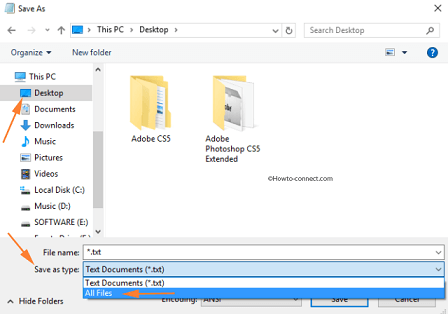
Step 5 – Make sure to rename the file as Erase_Cache.bat. As the last effort, click or hit Save.
Step 6 – Now, your batch file is absolutely ready to use. Next time onward, first terminate the Windows Update Service by using this code on an elevated Command Prompt – net stop wuauserv
Step 7 – Finally, to Remove Items From C:\Windows\SoftwareDistribution\Download Hit or tap the Delete key, go to your desktop, and double-click Erase_Cache file. In doing so, you will instantly remove all the items of Windows Update Cache.
Furthermore, you don’t like to be bothered with the long steps direct download Erase_Cache file from below and run.

Hopefully, Windows Update will work with all enthusiasm and should start re-downloading the files from scratch since Windows Update cache is reset. Finally, if you hold up some more ways to terminate Windows Update Cache in Windows 10, please make us aware of those by inputting them on the comments form.