After some Windows 10 updates, a large number of people find camera stops functioning properly and shows an unexpected error code issue. Most common codes that users notice are 0xA00F4244, 0xA00F4243, 0xA00F4246 and 0xC00DABE0. Furthermore, the app often displays a white camera icon in the middle of a grey background image mostly when opening the app. Whatever the code is when Windows 10 Camera not working, resolutions you should take are similar in most cases.
Camera issues in Windows 10 are pretty common and they generally occur due to corrupt and missing driver. Moreover, improper privacy settings, misconfigured system files, overloaded registry, app blockage caused by the antivirus program are somehow equally responsible. In this context, we will walk you through probable workarounds that will fix issues associated with built-in as well as a USB camera.
Windows 10 Camera not working
Here is how to fix Windows 10 Camera not working –
Before you jump into the troubleshooting steps straight away, we urge you to press F8 key once. Though it’s unclear at the same time weird, for some users this small trick worked to fix Windows 10 camera issues. You never know, you could be one of the among.
1] Look into the Privacy settings of Camera app
Windows 10 permits you to deny or allow access to any device connected to the computer. If anyhow the access of Camera is disabled, any application including desktop ones won’t be able to use it. Hence, you will need to go navigate to the associated settings page to check whether the camera access is enabled. Steps are as followed –
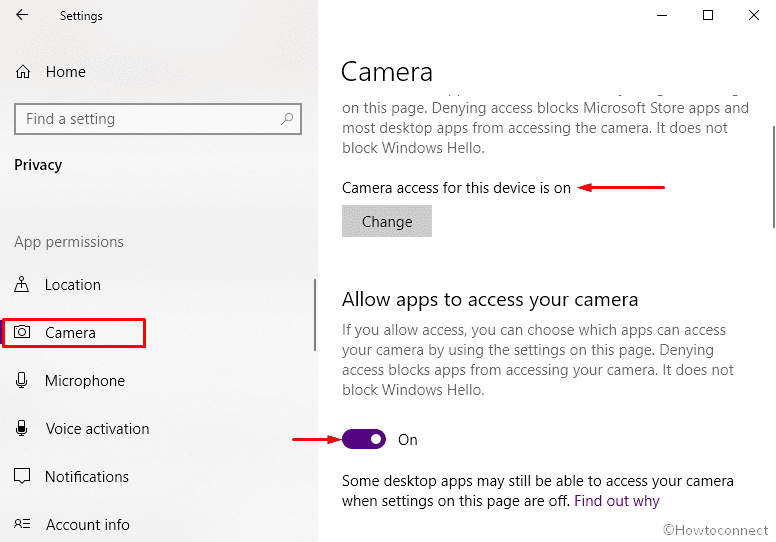
- Press Win+I and click on Privacy.
- Select Camera from the left sidebar.
- Shift to the right pane and make sure Camera access for this device is on. If not, click on Change and switch on its toggle button.
- Also, turn on the switch of Allow apps to access your camera.
- If the camera app is not working with a specific application, go through the options present under Choose which Microsoft Store apps can access your camera and turn on access for that item.
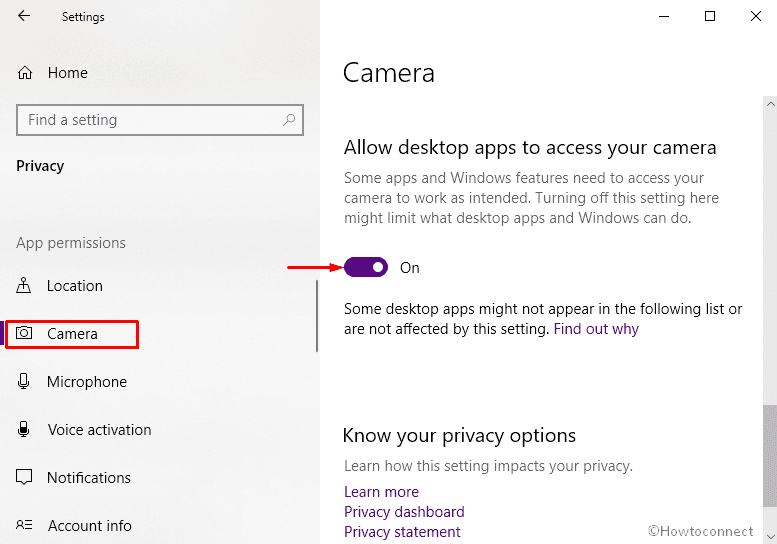
- Later on, scroll down a bit, and enable the toggle button located under Allow desktop apps to access your camera.
2] Reinstall Camera application
When the camera app is corrupted itself, various errors may arrive regarding this. Reinstalling the application will be best suited in such a case as it will bring back a fresh version. Here is how to proceed –
- Click on the search icon located in the taskbar and type PowerShell.
- Choose the option Run as administrator when the result shows up.
- If a UAC prompts, click Yes button.
- Insert the below command after winking cursor followed by hitting Enter –
Get-AppxPackage *Microsoft.WindowsCamera* | Remove-AppxPackage
- Doing so will uninstall the Camera app.
- After completion of the command, open Microsoft Store available in the Start menu.
- Search for the Camera app.
- Download the app and install it as well.
3] Rollback related driver to fix Windows 10 Camera not working
New patch of Windows comes with the package of drivers update too. A buggy update may also lead to corruption in the camera driver that ends up with Windows 10 camera not working issue. Keeping your drivers up to date is great to maintain a healthy PC, incompatible one can cause damage at the same time. Therefore, rollback the dedicated driver to fix Windows 10 Camera not working. To do so –
- Right-click on Start button and choose Run.
- Type in devmgmt.msc and press the Enter key.
- Expand Imaging devices by double-clicking.
- From the expanded list, right-click on your camera driver and choose Properties.
- Jump into Driver tab.
- Click Roll Back Driver button to get back the older version.
4] Update Camera driver
There might an instance when the previous workaround will not work as you will find the Roll Back Driver button greyed out. This happens when you did exclude Drivers from Updates earlier. Doing so restricts all drivers including Camera from receiving an update so there is no older version you will get. If this is the case, a backdated driver could be the reason behind Windows 10 Camera not working. Update the same by following below steps –
- Open Device Manager as shown in the previous method.
- Double-click on Imaging devices.
- Right-click on listed camera driver and opt for Update driver.
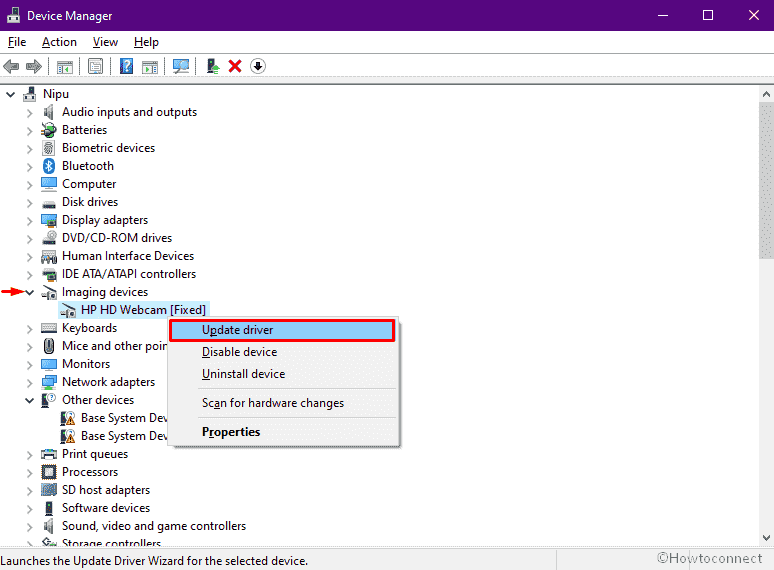
- Comply with onscreen guidelines to complete the process.
- If the system fails to get any update, visit the manufacturer’s website for camera drive and install it manually.
5] Reset Camera app
Recent changes made in the Camera app may lead to unexpected error codes, so we advise to reset the same. This way, the app will get back its early state along with the default settings. Steps are as followed –
- Press Win+X hotkey and select Settings.
- Click on Apps.
- Move to the right pane of the following page and look for Camera.
- Once found, click on the same and hit Advanced options link.
- Following that, scroll down a bit and click Reset button.
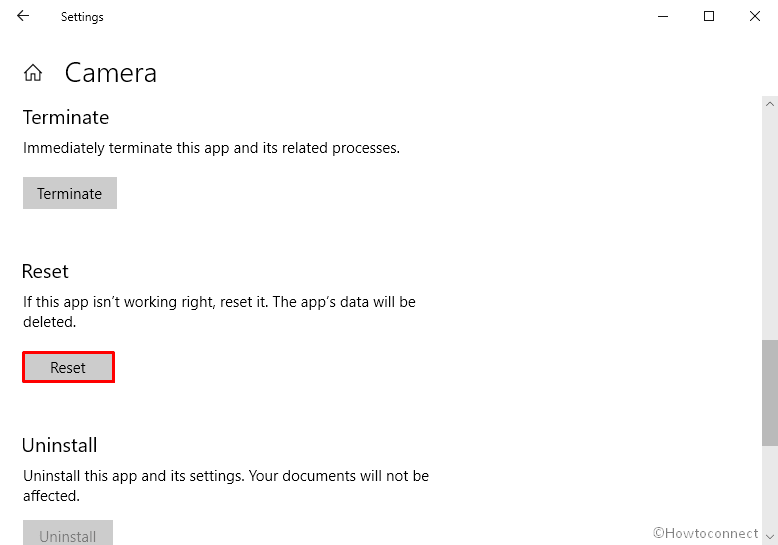
- If a pop-up appears for final confirmation, again click Reset.
See – How to Reset Camera App in Windows 10.
6] Reinstall Camera driver
As we said earlier, anything wrong with the driver is largely responsible to cause Windows 10 Camera not working problem. Therefore, reinstall the driver to get rid of such an issue. Here’s how –
- Press Win+S to invoke taskbar search.
- Type in devmgmt.msc and hit Enter key.
- From the Device Manager console, look for Imaging devices.
- Double-click the same in order to expand it.
- Right-click on the camera driver and select Uninstall device.
- When a pop-up prompts, click Uninstall button again.
- After completion of the uninstalling process, click Action from the menu bar.
- Opt for Scan for hardware changes.
7] Uninstall culprit patch to fix Windows 10 Camera not working
Often the Windows 10 camera stops working after receiving the latest update. If this is the case for you, uninstall that faulty patch by going through the below steps –
- Open Windows Settings app.
- Click on Update & Security.
- From the right-pane, opt the option View update history.
- Consequently, hit the link Uninstall updates.
- Scroll down to reach Microsoft Windows section.
- Select the patch you received recently.
- Click Uninstall button from the top ribbon.
8] Check your antivirus program
Third-party antivirus software sometimes block webcam access for the sake of privacy. This could be the reason why Windows 10 Camera not working. In such a situation, open the antivirus program installed on your PC and proceed to its privacy settings window or look for settings related to blocking access or permission.
9] Run Hardware and Devices troubleshooter
Windows offers built-in troubleshooter to fix bugs and problems you confront. To solve the camera-related issues, you will have to run Hardware and Devices troubleshooter. Here’s how –
- Click on taskbar search icon.
- Type in cmd.exe and hit Enter key.
- In the black panel, insert the below command –
msdt.exe -id DeviceDiagnostic
- Press Enter key to execute the command.
- When a separate wizard turns up, click Next button.
- Keep following on-screen instructions to complete the procedure.
10] Tweak Registry if Windows 10 Camera not working
If none of the methods above worked to fix Windows 10 Camera not working, add a new registry value as of last resort. For that –
- Press Windows key and R together.
- Type in regedit and click OK button.
- Click Yes if a UAC asks for consent.
- Navigate the below directory –
HKEY_LOCAL_MACHINE > SOFTWARE > Microsoft > Windows Media Foundation > Platform
Important – You will get the above directory only if 32-bit applications running on a Windows 64-bit computer.
- Once there, Create a new DWORD value (32-bit) named EnableFrameServerMode.
- Double click on the key you just created and set its value to 0.
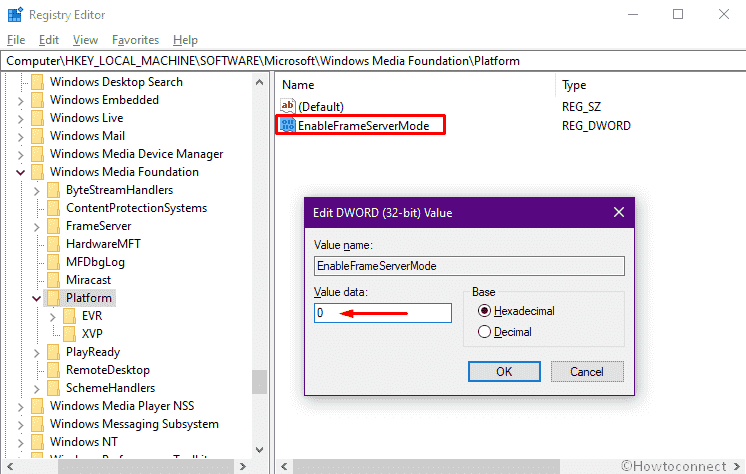
- Click OK.
- After a restart, Windows 10 camera should work properly.
Important to know that if your computer is powered with Windows 64-bit, you will have to navigate the following path –
HKEY_LOCAL_MACHINE\SOFTWARE\WOW6432Node\Microsoft\Windows Media Foundation\Platform
And make the same change as above.
Methods for fixing other camera errors –
1] Fix PhotoCaptureStartTimeout 0xa00f4292 Camera Error in Windows 10
2] Fix 0xA00F4289 ActiveCameraUnplugged Webcam Error in Windows 10
3] Fix – We Cannot Find your Camera Error 0xC00DABE0 / 0xA00F4244 in Windows 10
4] How to Fix Windows 11 Camera not working (Solved!)
Methods:
1] Look into the Privacy settings of Camera app
2] Reinstall Camera application
3] Rollback related driver
4] Update Camera driver
5] Reset Camera app
6] Reinstall Camera driver
7] Uninstall culprit patch
8] Check your antivirus program
9] Run Hardware and Devices troubleshooter
10] Tweak Registry
That’s all!!
Hello Christopher Clayton, check whether this key is available – HKEY_LOCAL_MACHINESOFTWAREWOW6432NodeMicrosoftWindows Media FoundationPlatform. If yes then make the same change with this one.
Although I am not confident or competent with Registry Editing have got part-way in your instructions for how to create a new DWORD value. But I am now stuck, I cannot get to what is described above re missing camera(s). I have reached Software>Microsoft. Then I do not find Windows Media Foundation>Platform as shown in your article. Can you assist please.