Windows 10 or 11 comprise a plethora of pre-installed essential services which are basically small programs. Most of the Microsoft applications coming along with the operating system carry specific services. Whereas with time, several third-party software also add services of their own and allow some tools to function better. But, some superfluous services make Windows 11 PC slow. Therefore, these are not such important to the operating system and can be turned off if you don’t need them. Here, in this article, we have mentioned 15 such types of Windows 11 or 10 Services to Disable for Performance to make PC fast.
Windows 10 or 11 has obviously highly advanced executable programs that run regularly in the background and run functions of their own. However, these services consume system resources just like third-party software. Typically, they don’t use as much RAM as third-party software. Still, lots of unnecessary Windows 11 or 10 services are available that ruin the system resources. When you put Windows services to disable, it free up extra RAM which would very helpful for gaming. Accordingly, it’s worth to disable some Windows 10 services prior to starting a game for performance. Here is the list of Windows 10 Services to Disable for Performance –
1] Phone Service
2] Print Spooler
3] Windows Insider Service
4] Bluetooth Support Service
5] WalletService
6] Fax
7] Remote Desktop Configuration and Remote Desktop Services
8] Diagnostic Policy Service
9] Security Center
10] Downloaded Maps Manager
11] Windows Mobile Hotspot Service
12] Windows Defender Firewall
13] Touch Keyboard and Handwriting Panel Service
14] DevicePicker_3e7b5d8
15] Turn Off Third-Party Services
Windows 11/10 Services To Disable for Performance improvement
Here are the Windows 11 or 10 Services to Disable for Performance –
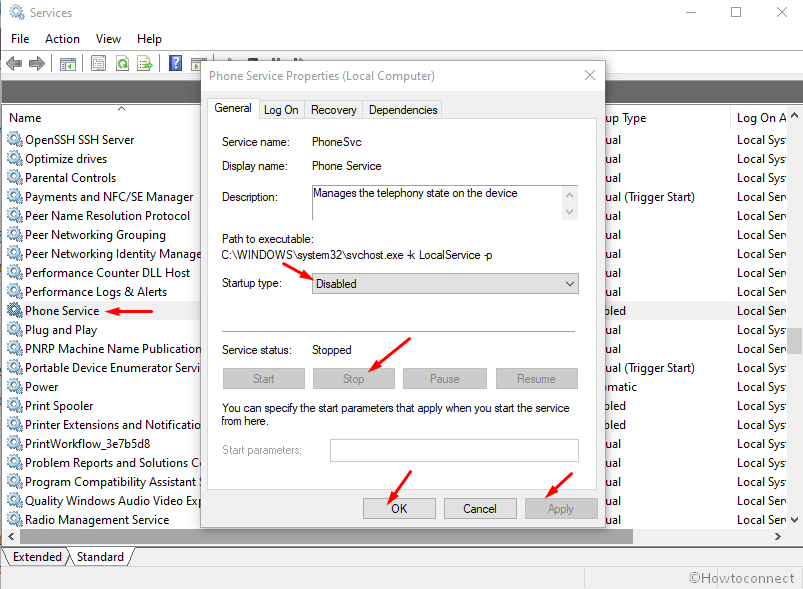
1] Phone Service
Windows 10 is getting new features and Your Phone app is one of them. This app has its own service which can improve performance of PC and most of all most people don’t use it. So you can disable this from Services console.
- Press Win+S, type services and then hit Enter.
- Find out Phone Service and make a double click on it.
- Click on dropdown adjacent to Startup type and select Disabled.
- Select Stop to put this Service to an end at once.
- At last, click on Apply afterward OK to save the tweaks.
2] Print Spooler
The Printer Spooler is one of the Windows 11 or 10 Services to Disable for Performance. Accordingly, this is mainly useful for printing purposes and who don’t have printers can certainly turn it off. In addition, users having printer can also temporarily disable this application before playing a game and thereafter enable it. Microsoft recommends to disable it only if you are not having a printer.
Here is the tip to disable it –
- First of all, right-click on the Start button and select Computer Management.
- In the left panel of the following page, spread out Services and Applications and then select “Services”.
- Locate Print Spooler in the Name column and do a right-click on it.
- From the list, select the Properties option.
- When Print Spooler Properties window appears, click on the drop-down menu against “Startup type”.
- Select Disabled.
- Now, click on the Apply and then OK button.
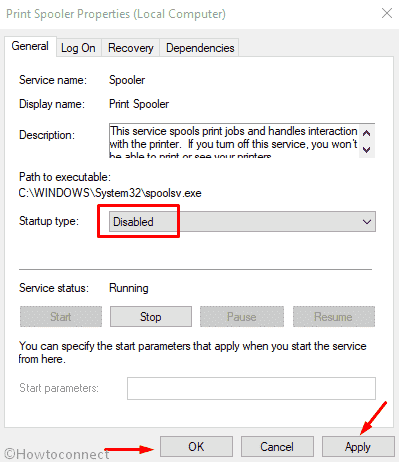
Now your printer spooler service is disabled. If needed, you can re-enable this by following the same steps and click Enable.
3] Windows Insider Service
Window Insider Service allows you to get the preview versions of future Windows 10 builds before revealing to the general public. However, this is not a very essential service for everyone. So, the user who is not registered with the Windows Insider program can certainly turn off this one.
- Click on the Start button and type “Control” and hit Enter.
- On the following screen, click on the Administrative Tools.
- Locate Services and double click on it.
- Find Windows Insider Service in the Name column and do a right-click on it.
- From the context menu, select the Properties option.
- When the Windows Insider Service Properties window appears, click on the drop-down menu against Startup type.
- Select Disabled.
- Now, click on the Apply and then OK button to save the changes in the service startup type.
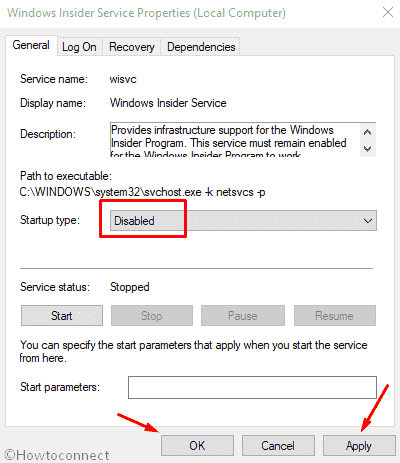
In this way, you can disable the Windows Insider Service.
4] Bluetooth Support Service
Bluetooth provides you the ability to pair devices such as mobile phone, speaker wirelessly with the desktops or laptops. This Service is essential for Bluetooth connectivity, but not mandatory for the Windows 11 or 10. Therefore, anybody who doesn’t need to pair with can certainly turn off this service.
- Press Win+S and let Taskbar search appear.
- Type Services and select it from the top of the list.
- Locate Bluetooth Support Service in the Name column and do a right-click on it.
- From the context menu list, select the Properties option.
- When the “Bluetooth Support Service” wizard appears, click on the drop-down menu adjacent to Startup type and choose Disabled.
- Now, click on the Apply and then OK button to save the changes in the service.
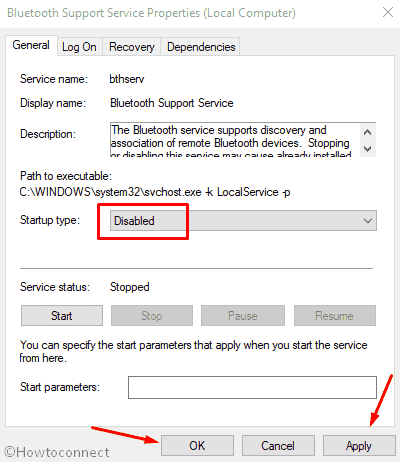
In this way, you can disable the Bluetooth Support Service.
5] WalletService
Clients of the wallet use host objects and these Services help them. If you don’t use Wallet on Windows 11 and 10 then you can disable this one to boost the performance.
6] Fax
In Windows 10 and 11, Fax is a third party service which has become obsolete and as a result, it slows down the system. This device was widely used in earlier times to send documents electronically over a telephone network. Therefore, those users who have long since chucked out fax machines can disable this service.
Through Control Panel
Step-1: First of all, press Win+R keyboard shortcuts and let Run dialog box appear.
Step-2: Type control panel in the empty text bar and hit the Enter key.
Step-3: Choose Programs and Features.
Step-4: Select Turn Windows Features on or off link from the left pane of the subsequent window.
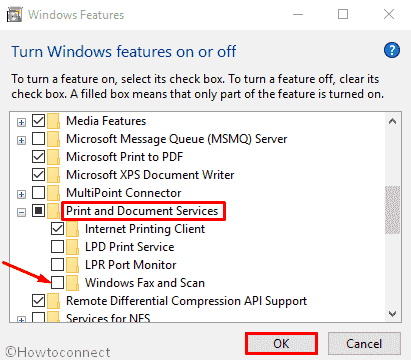
Step-5: When Windows Features tiny window appears, locate Print and Document Services and then expand it by clicking on the plus (+) sign.
Step-6: Uncheck Windows Fax and Scan option.
Step-7: Click on the OK button to save the changes.
Through Windows Services
- Type Administrative Tools in the Windows search and press Enter.
- Locate Services and double click on it.
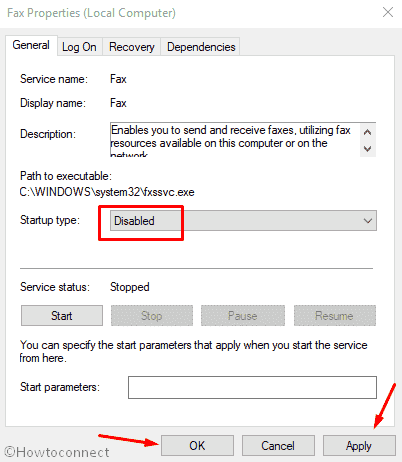
- Find Fax in the Name column and double click on it.
- When the Fax Properties window appears, click on the drop-down menu against Startup type.
- Select Disabled.
- Now, click on the Apply and then OK button.
7] Remote Desktop Configuration and Remote Desktop Services
Win 11/10 OS comprises a Remote Desktop utility which is mainly used for connecting another PC. Both the Remote Desktop Configuration and Remote Desktop Services are essential to enable for removing desktop connectivity. Moreover, RDP is a very crucial feature provides remote display over network connections. Although, users who don’t need this feature can disable it before starting the game.
Remote Desktop Configuration service
Step-1: Press Windows key+S, type Services and select it from the top of the list.
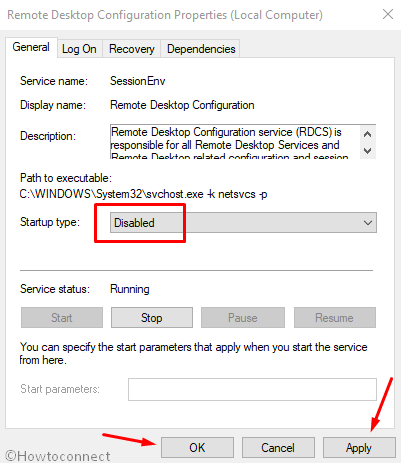
Step-3: Locate Remote Desktop Configuration in the Name column and perform a double-click on it.
Step-4: When the Properties wizard appears, click on the drop-down menu against Startup type.
Step-5: Select Disabled.
Step-6: Finally, click on the Apply afterward OK button.
Disable Remote Desktop Services
- Do a right-click on the Start menu icon and select Computer Management.
- In the left panel of the following page, expand Services and Applications and then select Services.
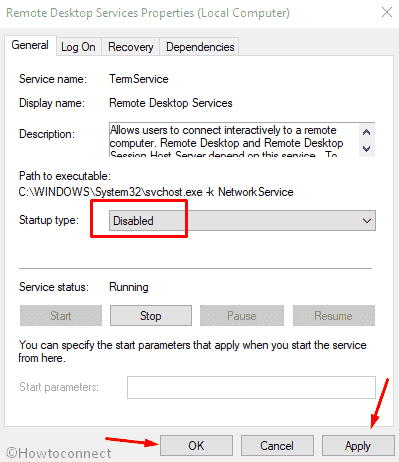
- Locate Disable Remote Desktop Services in the Name column and do a double-click on it.
- When Disable Remote Desktop Services window appears, click on the drop-down menu against Startup type.
- Select Disabled.
- Lastly, click on the Apply and thereupon OK button.
8] Diagnostic Policy Service
Diagnostic Policy Service also remains active in the background and performs some functions. Sometimes this also causes high CPU usage.
- Open Computer Management.
- In the left panel of the upcoming page, unfold Services and Applications and then select Services.
- Locate Diagnostic Policy Service in the Name column and double-click on it.
- When Diagnostic Policy Service Properties window appears, click on the drop-down menu against Startup type and select Disabled.
- In the end, click on Apply followed by OK button.
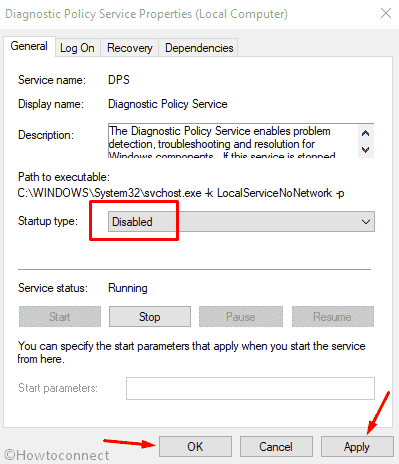
Now your Diagnostic Policy Service is disabled. If needed, you can re-enable this service by following the same steps and click Enable.
9] Security Center
The Security Center is one of the most necessary Windows OS components introduced by the Microsoft team. It periodically monitors the issues and informs users for various operations like – Windows updates pending. In spite of, this is not such a useful service and continuously runs in the background while booting up the device. Therefore, disabling it will not harm your PC and even make it run fast.
- Open Services as one of the methods given above.
- Find Security Center in the Name column and double-click on it.
- When the “Security Center Properties” window appears, click on the drop-down menu against “Startup type” and then choose Disabled.
- Ultimately, click on the Apply and consecutively OK button.
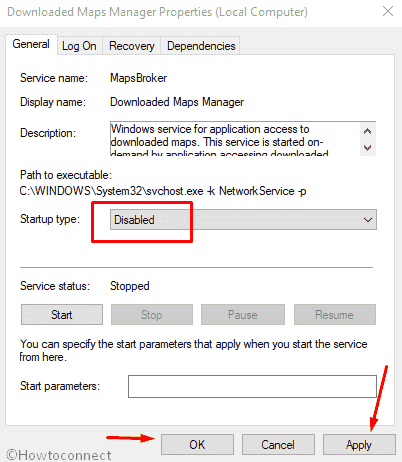
10] Downloaded Maps Manager
With a collection of services, Windows 11/10 comprises Download Maps Manager service which allows map apps to access downloaded maps. The included applications definitely need this service enabled. Although, users who don’t require any map apps can easily turn off this service to boost the gaming performance. Furthermore, you’re able to enable it if required in Windows 10/11. And if required in future you can enable it in Windows 11 or 10.
- Go to Services console, locate Downloaded Maps Manager in the Name column and do a double-click on it.
- When Downloaded Maps Manager window appears, click on the drop-down menu against Startup type.and then select Disabled.
- In the last, click on the Apply and afterward OK button.
11] Windows Mobile Hotspot Service
The Windows Hotspot Service empowers you to share the internet connection with a computer. Those who often utilize mobile hotspot will need to keep this on. However, when you have no need for this service, it would be better to disable it for enhancing the gaming performance.
- Get access to Services console, locate Windows Mobile Hotspot Service in the Name column and double-click on it.
- From the context menu, select the Properties option.
- When Windows Mobile Hotspot Service window appears, click on the drop-down menu against Startup type.
- Select Disabled.
- Finally, click on the Apply and subsequently OK button.
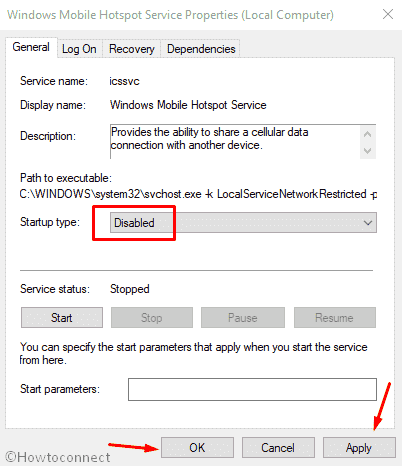
Now your Windows Mobile Hotspot Service is disabled. If needed, you can re-enable this service by following the same steps and click Enable.
12] Windows Defender Firewall
Microsoft team usually doesn’t recommend to disable Windows Defender Firewall. If you turn off this service, it can block software connections. However, that’s not really an essential system service and the firewall can also block multiplayer games. Therefore, it might be better if you disable this service before playing a game and re-enable when the game over. Some third-party antivirus software also incorporates firewalls. Therefore, you might not need the Windows Defender Firewall service on at all.
- Get at Services console, find Windows Defender Firewall in the Name column and do a double-click on it.
- From the context menu, select the Properties option.
- When the Windows Defender Firewall Properties window appears, click on the drop-down menu against Startup type.
- Select Disabled.
- Once done, click on the Apply after then OK button to store the modifications.
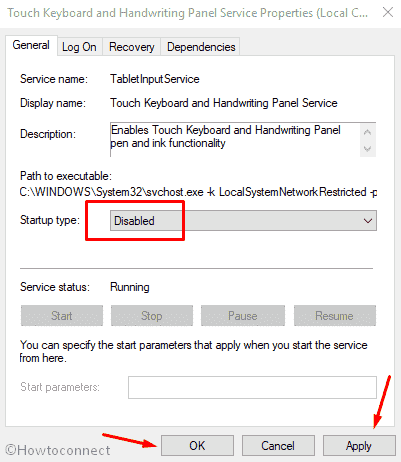
13] Touch Keyboard and Handwriting Panel Service
The Touch Keyboard and Handwriting Panel Service allows using the OSK in Windows 11 and 10. Although, several users ever require the same. Such users can disable on screen keyboard.
- Reach Service college, locate the Touch Keyboard and Handwriting Panel Service in the Name column and do a double-click on it.
- Choose Properties.
- When the “Touch Keyboard and Handwriting Panel Service wizard comes into view, click on the drop-down menu against Startup type and then select Disabled.
- As the ultimate step, click on the Apply and then OK button.
14] DevicePicker
This service is used for the management of the Miracast, DLNA, and DIAL UI. So when you are not using these features on your Windows 10 and 11 PC they will put an unnecessary load to the resources. So we suggest you Windows 11 or 10 Services to Disable for Performance.
15] Turn Off Third-Party Services
On Windows 11 and 10, several third-party application has its own services. Usually, these services provide automatic updates for programs, for instance – AllJoyn Router Service, Adobe Acrobat Update Service updates Adobe applications. They consume system resources a lot, but none are essential for the operating system. You are able to disable the running third-party applications through the Services window. Although, the System Configuration service incorporates a handy Disable all option.
Here is how you can turn off all third-party software services.
- Press Win+R hotkey and let appear the Run dialog box.
- In the void, type ‘msconfig’ and click on the OK button to open the System Configuration directly.
- Once the window appears, click on the Services tab.
- At the lowest part, tick the Hide all Microsoft services checkbox.
- Hit Disable all option.
- Click on the Apply and then OK button.
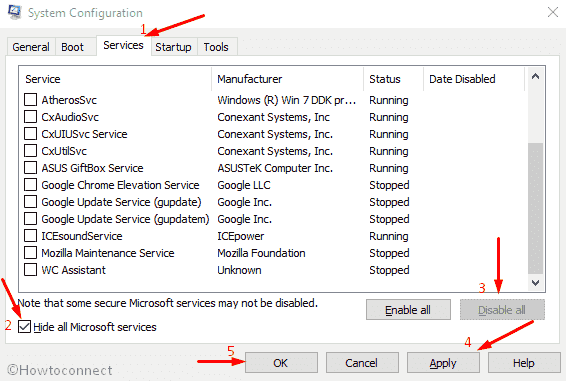
- Finally, a Restart button will appear on the dialog box. Click on it.
That’s all!!!