Windows 11 and 10 provide a built-in feature that lets you create WiFi history report easily. This report includes the Network name, Start and end time, session durations, moreover errors if occurred. Being so popular and productive invention, you always prefer to get connected with a WiFi connection wherever and whenever possible. In the same way, it becomes necessary to check the history with which your devices were connected in the past.
To Create WiFi History Report in Windows 11 or 10, you have to run a command line tool that eventually saves it as an HTML file on your PC. This HTML file is easy to understand and comprises all necessary information even for the last three days.
Create WiFi History Report in Windows 11 and 10
Here you will find this article in two sections – 1. Create WiFi History Report and 2. Access the report using a browser.
1. Create WiFi History Report
You just need to be a little keen on following the below steps.
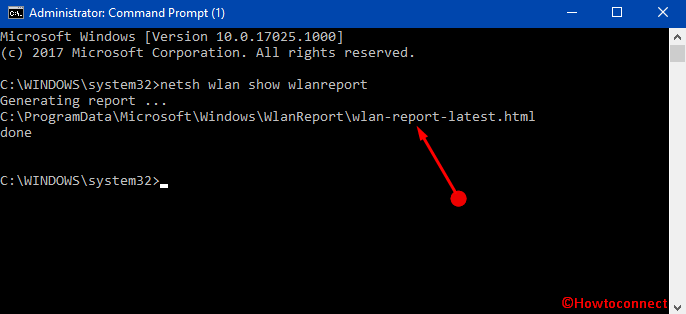
Step 1 – First of all, launch an elevated Command Prompt to Create WiFi History Report. To do so, simply search for cmd on Search. Right-click on the result and select the option namely “Run as Administrator“.
Step 2 – Now, run the command given below –
netsh wlan show wlanreport
Once you execute the command, you get to see a path along with a success note.
2. Access the Report
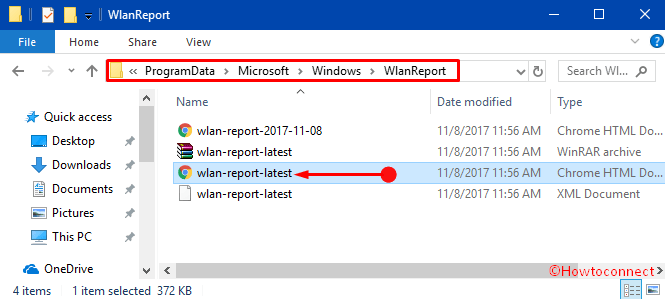
Step 3 -You can access the HTML file using the following path as a shortcut command. Alternatively, launch the File Explorer and go to the file location.
%ProgramData%\Microsoft\Windows\WlanReport
Step 5 – By default, the ProgramData folder is not visible and you need to click on the View tab and tick mark the option namely “Hidden items“. This is an HTML report and you can open the file in any of the latest browsers like Microsoft Edge, Google Chrome, and Firefox. The file name is similar to wlan-report-latest.html. The tool will save one more copy of this with a timestamp in the file automatically.
Step 6 – Double-click on the file name wlan-report-latest.html and open the file.
Decipher the Record
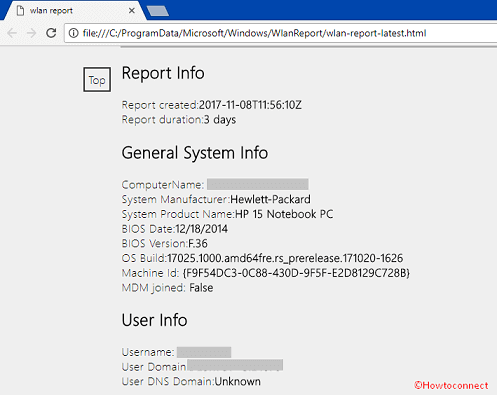
Therefore, the file is now open for you and you can check the records for the last three days.
As you have the file already on your computer, let’s try to look for the contents it is having.
1. The first section of the file is a graph that shows an overview of the events that happened in the past three days. Move the cursor to see the details of a selected event from the graph.
2. The next section is all about the system information like username, Network adapters and as well as script outputs. Some of the outputs are as follows:
ipconfig /all
netsh walan show all
certutil -store -silent My
certutil -store -silent -user My.
3. After the system information, you will find the success/failure details with reasons and the duration of the session.
4. Lastly, you have the report of the events happened while reporting on the WiFi session.
Microsoft has come up with their latest edition of Windows 11 or 10 at the beginning of this year including a number of advanced features and one of them is to Create WiFi History Report in Windows 11 or 10.
The present era is an era of technology and the new ones are coming now and then to replace the old ones. WiFi connection is one of the best examples of advancement in technology in modern times. It helps to connect your PC to a network within a particular range. People all over the world at present do prefer to get a WiFi connection since most of the places are covered by WiFi network now. Therefore, they might feel the need of checking the history.
You get the details of
a) Name of the network with which the PC was connected
b) Start time of the session
c) “Duration of connection”
d) Record of any error that happened during the whole connection time
e) Clear indication of the time when the wireless adapter entered at low power condition
e) Record of time when the wireless adapter entered a working state
f) Time of Zero Connectivity
g) List of times experiencing Limited connectivity
h) End time of the session.
Previous versions of Windows didn’t have such a feature to create history. As you know Microsoft is always dedicated to offering the best feature of the time, they have included this amazing feature along with Windows 11 or 10.
Let us head towards the series of steps.
Conclusion
Microsoft understands the need for the users with the demand of time. As a result, they always come up with new ideas as well as the latest features aiming to provide the maximum advantage to its users. The inclusion of the feature to Create WiFi History Report in Windows 11 or 10 is a revolutionary change. This feature has already been very much popular with the users connecting their computers with WiFi connections. This is why Microsoft is so famous and the best in the IT world.