You will be delighted to know that Windows 10 OS offers six different methods to Disable Ethernet Network Connection. Commonly, you need to do this to figure out certain basic network issues. The most familiar method is through Network Connections but here, we present you a few more ways.
Your PC may have more one than one network adapter and thus it is necessary to carefully locate the specific Ethernet connection. In addition, please possess all the administrative privileges to carry out the given methods. To maintain your expenses on data usage, you can Enable Metered Connection for Ethernet on Windows 10. Let’s hook to the tutorial and explore all the ways one after the another.
How to Disable Ethernet Network Connection in Windows 10
Method 1 – Through Network Connections
Step 1 – First & foremost, launch Settings program to Disable Ethernet Network Connection. For this, press Windows + I keys in one go. Alternatively, right-click Start and from the options select Settings.
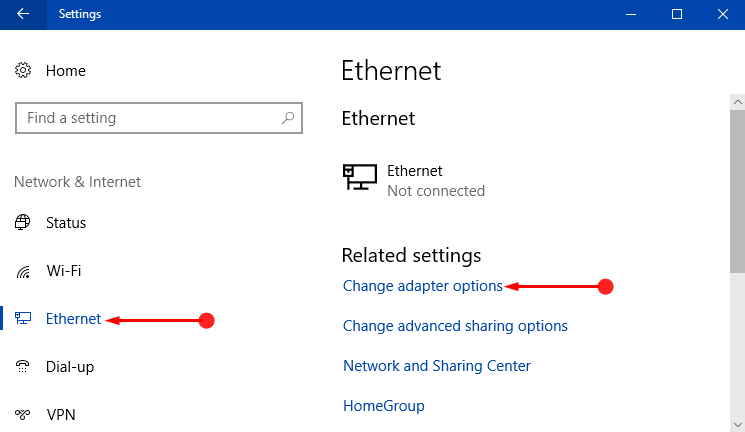
Step 2 – Select Network & Internet when various icons are visible in the Settings app.
Step 3 – Click Ethernet on the left sidebar of the next page. On corresponding right side of Ethernet, locate and click Change adapter options.
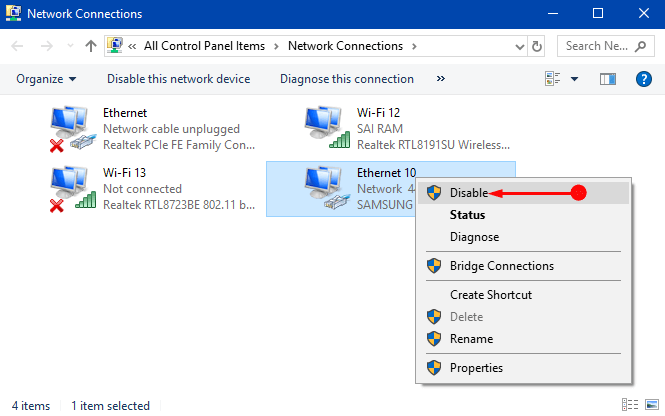
Step 4 – The above action launches Network Connections window on the PC screen, displaying all the connections.
Step 5 – So, find Ethernet in the list and execute a right-click on it. Out of few options that appear, click Disable. Finally, wait for few seconds and Ethernet connection gets disabled.
Method 2 – From Desktop
If you reset Ethernet connection time and again, you can create its shortcut on the desktop for easy accessibility.
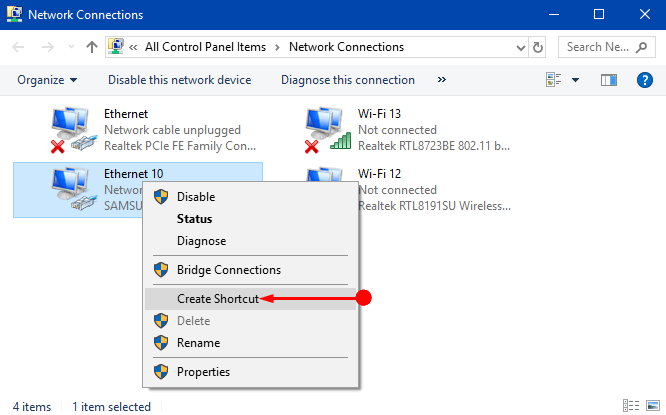
Step 1 – Type ncpa.cpl on Cortana text field and click the same that appears below Best match.
Step 2 – Right-click on Ethernet network and choose the option namely Create Shortcut. If you see a prompt, confirm the shortcut creation by clicking Yes.
Step 3 – Go to the desktop and right-click on the shortcut of Ethernet and choose Disable.

Read our tutorial to Create Desktop Shortcut to Network Connection Windows 10.
Method 3 – Using Command Prompt
Step 1 – To Disable Ethernet Network Connection, type cmd in Cortana text box and when the same cmd appears on top, conduct a right-click on it. This shows few choices, click Run as administrator.
Learn multiple ways to Launch Elevated Command Prompt on Windows 10.
Step 2 – Confirm the UAC prompt by clicking the Yes button.
Step 3 – Now, copy-paste the below line of command in the window that comes into view.
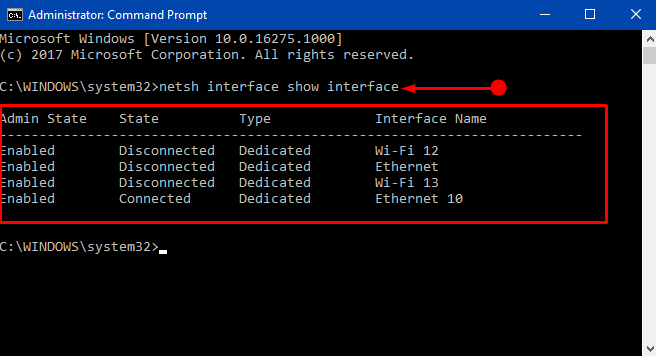
netsh interface show interface
Step 4 – It immediately shows all network adapter names of the computer as shown in the given screenshot. So, carefully, locate the name of your Ethernet that you prefer to disable.
Step 5 – Moving ahead, input the below command and press Enter to disable your specific Ethernet connection.
netsh interface set interface “network_adapter_name” admin=disable
Note – Here, ensure to replace network_adapter_name with the actual name and that too within quotes.
The final command with the actual name should look like this –
netsh interface set interface “Ethernet 10” admin=disable

Step 6 – That’s all and this simple command helps you to Disable Ethernet Network Connection quite effortlessly.
Method 4 – Via Device Manager
Step 1 – Right-click Start and out of various options, locate and select the one namely Device Manager.
Step 2 – Search for Network adapters and to see its list, click the arrow on its left side. When you see the list of adapters, find out the Ethernet you wish to disable.
Step 3 – Make a right-click and choose Disable device when few options are visible.
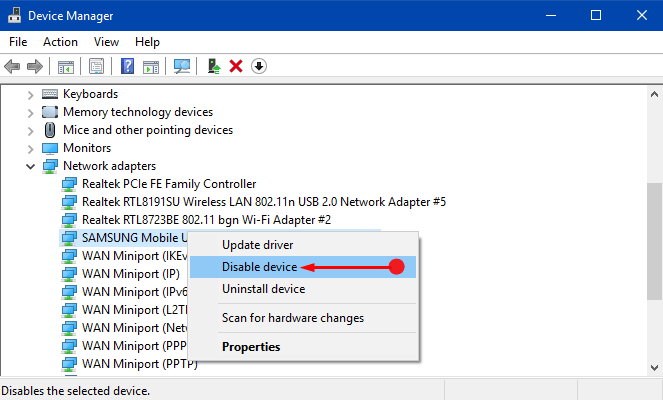
Step 4 – A dialog may appear to seek your confirmation, click Yes.
Method 5 – Use WMIC Command
Step 1 – Here also, type the command cmd on Cortana. When cmd comes on top, right-click and go ahead with “Run as administrator“. Agree to the UAC prompt and to do so, click Yes on the dialog.
Step 2 – Copy/paste this given command and when you press Enter to execute it, you can notice the list of network connections along with their index numbers on left.
wmic nic get name, index
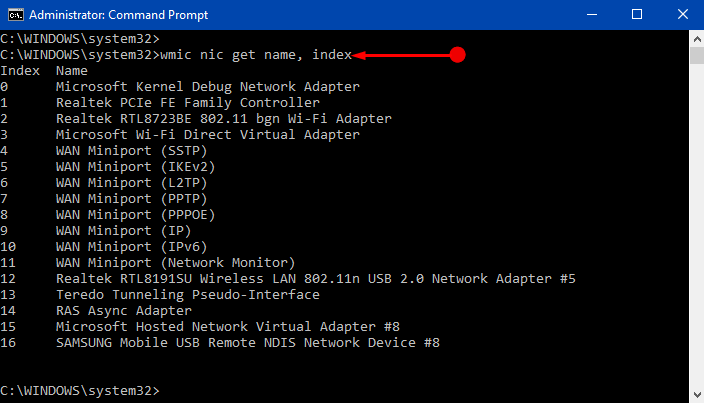
Step 3 – See the index number of your preferred Ethernet network and run this command.
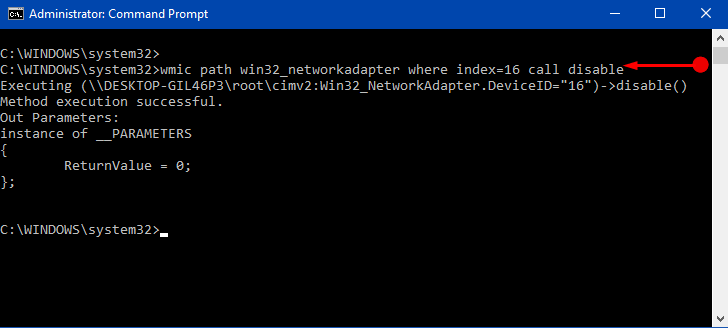
wmic path win32_networkadapter where index=index-number call disable
Note – Here also, ensure to substitute index-number with the actual number of the connection.
So, after inserting the correct number, the command looks something like this.
wmic path win32_networkadapter where index=1 call disable
Step 4 – To verify, open Network Connections and you can find the Ethernet disabled.
Method 6 – Through PowerShell
Step 1 – To begin with, press Win&X and move ahead by choosing Windows PowerShell (Admin) from the menu that shows up.
Explore more ways to Open Elevated PowerShell on Windows 10 After Creators Update.
Step 2 – Type in or copy/paste the command to retrieve the network interface list.
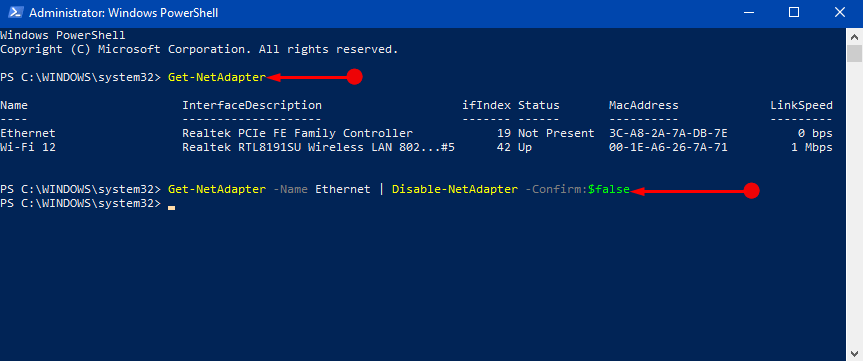
Get-NetAdapter
Step 3 – This shows you all the names of the network adapters moreover, their description, Status, Mac address and so on. So, see the name of the Ethernet you want to proceed with.
For reference, you may like to follow How To Modify MAC Address on A Network Adapter on Windows 10.
Step 4 – So, to Disable Ethernet Network Connection via PowerShell, copy-paste this piece of command.
Get-NetAdapter -Name networkadapter | Disable-NetAdapter -Confirm:$false
Note – Make sure to remove networkadapter and type in the name of the Ethernet you wish to disable.
For instance – The correct command goes like this –
Get-NetAdapter -Name Ethernet | Disable-NetAdapter -Confirm:$false
Conclusion
Hopefully, with these many procedures, you can quite effortlessly Disable Ethernet Network Connection on Windows 10. However, every user holds a different reason to disable this specific connection. If you have more ways to disable the wired connection, do write them to us.