2 Procedures to Enable or Disable Password Protection Sharing in Windows 10 through steps. – Password Protection Sharing feature works to strengthen the security of your public Folders and files, connected computers, and printers. After enabling this, the users can access items on your computer who know your user id and password. See another article in this concern How to Check Protection Updates for Threat Definitions in Windows 10.
After you Password Protection Sharing then a user will need to enter your credentials when he attempts to share anything. At the same time turn this feature off to allow other users to take advantage of all your shared files and resources. See a guide to Enable / Disable Password Protection Sharing on Windows 10 with 2 easy methods. If you want to tighten the security for an external drive follow – How to Make a Pen Drive Write Protected in Windows 10. Let’s get started.
Ways to Enable / Disable Password Protection Sharing on Windows 10
The 1st procedure is with the help of control panel and the 2nd one is using registry key hacking.
Note: You require signing in with an administrator to make this feature working.
Method 1: Using Control Panel
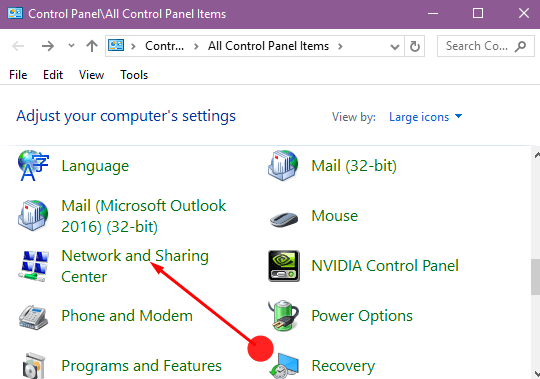
Step 1 – Press the Start button and type cp and then hit Enter.
To learn procedures in detail follow How to Open Control Panel on Windows 10 – Instant Ways.
Step 2 – Locate Network and Sharing Center icon in the N alphabetical section and click it.
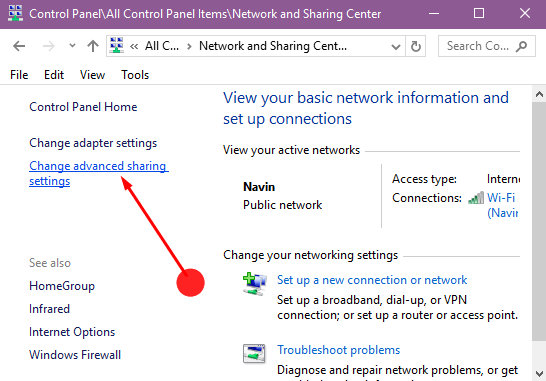
Step 3 – On the left upper side of your screen, you’ll see Change advanced sharing settings option. Click on this.
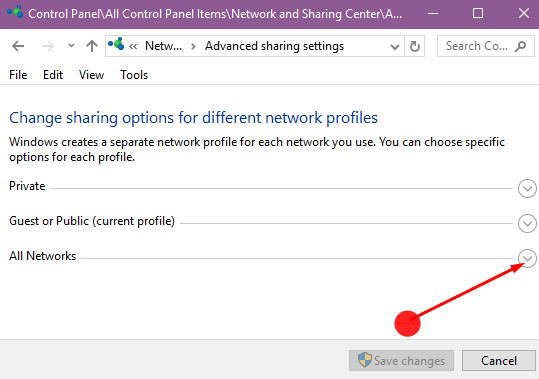
Step 4 – Click the down arrow, to the right of “All networks” option to expand the section.
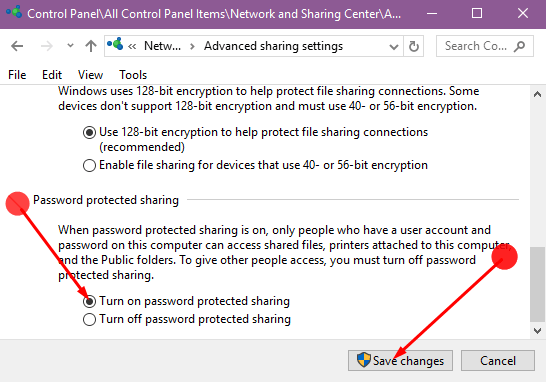
Step 5 – Check Turn on Password Protected sharing option (click the circle on its left) to enable this feature. Else, click the Turn off password protected sharing option to disable it.
Step 6 – Click Save changes (at the bottom) and close the Network and Sharing Center so that you can restart your system to execute the changed settings.
That’s it.
Method 2: Using Registry Editor
Step 1 – Click Start button and type regedit and Hit Enter or follow the below article to open the registry editor.
Read the collection of methods for – How to Access Registry Editor in Windows 10 – 5 Simple Tips.
Step 2 – In the left pane, reach the following key:
Computer\HKEY_LOCAL_MACHINE\SYSTEM\CurrentControlSet\Control\Lsa
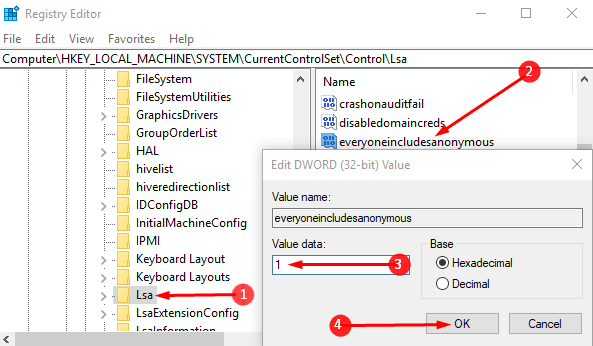
Step 3 – Once you have clicked the Lsa entry, look into the right pane. Search for the entry named everyoneincludeanonymous. Double-click on it to change its values.
Step 4 – To disable Password Protected Sharing feature, set the value to 1. Otherwise, make it 0 to enable the same. Click OK.
Step 5 – Navigate to the following key thereafter,
HKEY_LOCAl_MACHINE \ SYSTEM \ CurrentControlSet \ Services \ LanmanServer\ Parameters
Step 6 – In the right pane of Parameters registry, look for the entry named restrictfullsessaccess. Change its value from 1 to 0 to disable the password protected sharing. Else, make it 1.
Step 7 – Shut the registry editor and restart the system.
That’s it.
So these procedures will help you to pretty easily enable or disable password protected sharing on Windows 10. Once you use this feature you would control the sharing folders and devices in the local network.