Microsoft regularly comes up with new builds, cumulative updates, and more in order to maintain smooth operation of the system. But some users confront Failed to Install 0x8024000b Error during their update attempt. The issue mostly occurs when the operating system fails to decode the Update Manifest file required for installing the patches.
This happens when users cancel Windows Update service in the middle either accidentally or intentionally. The updates are often packed with fixes for several bugs and issues, new features, security updates, and more. So to get them successfully installed in the system without the above error, the following workarounds will be helpful.
0x8024000b Windows Update Error
Here is how to Fix Failed to Install 0x8024000b Windows Update Error in Windows 10 –
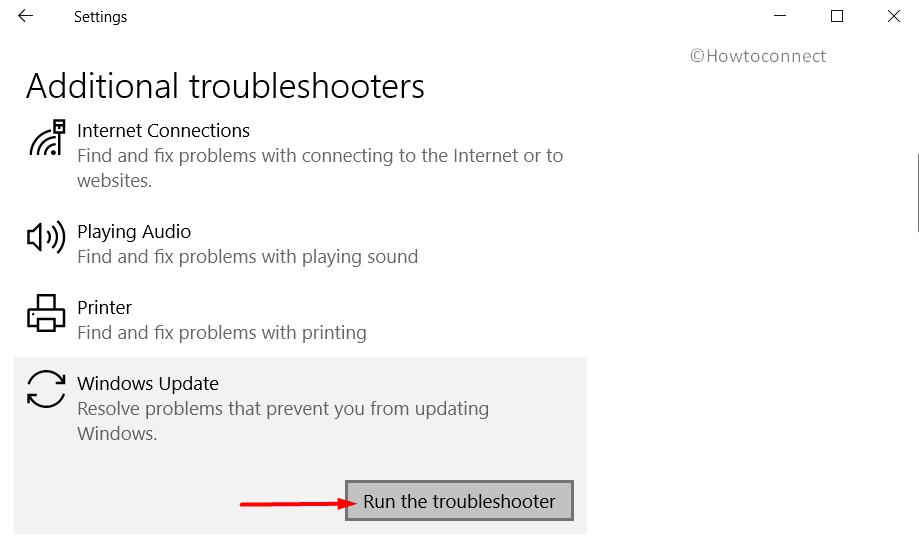
1] Run the Windows Update Troubleshooter
Windows Update troubleshooter is one of the finest utilities to mitigate any issues regarding updating the operating system. The tool can also fix the Install error 0x8024000b easily. To accomplish the task, follow the below steps –
- Fire up the Start Menu and click the gear icon.
- Click Update & Security.
- Moving forward to the next page, choose Troubleshoot located at the left pane.
- Jump to alongside pane and select Windows update under Get up and running section.
- Hit Run the troubleshooter button.
- The tool will, therefore, detect and find the associated issues from the system. Make sure the device is connected to an active internet connection. Follow the tasks guided by the tool on display to end this process.
- When the process ends finally, Restart Windows 10 PC to make the changes effective.
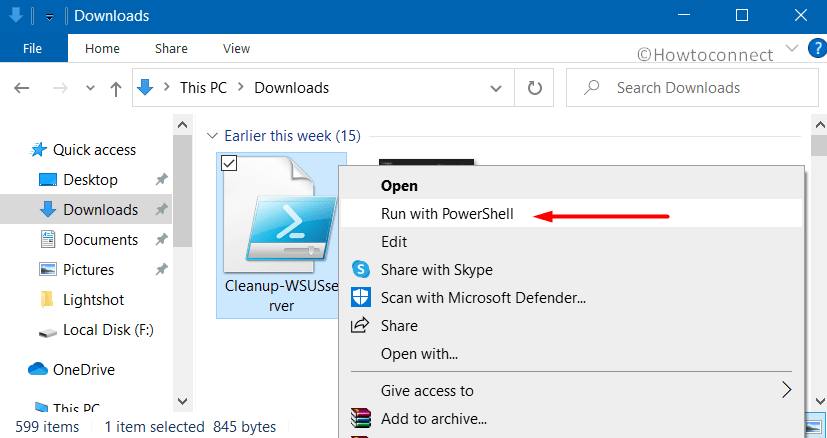
2] Execute PowerShell script to fix Failed to Install 0x8024000b Error
The most prominent way of fixing Install 0x8024000b error is to run a PowerShell script which will eventually clean all the superseded updates from system. Microsoft Technet has provided the script hence, it’s purely trustworthy. To run it, follow the below steps –
- Open any web browser and visit this site of Technet. Download the script from there. If legal terms and conditions stuff pop-up for confirmation, agree to them.
- Once the downloading gets over, launch File Explorer and go to Downloads folder and make a right-click on it.
- Select Run with PowerShell option and execute the script.
- Once the process ends successfully, reboot the device to implement the changes.
- After coming back to the new session, there will be no issues with Windows Update as expected.
3] Rename the Spupdsvc.exe File
Renaming a file entitled spupdsvc.exe. is often found to resolve the Install error 0x8024000b. This file usually stands for Microsoft Update RunOnce Service and it’s a process that is necessary for downloading Windows Update. The renaming must be done using the Run dialog as shown in below instructions –
- Right-click on Start icon and select Run from the Win+X menu.
- Insert the following text in the empty typing box and click OK or press Enter to execute it.
cmd /c ren %systemroot%\System32\Spupdsvc.exe Spupdsvc.old
- Once the process ends, reboot Windows 10 to save the changes.
4] Fix 0x8024000b by Resetting Windows Update Components
Sometimes, error 0x8024000b can occur due to some of the faulty update cache files in the system. Therefore, deleting those related files may resolve the issue. For that, follow-through below guidelines –
- Open Run dialog box by pressing “Winlogo+R” hotkey together. Type services.msc in the void text space and click OK.
- Once the Services Manager shows up, locate, and right-click Background Intelligent Transfer Service (BITS).
- Select Stop from the list of options.
- Now, move forward to Windows Update Service (wuauserv) and do a right-click on it as well.
- Choose Stop from the appearing menu.
- After stopping both the services, fire up File Explorer pressing Win+E hotkey at once.
- Navigate to the below-mentioned path –
C:\Windows\SoftwareDistribution
- Press Ctrl+A to select all from SoftwareDistribution folder and press Delete key on the keyboard. If a pop-up appears for confirmation, click Continue.
- Again head back to the Services console and right-click on Background Intelligent Transfer Service (BITS) and Windows Update Service (wuauserv) respectively.
- Choose Start and then make an attempt to grab the updates. Hopefully, this will mitigate the 0x8024000b Windows Update Error.
5] Perform System File Checker
To resolve any Windows 10 issues, executing the System File Checker tool is very handy. Certain significant system files go missing or get faulty due to several reasons. This built-in utility will detect and restore the corrupted files.
- Go to the taskbar search box and type in cmd.exe in its text box.
- Right-click on Command Prompt and choose Run as administrator.
- Upon a UAC popup, click Yes to proceed ahead.
- Once the black window shows up, insert the below command line and press Enter –
sfc /scannow
- The entire scan will take some good amount of time to complete. If the utility detects any issues, it will replace them with the files from the Windows cache folder.
- To successfully make this workaround effective, it is best to reboot the device.
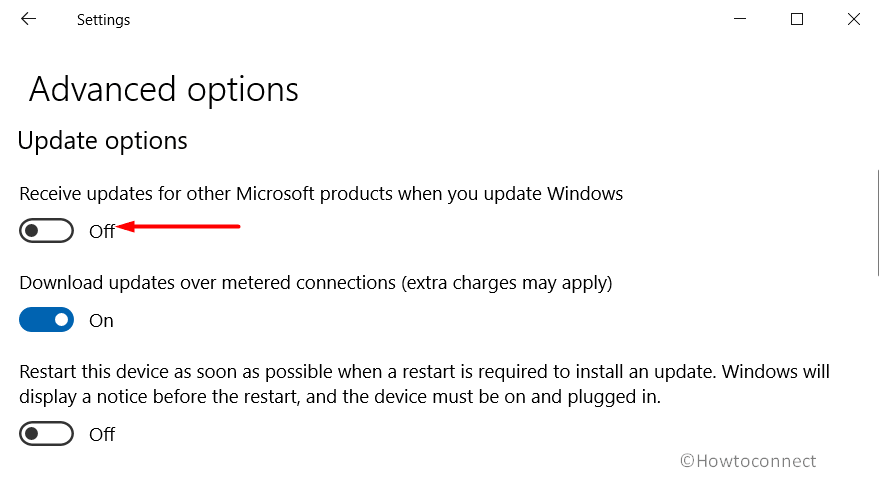
6] Change Advanced Windows Update Settings
Failed to Install 0x8024000b can occur when the Windows Update Settings are faulty. In that case, tweaking the settings a bit can provide good results. Here are the instructions you can follow –
- Open Windows Settings app pressing “Win+I” hotkeys at once.
- When in the UI, click the Update & Security tile.
- Upon opening the next page, select Windows Update from the left pane.
- Jump to the right side pane and click the Advanced options.
- When the succeeding page unrolls, toggle OFF the slider under “Receive updates for other Microsoft products when you update Windows“.
- Now, reboot the device and upon startup navigate to the Windows Updates Settings page once again.
- Click the Check for updates button.
- Once all the patches are installed, you will see “Your device is up to date.” dialog.
- Do a click on the Advanced options again and pass forward to the next page.
- If you prefer, then turn ON the slider under “Receive updates for other Microsoft products when you update Windows“.
Methods:
1] Run the Windows Update Troubleshooter
2] Execute PowerShell script
3] Rename the Spupdsvc.exe File
4] Reset Windows Update Components
5] Perform System File Checker
6] Change Advanced Windows Update Settings
That’s all!!