Mouse Lagging in Windows 10 April Update has become one of the most nagging issues since the launch of the latest Version 1803. The experience is quite annoying especially when you are doing something important and your mouse stops responding.
Also, Windows 10 mouse problems might be quite troublesome when it comes to gaming. Imagine you are at a crucial point of your game and the mouse is not moving. How horrible that can be! But fortunately, you can fix this with little tweaks. Let’s see how –
Mouse Lagging in Windows 10 April Update
Windows 10 version 1803 carries loads of features but sadly many users are complaining about various bugs and problems.
In addition to this, a substantial number of users are also facing multiple issues with their Start Menu Not Working.
Let us now move towards the workarounds and give an attempt to resolve Mouse Lagging in Windows 10 April Update.
Repeatedly Enable / Disable Scroll Inactive Windows
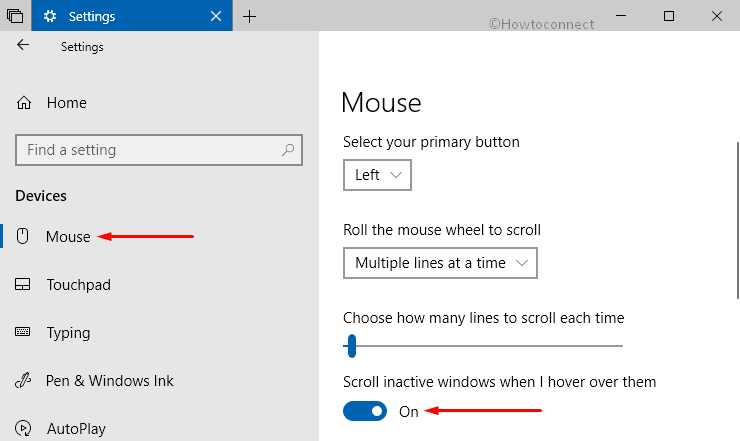
Step-1: Launch Start Menu and perform a click on the gear icon in order to open Windows Settings.
Step-2: When it rolls out on the screen, do a click on Devices once highlighted.
Step-3: From the left column, select Mouse and shift to the right side.
Step-4: Here you will see a toggle button under the option namely Scroll inactive windows when I hover over them. Turn it ON and OFF a few times repeatedly and see if this bypasses the issue of Mouse Lagging in Windows 10 April Update 1803.
Disabling NVIDIA High Definition Audio
Using NVIDIA card can cause Mouse Lagging in Windows 10 April Update. Let’s see how to disable it –
• Go to the Cortana search box and type device manager in the void place. When the result appears, press Enter.
• Now, Device Manager will show on the screen. Find out and expand “Sound, video and game controllers” by clicking the arrow that appears next to it.
• When you notice NVIDIA High Definition Audio, make a right click on it and select Disable.
If you are using another audio driver like ‘Realtek’, follow the same procedure to disable them as well. In case, disabling doesn’t work for you then you might need to uninstall it.
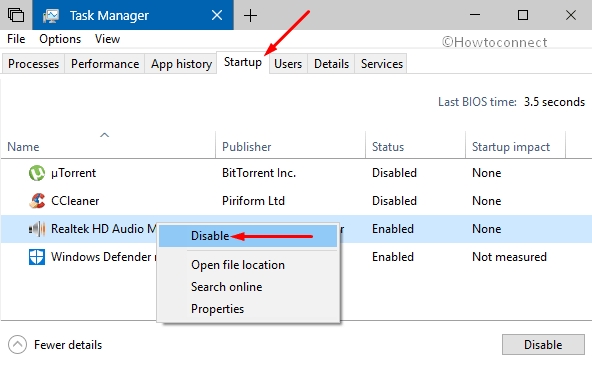
On the other hand, using Realtek audio can cause Windows 10 mouse problems as this application starts automatically with Windows. To resolve Mouse Lagging problems, you should make an attempt to stop Realtek audio from startup.
– Perform a right click on the Taskbar and from the menu that pops up, select Task Manager as shown in the below figure.
Read the fix if Windows 10 Task Manager Not Opening or became Unresponsive.
– In order to expand it, do a click on More details. Switch to the Startup tab and here, locate the entry “Realtek Audio Manager“.
– Thereafter perform a right click on it and select Disable.
Hopefully, it will resolve the issue. If the mouse continues to disturb you, check out the next solution.
Alter Palm Check level
Move hover your cursor to the Start menu icon and click on it. Now, from the bottom left corner do a click on the cog icon to access Settings app.
Moving ahead, make a click on Devices category. Once it appears, choose Mouse from the left column.
Now, move to the right side and perform a click on Additional mouse options. Mouse Properties pop-up will come into view.
Shift to the Device Settings tab and do a click on the Settings button.
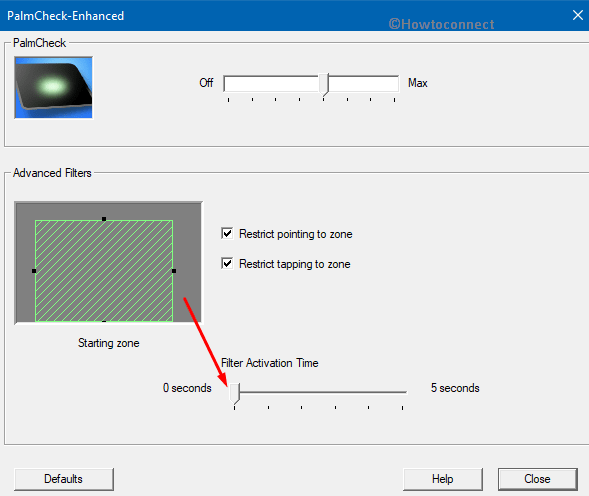
This will open a Properties for Synaptics TouchPad on the PC screen. Here, select PalmCheck-Enhanced and click on its gear icon (see snapshot).
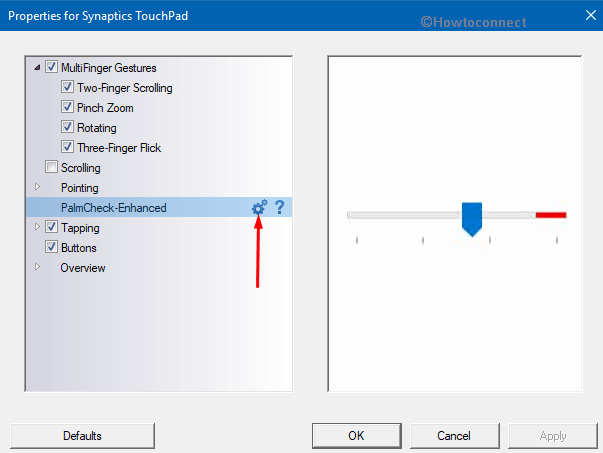
Toggle the PalmCheck slider towards OFF position.
For reference, see How to Enable / Disable PalmCheck on Touchpad in Windows 10.
Turn off Fast Startup
Disabling “Fast Startup” may assist you to settle Mouse Lagging in Windows 10 April Update.
Do a right click on Battery icon from the Notification bar and select Power Options.
Note- If battery icon is missing, read How to Fix Battery Icon Disappeared in Windows 10.
When the new window appears, click Choose what the power button does on the top left side. It will guide you to System Settings.
Now, make a click on “Change settings that are currently unavailable“.
This time, you will see some options have been unlocked in the bottom. Uncheck the option “Turn on fast startup“.
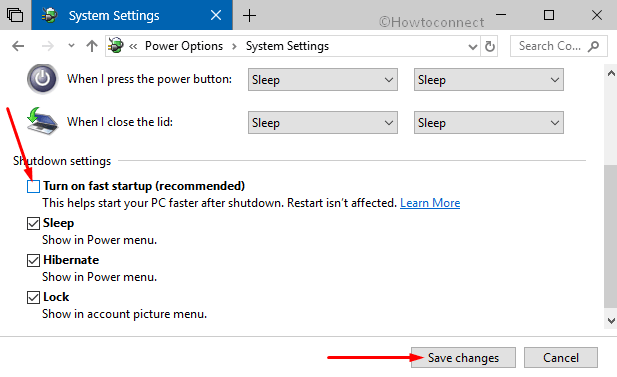
Doing so will eventually fix up Mouse Lagging in Windows 10 April Update.
Modify Clickpad settings
To fix mouse lagging issue, you can also try this tweak. Here are the steps –
Press Win+S jointly to launch Cortana. Type cp in the search box and when the result shows Control Panel, press Enter.
Control Panel will come up on the PC screen, locate Mouse and make a click on it.
Now, Mouse Properties pop-up will be visible, move to “TouchPad” tab then click on Settings button.
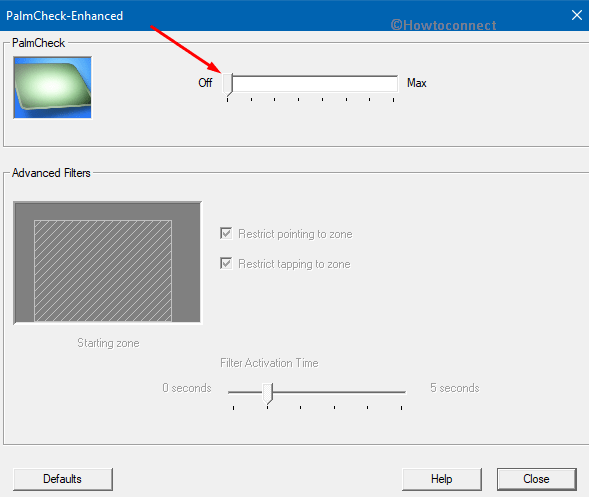
This time a new pop-up will flash into the display namely Synaptic Control Panel. Shift to the Advanced tab.
Under Advanced filters section, you will see an option namely Filter Activation Time. Move the button all the way to the right for the sake of setting it 0.
Note: In case, the TouchPad tab is not there, then go to Device Settings tab => Select “Synaptics TouchPad” => Click Settings => Double-click PalmCheck-Enhanced => Activation Filter Time.
Though it’s not a universal solution, however, it may work to resolve the issue.
Install Mouse Driver from Manufacturer website
Another possible workaround to bypass mouse lagging problem is by installing the official driver of the mouse they are using. In most cases, Windows install it automatically but sometime this types of error occur while using that driver.
First of all, to install official driver, go to the manufacturer’s website of your mouse.
Find out the latest version of your mouse driver. Make sure it is the right version; otherwise it may cause some other error.
Simply, go ahead, download and install the driver.
It is to be hoped that this will resolve mouse lagging issue.
Rolling back your Drivers to the previous version
A substantial number of users are with a view that rolling back to the previous version of the mouse driver eventually fixed the lagging issue.
Right-click Start icon to launch WinX menu. Now make a click on Device Manager from the list.
On the following window, look for the entry namely Mice and other pointing devices. Double click on it to expand it.
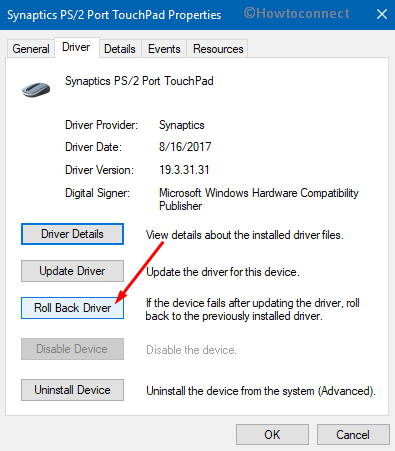
Once expanded, do a right click on your mouse device and choose Properties.
A new properties pop-up will appear, shift to the Driver tab. If Roll Back Drivers is available, perform a click on it otherwise this tweak will not work for you.
Tip: To avoid the mouse driver from being updated again, see How to Forcefully Stop Driver Updates in Windows 10.
Change Power Management options
Sometimes, Power Management can also end up in mouse lagging troubles. However, you can fix this by doing the following –
• Open run dialog box by jointly hitting “Win+R” keys and type in devmgmt.msc. Click OK to access Device Manager.
• Find out USB Hub and make a double-click on it when Device Manager shows up on the screen.
Now, USB Hub Properties will pop-up. Shift to the “Power Management” tab and uncheck the option “Allow the computer to turn off this device to save power” (see the below snapshot).
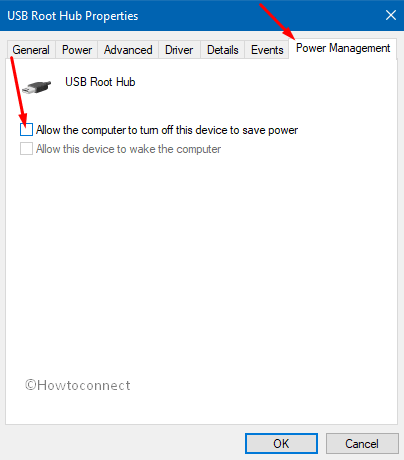
• In the end, do a click on OK to save the changes.
You need to follow the above steps for each USB Hub devices that are connected to your PC. Finally, restart Windows 10 PC and check the behavior of the mouse.
Use USB 2.0 port for your mouse
This mouse lagging complications usually occurs with a wireless mouse. To overcome such situations, you just need to connect your mouse receiver to “USB 2.0 port”.
Remove portable USB devices except Mouse
Sometimes, other USB disturb the mouse and as a result, it stops responding. This problem arises when you are using a HUB to connect multiple USB devices. Some users suggest that after removing the Portable USB devices from the USB port, Windows 10 mouse problems no longer happens.
Disable Cortana
This might sound silly but it worked for so many users. Users are with a view that after “turning off Cortana”, Mouse Lagging in Windows 10 April Update disappeared.
But post “Anniversary Update“, you cannot turn it off manually through settings. However, there is a way out through Registry Editor. So, follow our article to Disable Cortana Service on Windows 10 After Anniversary Update.
Reset Mouse Devices
In certain cases, conflicting mouse settings might create a problem like Mouse Lagging in Windows 10 April Update 1803. Reset Devices on Mouse Properties is a strong option to fix this issue.
Open Control panel by typing cp in the search bar on the taskbar and pressing Enter.
Click on Mouse from the Applets and switch to Device settings tab once appeared.
Press Reset Devices option.
Take help of USB extender
It’s not always possible to disconnect all other USB devices from your computer. Sometimes, it’s necessary to use both at the same time. In this circumstance, you can take help of a USB extender. To do so connect your receiver to the extender and keep it away from your computer and other devices that can create interruption. This tweak has worked for many people. So you can try at least once.
That’s all. We know how much disturbing this Windows 10 mouse problems is. So, we tried to cover maximum solutions in this context. Hopefully, it will be helpful and you will no longer face Mouse Lagging in Windows 10 April Update.