After updating Windows 10, many users started getting error netwtw06.sys from which it’s hard to recover. The error is mostly accompanied by PAGE_FAULT_IN_NONPAGED_AREA, SYSTEM_THREAD_EXCEPTION_NOT_HANDLED and last but not least DRIVER_IRQL_NOT_LESS_OR_EQUAL. Once affected, Windows 10 crashes frequently making everything freeze moreover inaccessible that clearly indicates its a blue screen of death.
Such an incident mainly turns up when the operating system somehow receives corrupted or incompatible versions of Wireless network card device drivers for Intel. However, let’s move straightway to the simple methods that perhaps Fix netwtw06.sys Blue Screen Error Windows 10.
netwtw06.sys blue screen Error
Here is how to fix netwtw06.sys Blue Screen Error Windows 10 –
1] Rollback to previous version of Wireless network driver
Main reason to bring forth netwtw06.sys error is wrong version of Wifi driver in most cases. Though we always talk about the importance of updating drivers, to be frank, getting the driver that works fine is more necessary than a newer one. So if you started getting this blue screen of death after updating Windows or upgrading the specific driver, rollback to previous state when everything was working absolutely fine. To do so –
- Click on taskbar search icon and type devmgmt.msc.
- Hit Enter key after viewing Device Manager at the top of appearing result.
- Double-click on Network adapters to expand the same.
- Right-click on the driver entry labeled with WiFi adapter and choose Properties.
- On forthcoming popup, Shift to the Driver tab followed by clicking Roll Back Driver button in order to install the previous known stable version.
- Lastly, restart Windows 10 for the changes to take effect.
2] Reinstall Wifi driver
Clean install Wireless network adapted if netwtw06.sys blue screen error is being generated by the present version of the same. Steps are as followed –
- Go to the manufacturer’s website of Intel WiFi driver and download the suitable version that is compatible with your device.
- Later on, open Device Manager and expand Network adapters by double-clicking.
- Right-click of WiFi adapter exists there and choose Uninstall device.
- A pop-up will show up for final confirmation, hit the Uninstall button.
- Now, press Win+R to invoke Run command.
- Type %temp% in the dialog box and click the OK button.
- Select all items available in that specific folder by pressing Ctrl+A together.
- Hit Delete button to wipe out the temp files.
- Thereafter, reboot Windows 10.
- Once the Windows powers up, go to the folder where you downloaded the driver in the beginning.
- Double-click on the installation file and do what the system suggests to you.
- After completion, check if netwtw06.sys blue screen Error still persists.
3] Update Wireless network adapter
Outdated network drive can often get corrupted and generate netwtw06.sys blue screen Error. Therefore, attempt to update the same manually to get rid of such an issue. Here is the process you need to follow –
- Right-click on Start icon and select Device Manager.
- Once it shows up, locate Network adapters and click on the small arrow icon located beside the same.
- Right-click on WiFi adapter and choose Update driver.
- Next, opt for Search automatically for updated driver software.
- Wait and let your device download and install latest version of WiFi adapter.
As an alternative, you can take help of Intel® Driver & Support Assistant to get the update for specific network driver.
4] Run DISM to fix netwtw06.sys blue screen Error
DISM command-line will scan for corruption related to netwtw06.sys blue screen Error moreover attempt to repair any issues that it finds automatically. Here is how to proceed –
- Press Win+S and type cmd.exe in the search bar.
- When the result comes into the view, click Run as administrator.
- A UAC will prompt up for consent, click Yes to continue.
- On the black panel, type the following and hit Enter to execute –
DISM.exe /Online /Cleanup-image /Restorehealth
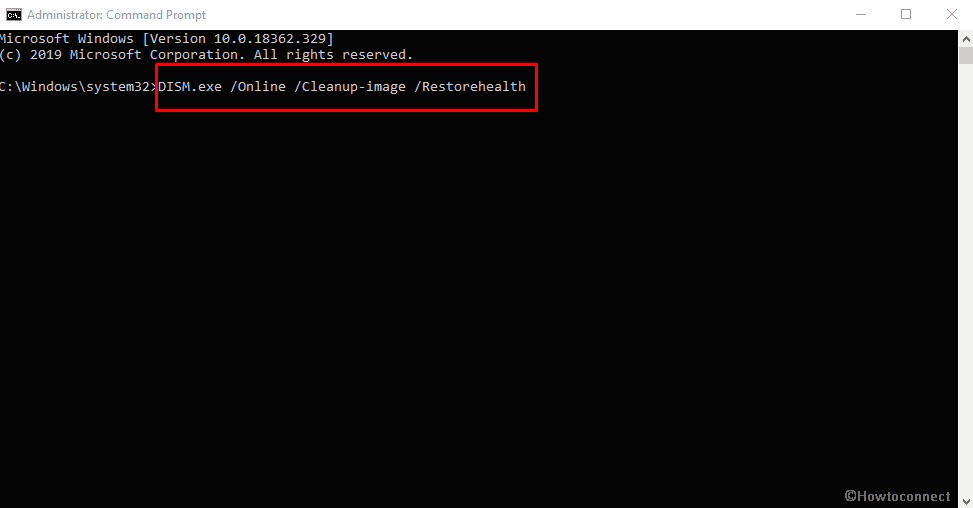
The process will take longer time to complete if corruption is found during the scan of the image. Also, the procedure may get stuck in between but this is no cause to concern as scanning should commence after a moment automatically.
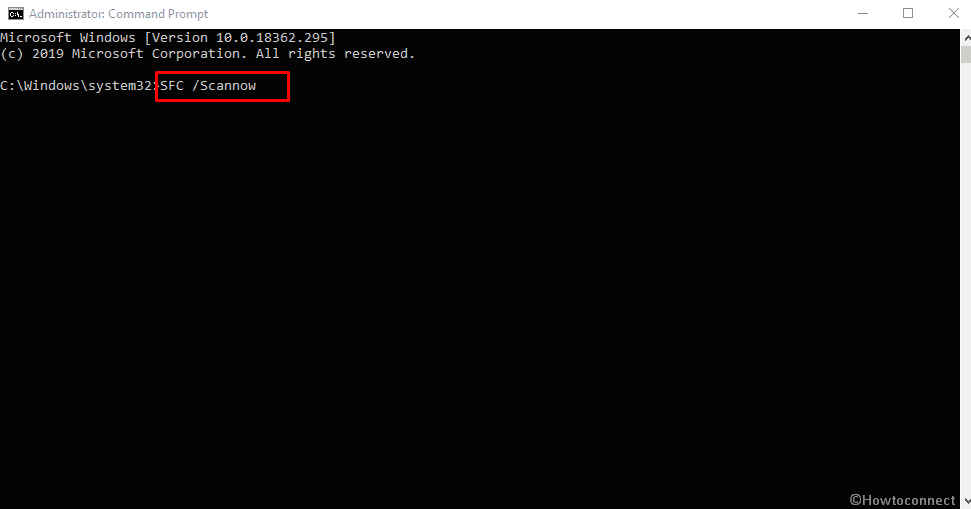
5] Bring System file checker into service
System files play an important role to make the device operate according to plan and there is no way to remove them manually even through the use of permissions. Still, there is a time when those items get misplaced or corrupted somehow consequently give birth to several issues. netwtw06.sys blue screen error is one of the among. To recover your Windows 10 from such critical situation, run sfc /scannow by following below steps –
- Press Win and R keyboard shortcut to open Run command.
- Type cmd.exe in the dialog box followed by pressing Ctrl+Shift+Enter altogether.
- Click Yes button for appearing UAC.
- Insert
Sfc /scannowcommand after blinking cursor and then hit Enter.
- Let the procedure hit 100% without interrupting in between.
- Usually, system repairs all issues automatically after completion of scan. In rare cases, you need to go through the report it shows and take next steps accordingly.
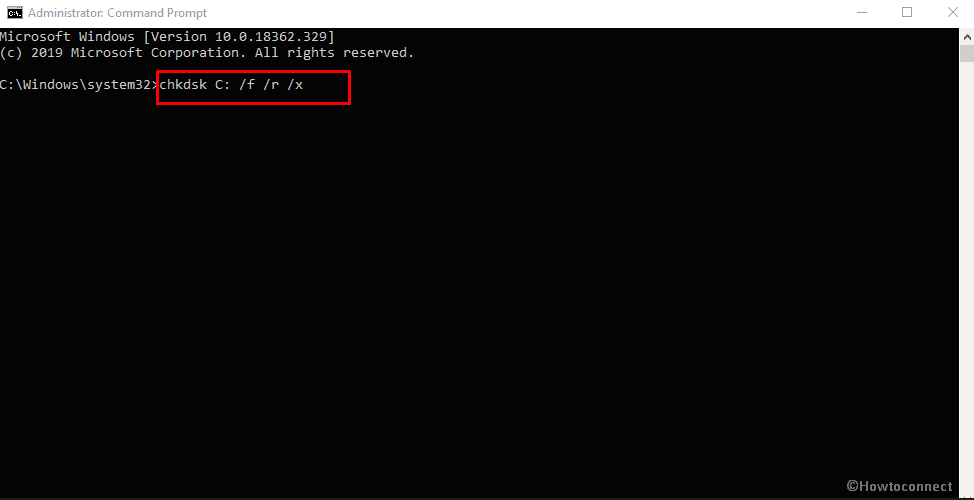
6] Check for hard disk error
To settle upon netwtw06.sys blue screen Error, disk checking tool often does the tweak. The command-line utility will look into the specified disk and recover data on the network drive if necessary. To run the command –
- Invoke Windows search by pressing Win+S simultaneously.
- Write in cmd, thereafter, press Ctrl+Shift+Enter altogether to bring forth Command prompt with admin privilege.
- Click on Yes when a User Account Control asks for permission.
- Type the following command and then hit Enter key –
chkdsk C: /f /r /x
7] Revert back previous version of Windows
netwtw06.sys blue screen error mostly appears after making any change into the system. Hence, go back to previous version when there was no error. For that –
- Press Windows key and type rstrui.
- Hit Enter after viewing the result.
- Once the System Restore wizard becomes visible, click on Next.
- Pick the last restore point and again hit Next.
- Lastly, hit Finish button to go back to the previous state.
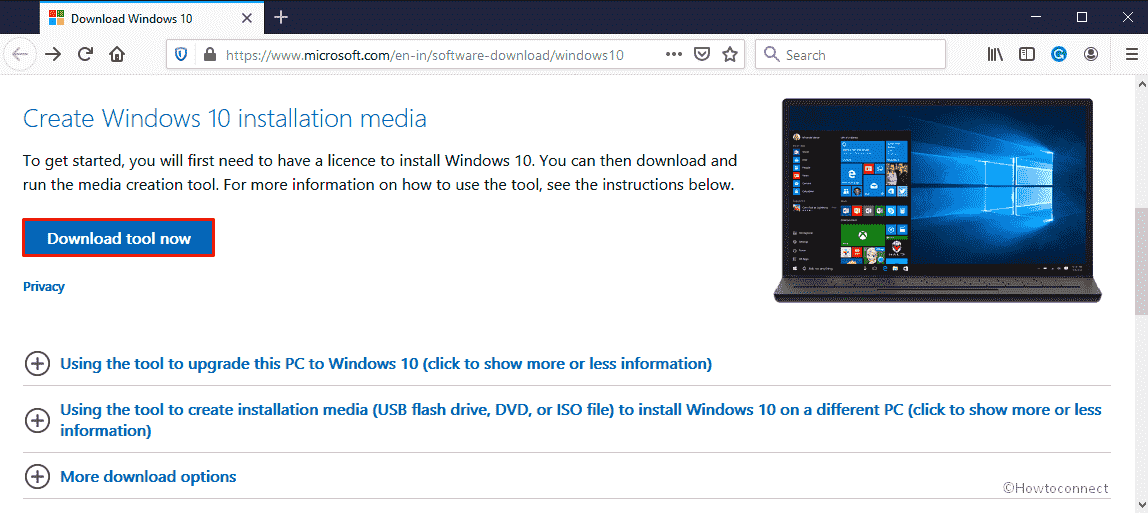
8] Clean install Windows 10 to fix netwtw06.sys blue screen Error
Sometimes netwtw06.sys error is stubborn enough to kick out, therefore, you left with no choice rather than installing Windows 10 again. Clean install will be best-suited option to do so because it prepares Windows 10 to perform better moreover lessen the startup time. Though the process takes good amount of time to be done, in the end, you will appreciate the same as its worth. Here are the steps you need to follow –
- Open Edge browser and head over the official page of Microsoft.
- Click on Download tool now located beneath Create Windows 10 installation media.
- Hit the Run button from bottom.
- Click Yes for the UAC.
- When Windows 10 Setup wizard shows up, click on Accept to agree with its terms and conditions.

- Opt for the radio button of Create installation media (USB flash drive, DVD or ISO file) for another PC option and click on Next.
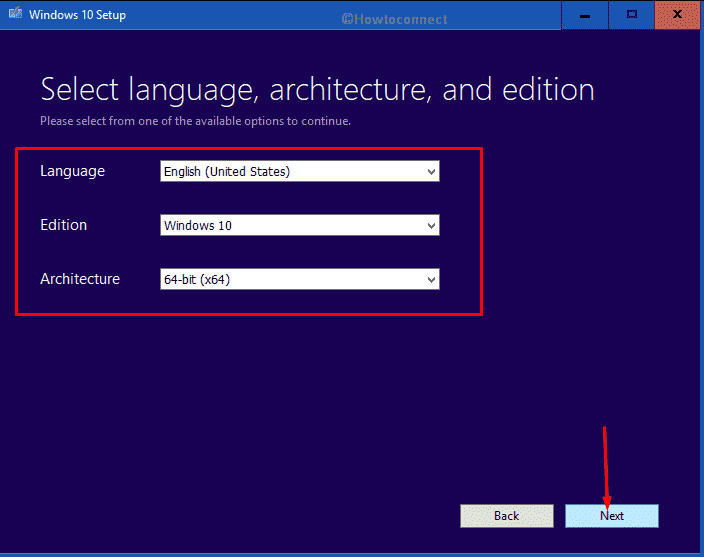
- Check preferred Language, Edition and Architecture that system picked for you. If everything seems fine, hit Next to move further. You are allowed to change the preferences too.
- Click the radio button set for ISO file option thereafter hit the Next button.
- Choose a desired location where you want to store the file and then click on Save.
- Once the process hits 100%, click on Finish to exit from the Media creation tool.
- As of now, you need to .
- After doing so, insert the USB into one of the ports of your device.
- When the system commands you to press either of ESC, Del, F2 or F12 to proceed Boot options Setup screen, hit the required key.
- Choose the suitable options from the dropdowns of Language to install, Time and Currency Format, and Keyboard or input method gradually followed by clicking Next.
- On the imminent wizard, click on Install now button.
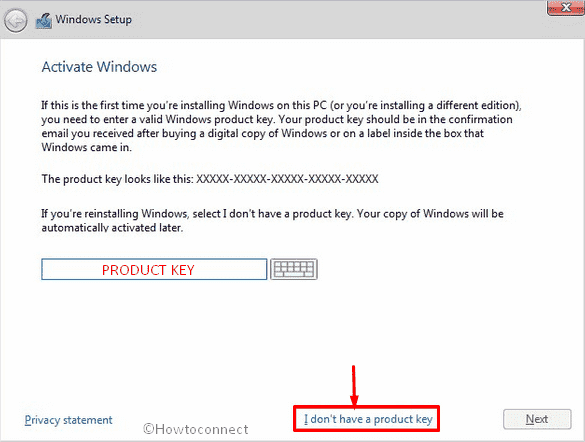
- Write down the genuine product key in the specific bar. In case of not having any, click the option entitled I don’t have a product key.
- Hit the checkbox of I accept the license terms and then click on Next.
Note – Following part is not mandatory to imitate, you can opt the best suited for you.
- Click on Custom: Install Windows only (advanced).
- Select the drive connected to your Windows 10 device and hit the Next button.
- Click on OK when a warning box rolls out indicating about the deletion of existing content.
- The farther process is automatic; still, you should be present in front of your device and if the setup tool asks to choose an option, select the correct one.
- In-between the procedure, the PC will restart itself several times as a part of the installation.
- After completion, put either of Microsoft email account, phone and Skype identification in the respective fields when prompted or proceed with Set up a PIN option.
- Click the Yes button if you are eager for turning on Cortana.
- In the end, choose the Privacy settings as you like and then click on Accept to finish the process.
Methods:
1] Rollback to previous version of Wireless network driver
2] Reinstall Wifi driver
3] Update Wireless network adapter
4] Run DISM
5] Bring System file checker into service
6] Check for hard disk error
7] Revert back previous version of Windows
8] Clean install Windows 10
That’s all!!