Blue Screen errors are not new in Win 10 PC as users experience them often in several situations. Some BSOD like aksdf.sys and hardlock.sys error Page Fault in Nonpaged Area occurs during an attempt to install Windows 10 2004. However, one such stop code PDC_UNEXPECTED_REVOCATION_LIVEDUMP causes to revoke an activator on Windows 10. Bug check value for this Blue screen error is 0x0000017D.
Though the PDC UNEXPECTED REVOCATION LIVEDUMP BSOD issues make the affected users a little nervous, they can easily overcome these errors. Here also, there are certainly simple and effective workarounds that can help you to get the system back to normal working conditions.
PDC_UNEXPECTED_REVOCATION_LIVEDUMP
Here is How to Fix PDC_UNEXPECTED_REVOCATION_LIVEDUMP Error in Windows 10 –
1] Disable Automatic Restart
Whenever a Blue Screen of Death hits a computer, the system slips into auto reboot. This automatic feature will restart the system without providing any advance warning which leaves no time to try out any workarounds. Moreover, Windows 10 (including previous versions) perform this task in order to protect the PC from further damage. Hence it’s better to disable this feature so that you will have enough time to carry out the solutions to fix the BSOD errors. Go through the below guidelines to carry out the task –
- Head to the desktop and do a right-click on This PC icon. From the list of options, choose Properties.
- Click Advanced system settings link on the upper left corner.
- Hit Settings button that appears under the Startup and Recovery section.
- On the following wizard, under System Failure area, uncheck the box Automatically restart and click OK to implement the changes.
- Henceforth the system will not reboot all by itself and you can deploy workarounds to get rid of PDC_UNEXPECTED_REVOCATION_LIVEDUMP.
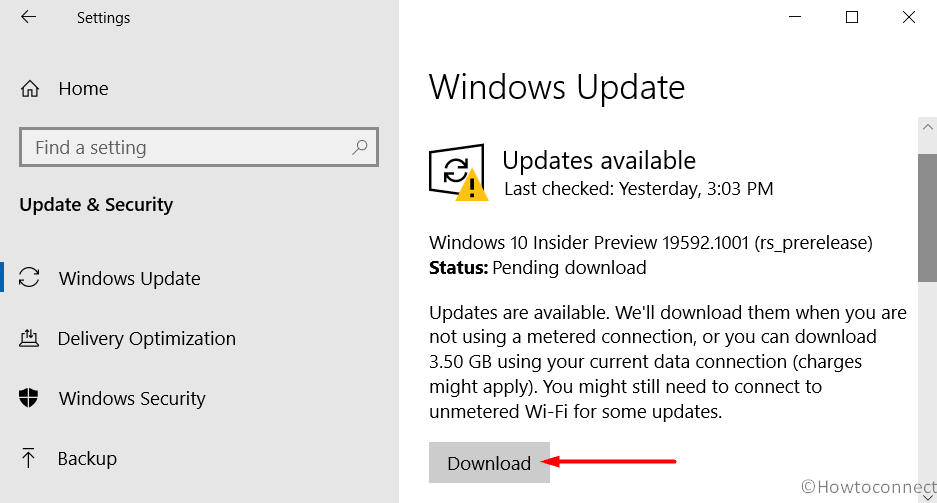
2] Check and Install Available Updates
Microsoft releases cumulative updates, preview builds, and Tuesday patches regularly to keep the operating system up to date. These patches also contains fixes for several bugs and issues, driver updates, and more. Blue Screen error PDC_UNEXPECTED_REVOCATION_LIVEDUMP may occur when you don’t download and install the updates. So as a possible solution, you need to first check for the available updates and if and then receive them in proper way. Follow these steps to perform the update –
- Press Windows key and click the tiny cog icon on the Start Menu.
- On the Settings app, select Update & Security.
- Choose Windows Update from the left sidebar of the following page. Switch to the right pane and click Check for updates button.
- Wait for the system to detect and display the list of available updates. Once you see them, click Download.
- Some of them require a reboot to finish the installation. So observe the guidelines of the updates and install them successfully.
3] Disconnect Hardware Accessories
Specialists from Microsoft always suggest disconnecting hardware accessories to resolve BSOD errors including PDC_UNEXPECTED_REVOCATION_LIVEDUMP. Basically, certain external devices go incompatible with the system which further leads to several unexpected issues. So if some of the peripherals that are not in use like printer, scanner, then it’s better to detach them temporarily.
Once you disconnect the devices, restart Windows 10 PC and upon startup, check for PDC UNEXPECTED REVOCATION LIVEDUMP Blue screen error code. If the BSOD does not occur anymore, then the removed external accessories were one of the culprits. Now determine the accurate one cause by removing the devices one by one. Finally, update the drivers for the device leading the error to fix the issue.
Note – To grab the latest and correct version, visit the manufacturer’s website of those devices and download the same.
4] Run System File Checker to Fix PDC_UNEXPECTED_REVOCATION_LIVEDUMP
Due to various reasons such as malware, software corruption, and other system files go missing from the computer. It might be the installation of a 3rd party program, incorrect Registry modification, or something else that created this issue. The missing of such important elements including DLL files generate BSOD error like PDC_UNEXPECTED_REVOCATION_LIVEDUMP. To restore the files, Windows has a built-in command-line tool System File Checker that can make things normal. So pursue the below steps to run this inbuilt utility –
- Fire up taskbar search and type in cmd.exe.
- When Command Prompt shows up in the results, right-click on it. Choose “Run as administrator“.
- Click Yes when UAC prompts up for further permission.
- Once into the elevated Command Prompt window, insert the given-below text and hit Enter –
sfc /scannow
- The scan would take some time to finish up. Hence wait patiently and once it gets over, the tool will restore those files from Windows cache folder.
- For effective results, reboot the device and then check for the BSOD error.
5] Conduct a Full PC Scan
Malicious infection, when getting into the device they cause huge damage to the system. As a result, BSOD errors become common, and PDC_UNEXPECTED_REVOCATION_LIVEDUMP isn’t an exception. Hence, to improve Windows 10 performance, experts always suggest scanning the computer very often. Windows Security app is the inbuilt protection tool that is specifically designed to safeguard the system in multiple ways. One of its most prominent features is a full PC scan which will deeply examine all the files and folders of the system. Consequently, the deep investigation may take some time but it will report you about the malware or virus attack in detail. Therefore, walk through these series of steps to conduct this scan –
- Press Windows logy, type security and then hit Enter.
- Once into the app, click Virus & threat protection.
- Switch to the right pane and hit Scan options link.
- This will reveal all the available options, choose Full scan.
- To start the process hit Scan now button. The security tool will initiate its detection of threats into each and every file of the system. The scan will take a couple of hours to complete depending on the disk size, so be patient.
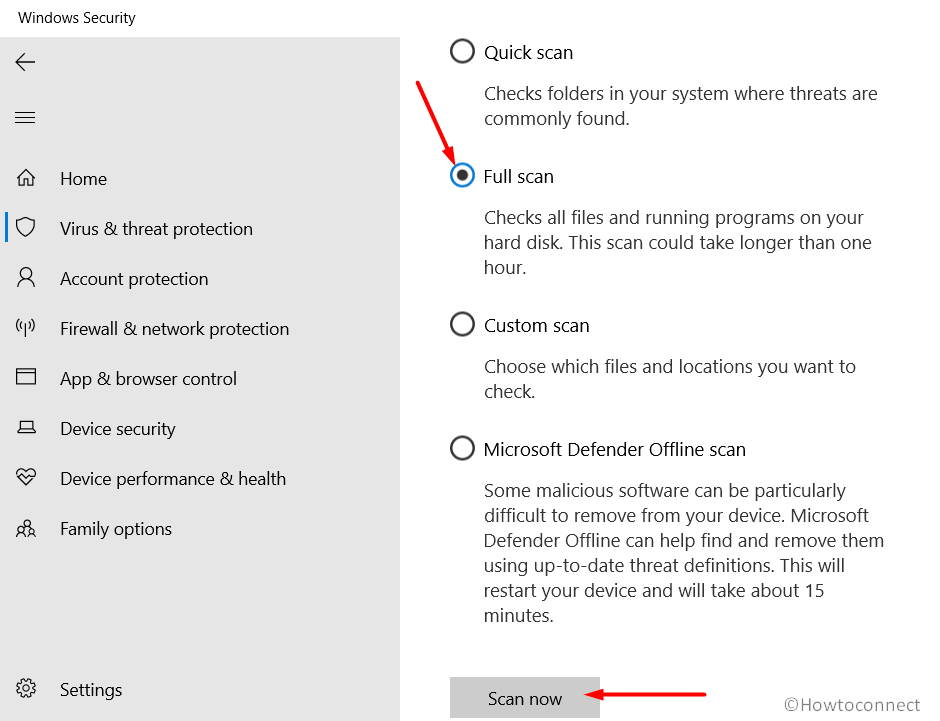
- When the scan is finished, if it traces out any infection, click Clean threats.
- Get rid of all the threats and malware components from the device and reboot the device.
6] Repair Windows Image Files by Running DISM Tool
Windows Image Files are pretty sensitive and due to several reasons, they become corrupted So there are chances for the error PDC_UNEXPECTED_REVOCATION_LIVEDUMP to be an outcome of faulty Windows image files as well. Windows include an inbuilt tool DISM which is specifically originated to repair such files. This is a command-line tool that will examine the system and rectify those dreadful files as well. To execute this built-in utility, walk through these steps –
- Insert cmd.exe on taskbar search and when Command Prompt appears, do a right-click on it.
- Select Run as administrator.
- Hit Yes on the UAC prompt and access administrative privileges.
- When into the black window, copy-paste the given text and hit Enter.
DISM.exe /Online /Cleanup-image /Restorehealth
- Let the tool finishes its process and once it gets over, restart the device to implement the modifications and then check for the error.
7] Update Obsolete Drivers to resolve PDC_UNEXPECTED_REVOCATION_LIVEDUMP
There are at times when certain device drivers become obsolete which eventually results in PDC_UNEXPECTED_REVOCATION_LIVEDUMP. The giant software company rolls out driver updates that need to be installed every time they are released. When drivers become outdated they don’t work correctly and open the door for multiple problems. So it would be a great idea to check them manually if Microsoft has made any updates available for any of its drivers. Let’s see how to proceed with the update procedure –
- Open Run dialog box by pressing “Win+R” keyboard shortcut.
- Insert devmgmt.msc and click OK.
- On the Device Manager console, click the arrow beside each category and see which one displays a yellow exclamation sign next to it. This warning sign specifies that its drivers are not functioning properly and it requires an update.
- Once you locate the problematic device, do a right-click on it and choose Update driver.
- Select the first option Search automatically for drivers on the subsequent wizard. Let Windows find and install the new updates for the selective driver.
- For effective results, reboot the device and see if this workaround resolves the issue.
Note – As an alternative, visit the manufacturer’s site to find the latest version of the driver. Download the supportable file and install it manually to keep the drivers updated.
8] Try Online Blue Screen Troubleshooter
Microsoft offers several troubleshooters to deal with problematic scenarios and the same with the Blue Screen issues. Previously the tool was included in the Settings app and also in the Control Panel but in the recent versions, the company rather made it available online. It is a walk-through process where the affected user needs to put in some questions to get rid of this BSOD. Observe these steps and use this online utility –
- Launch any web browser and visit this page.
- Go on answering the questions on this page and it will assist with the possible workarounds to fix the PDC_UNEXPECTED_REVOCATION_LIVEDUMP.
9] Fix PDC_UNEXPECTED_ REVOCATION_LIVEDUMP by Using Disk Cleanup Tool
Windows 10 keeps on gathering internet browser cache, temporary files, old Windows installation files, thumbnails, downloaded program files, etc. These junk items are pretty useless and occupy valuable hard disk space which makes it difficult for programs to get installed and perform functions. The clutter leads to low disk space issue which is responsible for PDC_UNEXPECTED_REVOCATION_LIVEDUMP. So if the junk is accumulating in the system for quite a long time, then it’s a good time to clean them. So go through these steps to get rid of the unwanted items from the PC –
- Press Win+S to invoke taskbar search, type cleanmgr, and hit Enter.
- When the Disk Cleanup tool wizard shows up, click the drop-down and choose the system drive letter(generally C:). Click OK.
- Once the list of items comes into view, click “Clean up system files” button.
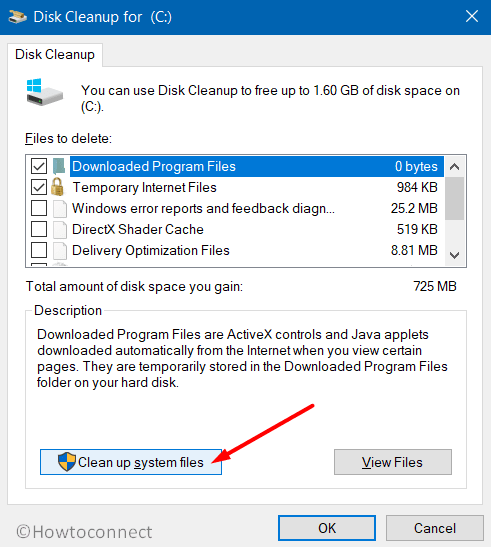
- On the following pop up, again select the same hard disk drive letter and click OK.
- Here, select all the checkboxes and make sure those directories don’t have any important files in them. Click OK and let the deletion begin.
- After clearing out the junk items, reboot the device, and see for the error.
Note – Ensure to safely keeps the necessary files from Downloads and Recycle Bin to another directory. Recovering them after Disk Cleanup would be a difficult task. However, you can Undelete Files using Windows File Recovery Microsoft Store App.
10] Check Computer for Memory Problems
RAM complications can put the computer in lots of difficulties. Issues with the Random Access Memory (in short RAM) mostly result in a sluggish performance which might further cause PDC_UNEXPECTED_REVOCATION_LIVEDUMP. Another built-in utility from Microsoft is Windows Memory Diagnostic Tool that could help you in overcoming issues associated with RAM. Make sure to save and close all the ongoing work before executing the tool and then go through these series of steps –
- Click the taskbar search icon, type mdsched, and hit Enter.
- Make a hit on “Restart now and check for problems (recommended)” option from the upcoming window.
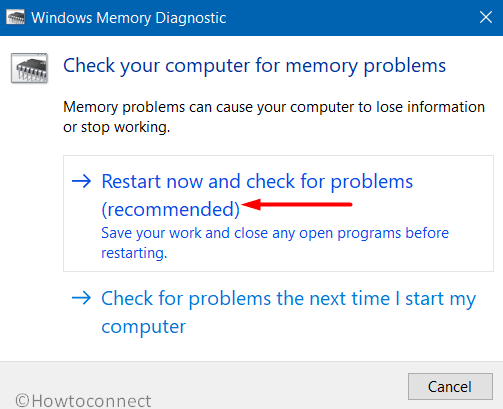
- This will reboot the system and on the next login, the tool will start detecting the memory. After the detection gets over, the device will reboot and the results will be displayed in the system tray.
- Now, if any issues are detected in the scan, take the required action to deal with them.
11] Roll Back Defective Device Drivers
Device Drivers have always been an important component of an operating system and when any of them are not installed or gets corrupted, BSOD errors like PDC_UNEXPECTED_REVOCATION_LIVEDUMP are likely to occur. So if you are sure that the issue is showing up after installing any drivers, then you can roll back to its immediate former version. Walkthrough the below instructions to carry out the task –
- Make a right-click on Start icon and from the Win+X menu choose Device Manager.
- From the console, locate and double-click the terrible device whose driver was creating the mess.
- Do a right-click on the device and choose Properties from the list of options.
- On the upcoming wizard, focus on the Driver tab and click Roll Back Driver button.
- Reboot the computer to implement the driver changes.
12] Remove 3rd Party Antivirus Tools
There is a wide range of top free antivirus solutions that give complete security to your system in many ways. But using these 3rd party security programs have a downside as they have their own set of settings having conflicting behavior. These settings generate unwanted complications in the system that may further lead to BSOD errors like PDC_UNEXPECTED_REVOCATION_LIVEDUMP. Hence, experts suggest the removal of such software from the system and to rely on Windows Security. To do so,
- Press Windows key and select Settings cog.
- Choose Apps.
- Switch to the right pane of the Apps &features page. Find out and select the 3rd party security tool that is installed in your system.
- Hit Uninstall button and henceforth follow the instructions of the utility to uninstall it including its settings from the system.
- After finishing the uninstallation, restart the PC and see for the BSOD error.
13] Delete Faulty Windows Update Files
Commonly, patches that Microsoft releases contain update issues or some other problems like PDC_UNEXPECTED_REVOCATION_LIVEDUMP. So if you are encountering this error post-installation of an update, then its the same buggy update file that is creating the issue. Hence it is better to delete those faulty update files from the system using these steps –
- Press “Win+I” key combination to open Windows Settings.
- Select Update & Security.
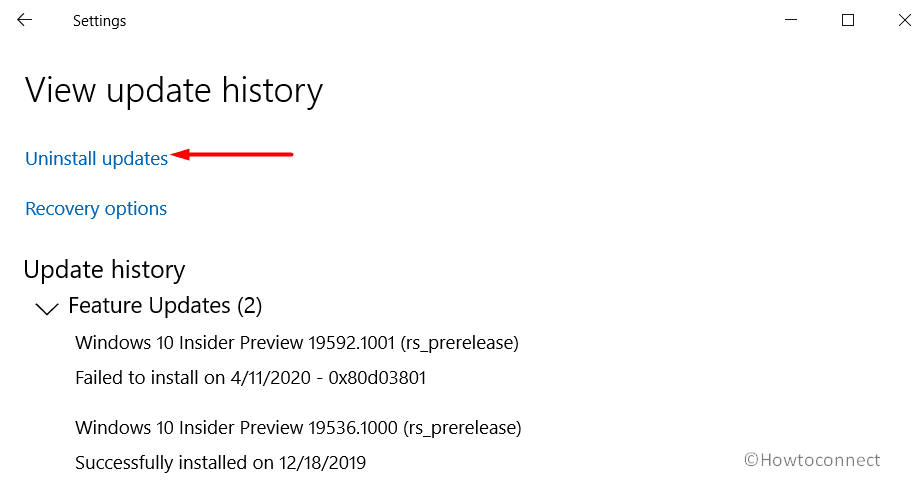
- Make a click on View update history on the adjacent side of the following page.
- Click Uninstall updates link.
- Control Panel will show up displaying a list of installed updates. Find out the latest one and right-click on it. Hit Uninstall.
- Go through the directions on the screen to completely delete the update file from the system. Once the removal gets over restart the device and on next login see for the error.
14] Roll Back to Previous Working State using System Restore
Registry Editor in Windows is something that needs to be handled very carefully. However, certain changes in the Windows 10 often tweak the registry all by itself without your knowledge. Any incorrect changes often lead to BSOD errors such as PDC_UNEXPECTED_REVOCATION_LIVEDUMP. So using System Restore in such situations helps to take back the system to the state when everything was operating perfectly. To revert the system back, follow these guidelines –
- Hit Win+Q hotkey, type rstrui, and press Enter.
- Once the System Restore wizard becomes visible, click Next to proceed further.
- Opt for the latest ‘restore point’ from the list that comes into view on the following screen and click Next.
- To begin the revert process, click Finish and let the system be back to the normal state.
15] Reset This PC to Fix PDC_UNEXPECTED_REVOCATION_LIVEDUMP
The last workaround that you can try to fix PDC_UNEXPECTED_REVOCATION_LIVEDUMP BSOD error is to reset the PC. Going ahead with this method would be completely safe as it lets you keep the personal files intact without letting you lose them. However, it also provides you an option to delete them as well. But before removing them, keep a backup of them on a USB flash drive or on a disk. Try out this solution by going through these sequence of steps –
- Launch Settings and head to Update & Security.
- On the left sidebar, select Recovery subsection.
- Switch to the corresponding side and hit Get started under “Reset this PC” section.
- Select the appropriate option and move ahead with the reset process.
Methods:
1] Disable Automatic Restart
2] Check and Install Available Updates
3] Disconnect Hardware Accessories
4] Run System File Checker
5] Conduct a Full PC Scan
6] Repair Windows Image Files by Running DISM Tool
7] Update Obsolete Drivers
8] Try Online Blue Screen Troubleshooter
9] Use Disk Cleanup Tool
10] Check Computer for Memory Problems
11] Roll Back Defective Device Drivers
12] Remove 3rd Party Antivirus Tools
13] Delete Faulty Windows Update Files
14] Roll Back to Previous Working State using System Restore
15] Reset This PC
That’s all!!