Once the system generates such BSOD, Windows 10 desktop stops working moreover restarts randomly from which it’s hard to getting back in normal state. WIN32K_ATOMIC_CHECK_FAILURE blue screen of death holds bug check code 0x00000160 that points out Win32k function somehow surpassed an ATOMICCHECK.
Generally, an outdated OS, incompatible or wrong version of device drivers, malfunctioned RAM is more likely to cause WIN32K ATOMIC CHECK FAILURE. Furthermore, missing DLL files due to virus attack, corrupt system components, low disk space is also accountable for bringing forth bug check code 0x00000160.
WIN32K_ATOMIC_CHECK_FAILURE Solutions
Here is how to fix WIN32K_ATOMIC_CHECK_FAILURE Error in Windows 10 –
When WIN32K ATOMIC CHECK FAILURE is being generated, Windows 10 restarts itself time and again to avoid data loss and farther damages. However, Windows 10 does it with good intention, trying out workarounds effectively might seem hard to you. That’s why disabling auto shutdown is very much necessary before attempting to deploy solutions. Steps to do so are as followed –
- Press Win+D hotkey at one go to reach desktop screen.
- Right-click on This PC and choose Properties.
- Click Advanced system settings from left column.
- Hover the mouse pointer and end up at Startup and Recovery section.
- Click on Settings button lying beneath the same.
- Move down to System failure and then untick the box set to Automatically restart.
- Lastly, click the OK button to make the changes effective.
As of now, you have disabled automatic shutdown, carry through the plausible workarounds to fix WIN32K_ATOMIC_CHECK_FAILURE.
1] Check for latest Windows 10 patches
Bug check code 0x00000160 mostly shows up when Windows 10 gets corrupted itself. To correct this kind of blue screen error, Microsoft keeps releasing cumulative updates quite frequently. These patches not only include bug fixes but also contains new system settings and features that improve PC performance.
- Open Settings app by pressing Win+I together.
- Click on Update & Security.
- Switch to right pane and hit Check for updates button even though the page shows You’re up to date.
- Click Download button if any patch is available.
- During the installation process, stay in front of the desktop as the system may ask to reboot Windows 10 several times to make it done properly.
2] Clean existed threats with Windows security
Viruses are kinds of ill-disposed programs who can replicate themselves to another program usually by means of copying. They get spread at a faster rate through media like emails, USB, Removable Storage, and so many similar options. Viruses have an achievable goal of corrupted system files and getting control over Admin eventually stealing sensitive data.
We are really unfortunate that the security system is getting frail day by day as it’s quite easy for them to sneak into computers dodging the defense. Blue Screen error such as WIN32K_ATOMIC_CHECK_FAILURE occurs when there is significant corruption in the system files and missing core components. Considering this very fact, Microsoft brought up Windows Security delivering comprehensive and real-time protection for your files both off and online. Here is how to run it –
- Press Win+I, thereafter, choose Update & Security.
- Opt for Windows Security from left column and shift to right pane.
- Select the Virus & threat protection category.
- On the newly launched window, move to right surface and click Scan options.
- Hit the radio button assigned for Full scan, hereafter, click Scan now button.
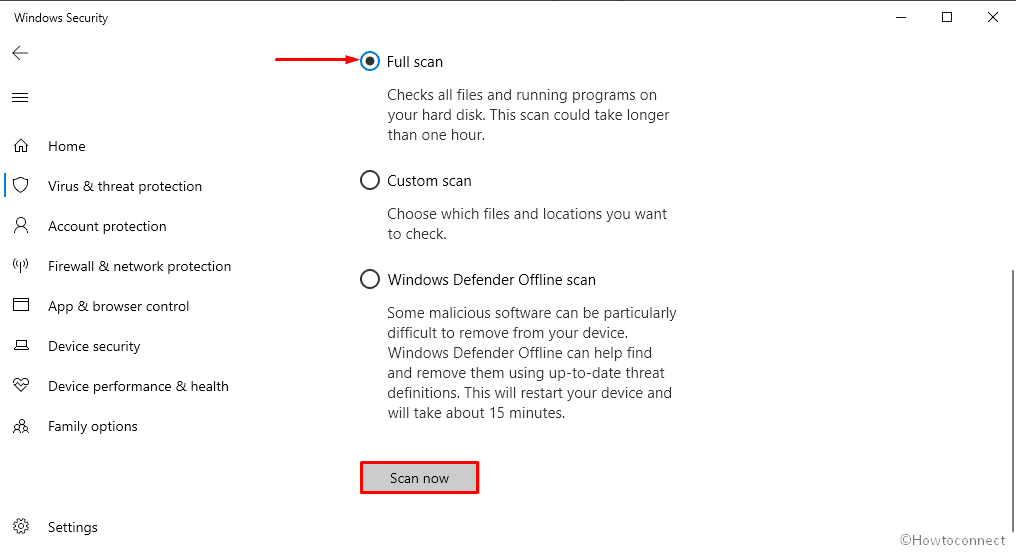
- As the utility scans every corner of the computer, it would take a little longer time to finish.
- After completion, if the system traces out any danger, click Clean threats.
3] Update device drivers if necessary to fix WIN32K_ATOMIC_CHECK_FAILURE
Drivers are usually software controlling specific types of hardware inherent to system. It provides software interference to hardware and communicates with the device through a computer Bus. These are such necessary programs that any outdated or incompatible one may cause serious fatality such as WIN32K_ATOMIC_CHECK_FAILURE in Windows 10.
Microsoft has made the task of their updating process very simple and it’s actually autonomous with Windows Update. Despite that, sometimes this process fails to meet up the demand and drivers keep on running an outdated condition.Hereby, they invoke blue screen error in the system unless we try updating them using default Device Manager. The guidelines are as follows –
- Press Win+X and choose Device Manager.
- Look for the device whose driver you want to update and double-click on the same.
- From the expanded list, right-click on the item and select Update driver.
- Choose Search automatically for updated driver software.
- After online search, if the system finds any update, it will be installed automatically. Otherwise, you will have to visit the manufacturer’s website to get the same.
- Repeat same process for all drivers that seem outdated and faulty to you.
4] Disable or Rollback incompatible driver
We have got to know how important device drivers are for smooth running of Hardware. In the previous workaround, we have also discussed the way to update these software using Device Manager as well. But there is a little pinch out there as some of the drivers are too installed who are somewhat incompatible.
If the same happens with your machine, there may be a likeness to have bug check code 0x00000160 in the system. In that sense, we have to disable or Rollback these dreadful drivers to previous state using below steps –
- Open Device Manager then look for the driver you have updated recently.
- Once found, right-click on the responsible driver and choose Properties.
- Jump to Driver tab and either click on Roll Back Driver or Disable Device.
- Go along with the on-screen guidelines to finish the process.
5] Repair corrupted system files to fix WIN32K_ATOMIC_CHECK_FAILURE
System files in a device have certain structures and specific contents in it and file acts normal only when the information inside is arranged in proper place. When wrong information is written in the file and placed in an improper place, it will affect the data display. It may not open at all or will show error messages even show up as unreadable or scrambled. This happens usually due to malicious infection leading to remove some of the components.
Another mentionable reason is, whenever some similar programs run in the same system, they can engage in conflict and delete a few files as well. When these happen, Blue screen error WIN32K_ATOMIC_CHECK_FAILURE may evolve in the machine and you will have a troublesome schedule. However, there is a simple tool to make things right, System File Checker we call it. The Tool is introduced in Windows and it activates in Elevated Command Prompt when you run specific command. Here is the detailed process –
- Hit Win+R and type cmd.exe in the run command.
- Press Ctrl+Shift+Enter to run Command Prompt as admin.
- Click Yes for the UAC to give consent.
- Insert
Sfc /scannowcommand line and hit Enter to execute. - Let the process hit 100% without interruption.
6] Clean junk files from computer
Various useless files are created while a user works with machine starting from opening a document in MS Word. Visiting some web pages, the browser downloads parts of the temporary files as well to load the page a little faster. These files are useful for small period of time and after that, they become useless. To be honest, they don’t cause any harm but take spaces in the disk.
Everyday, these files pile up in HDD and cover up a big amount of space making the device slower. Since the disk space reduces, WIN32K_ATOMIC_CHECK_FAILURE BSOD error also results in the system and makes your operation a hectic one. To clean these junk files internally without using any third-party application, we have the super handy built-in Disk Cleanup utility.
- Press Windows key and S simultaneously thereafter type cleanmgr.
- Choose Disk Cleanup from the appearing result.
- Click OK button where C: drive is pre-selected.
- Hit Clean up system files from the left bottom corner of currently running wizard.
- Again, click on OK for Driver selection pop-up.
- Hover the mouse pointer to Files to delete segment and check all the options available there.
Note – Be careful about Downloads and Recycle Bin option as both directory will be wiped out if you keep it marked. Therefore, leave them unchecked in case of having important files in it.
- Finally, hit the OK button.
Upon finishing the task, you can have a good amount of free space in the disk and possibly the Windows 10 blue screen error will take a leave.
7] Check for bad sectors in RAM to fix WIN32K_ATOMIC_CHECK_FAILURE
Like some other physical issues involved in hardware accessories, Random Access Memory (RAM) may have bad areas formed in it. Some more memory issues may evolve and all together form BSOD error in the system. To be very honest, these types of issues demand changing the dreadful RAM stick but initially, there is a simple solution too.
You can proceed to run Windows Memory Diagnostic tool and detect what actually the problem is. Most of the time, this workaround fixes memory problems and you can get rid of WIN32K_ATOMIC_CHECK FAILURE straightway. The process is as following –
- Get access to the taskbar search by pressing Win+S and type memory in the provided box.
- Select Windows Memory Diagnostic.
- Choose Restart now and check for problems (recommended) option.
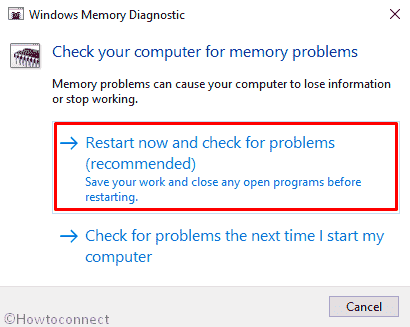
- WIN32K ATOMIC CHECK FAILURE – check for memory issue
- This would reboot the device and after powering up, the utility will start detecting RAM issues.
- After completion, the PC will restart once again and you will have to check system tray to get scan results. All you need to do is, go through it and take the necessary action accordingly.
8] Turn off fast startup
Fast Startup is a Windows 10 function which is quite similar to the hybrid sleep mode. When you save an OS state to a hibernation file, you can actually make the boot up for your computer faster than before, thus save time while turning on the machine.
Fast Startup comes in every Windows as pre-installed programs but often doesn’t work properly everywhere, hence creating issues like BSOD error WIN32K ATOMIC CHECK FAILURE. Therefore you might consider disabling it using following guidelines –
- Click on taskbar search and type control panel in it.
- When you see the result, hit the Enter key.
- Set the View by option of Control Panel to Small icons.
- Locate Power Options eventually click on the same.
- Next, select Choose what the power buttons do link from the left side bar.
- After that, click Change settings that are currently unavailable to disclose the hidden options.
- Move down and untick the box assigned for Turn on fast startup (recommended).
- Once done, click Save Changes button to make the changes effective.
9] Eliminate the chance of security programs confliction
Viruses are malicious codes developed for stealing sensitive information and creating havoc in computer system. Nowadays, these are available everywhere on the web and it’s actually quite easy and simple for them to sneak into a computer by dodging the defense systems.
A good number of antivirus programs are available now to eradicate them from the system, however, not all are trusted every time. On the contrary Windows 10 is adorned with Windows Security which has a robust suite of safety features dedicated to keeping the files protected from viruses, spyware, malware, and related threats. If you have some third party anti-malware tool along with default one, they might engage in conflict leading to delete various valuable data from the system and call in BSOD error. To avoid such scenes, you can uninstall the third party application easily. For that –
- Open run command by pressing Win+R.
- Type appwiz.cpl in the dialog box and click OK button.
- Look for the antivirus installed on your system and select the same.
- Click Uninstall option from the top ribbon.
- Keep following the on-screen guidelines to finish the procedure.
10] Remove hardware that is connected externally
Nowadays, this is somewhat obvious that we use various accessories with PC like mouse, keyboard or printer. There is surely no harm in connecting one rather they serve big time. Unfortunately, some people have faced WIN32K_ATOMIC_CHECK_FAILURE BSOD just after connecting any of Hardware accessories.
If the same happens with you also, simply give a pause i.e. disconnect the component from PC. The solution has brought good results according to many users. Once being confirmed that the issue has resolved, you can connect again and use them for good.
11] Settle upon defective Windows image files to fix WIN32K_ATOMIC_CHECK_FAILURE
Windows Image files or ISO files are the prime components for Updating the OS. If you have any issues in the Updating process, there might be problem with those files. The scenario finally ends up emerging blue screen error in Windows 10 as for dreadful image files. Well, you can now easily fix these components with a very effective built-in Windows Utility called DISM tool.
Deployment Imaging Servicing Management Tool helps in recovering the corrupted image files as well as ISO files and it supports the Full Flash Update (.FFU) coming to the latest update. This is a newly implemented technology that is applicable in the entire drive along with partition information; this makes the deployment faster than ever. DISM tool activates in the Command Prompt with administrative privileges, therefore proceed with the below guidelines and recover your problematic image files –
- Press Win+R keys to invoke Run command.
- Type cmd in the text bar and press Ctrl+Shift+Enter hotkey at once to open Command Prompt as Admin From Run Dialog.
- When a UAC prompts, click Yes button.
- Insert the bellow commands one at a time and hit Enter after each scan is complete –
Dism /Online /Cleanup-Image /CheckHealth
Dism /Online /Cleanup-Image /ScanHealth
Dism /Online /Cleanup-Image /RestoreHealth
- Once all the scan gets finished, reboot the system and hopefully, no error will show up.
12] Go for Windows 10 automatic repair
When Windows 10 gets WIN32K_ATOMIC_CHECK_FAILURE BSOD error, the system launches Automatic Repair at the third Boot and you will get the problem fixed autonomously. This will carry out several tests in order to detect as well as repair the stop code. Unfortunately, sometimes such autonomous processes get stuck in a loop and create further issues in the device. Therefore, you better accomplish the task set up it manually using below guidelines –
- Launch Settings app and head over to Update & Security.
- Select Recovery from the subsections on the left column.
- Shift to right pane and click Restart now button located under Advanced startup.
- After powering up, choose Troubleshoot =>Advanced options => Startup Repair resepectively.
- When Automatic Repair page becomes visible, provide the credentials of your account and then click Continue to initiate the repairing process.
13] Fix WIN32K_ATOMIC_CHECK_FAILURE by performing a clean boot
Clean boot precisely is a fixing method that allows a user to prepare OS for running bunch of diagnostics for detecting the elements of the normal boot process that are culprits. The procedure also helps you to recover a PC from the grasp of Blue screen error sideways troubleshooting other issues like performance, software conflicts and many more. After performing a Clean Boot, optional features and related usual functions get limited making the solving easier for you.
- First of all, open Control Panel.
- Make the applets into small view and select Administrative Tools.
- Double-click on System Configuration.
- Hit the radio button of Selective startup and uncheck the box set for Load startup items.
- Jump into Services tab and check the box set for Hide all Microsoft services.
- Click Disable all button.
- Shift to the Startup tab and click on the link Open Task Manager.
- Thereafter, right-click on each item listed here gradually and choose Disable.
- Go back to the System Configuration window.
- Finally, click on Apply and then OK.
14] Uninstall unwanted programs
You need various software programs beside us for routine activity and install them in device accordingly. Some of these applications are of similar kind and contains same types of files inside. Once the software are in use parallel, these files can engage in collision with each other. The result can plausibly go drastically wrong and lead to missing some of the important files including Windows core components.
Previously we have seen, WIN32K_ATOMIC_CHECK_FAILURE BSOD error occurs due to missing system elements and this is no exception. As to avoid this unwanted scenario, you need to uninstall a few unnecessary programs from the machine or remove some from similar app group. This will reduce the likeliness of surfacing blue screen issues obviously. To uninstall an app, proceed with the below guidelines –
- Press Win+X hotkey and select Apps and Features from Power user menu.
- Move to the right side and go through the applications installed on your PC.
- Locate the suspicious app, click on the same and hit Uninstall.
- If UAC prompts, select Yes to continue.
15] Take help of disk checking utility
Hard Disk can be referred to as the soul of a computer and it can have bad sectors inside because of corruption as well as physical damage. The possible cause might be mishandling, poor maintenance, even for prolonged use as well. If a specific section is damaged, it will cause Windows 10 to crash abnormally, some files will go missing for no reason, some of the application will terminate as most importantly, BSOD error will show up.
Hard Disk demands to be maintained in good health and you have to step up to find out poor areas in it once affected with WIN32K_ATOMIC_CHECK_FAILURE. The easiest, as well as most effective way to do so, is to deploy Disk Checking Tool. This is a default Windows utility which can detect and fix bad areas in HDD or SSD once activated in elevated Command Prompt. The method will be discussed in the below portion –
- Press Win+X together and choose Settings.
- Opt for Update & Security.
- Select Recovery from left sidebar.
- Shift to right and click Restart now button located beneath Advanced startup.
- Choose Troubleshoot => Advanced Options thereafter, select Command Prompt.
- Put the following command lines and hit Enter after each one to run them –
bootrec.exe /rebuildbcd
bootrec.exe /fixmbr
bootrec.exe /fixboot
- After running the above commands, you will have to execute additional chkdsk commands as well. To do so, insert the below command and press Enter –
chkdsk C: /f /r /x
- Reboot the device and check for the blue screen of death.
16] Put an end to faulty Windows Update Files
Windows 10 receives cumulative update patches quite regularly precisely via Settings app in the Windows Update section. The process is autonomous and downloading starts automatically if you are connected to internet network. Unfortunately, the process might stop up in poor connectivity and the process stops in the mid-way.
Besides, some of the updates can be dreadful after being downloaded. You can have blue Screen error with bug check code 0x00000160. These files cause damages more than they were useful and you have no way but to remove them as soon as you have been encountered with BSOD error. The simplest way to remove these files is as below –
- Open Windows Settings app and click on Update & Security.
- Pass to right surface and hit the option named View Update history.
- On the following page, click Uninstall updates link.
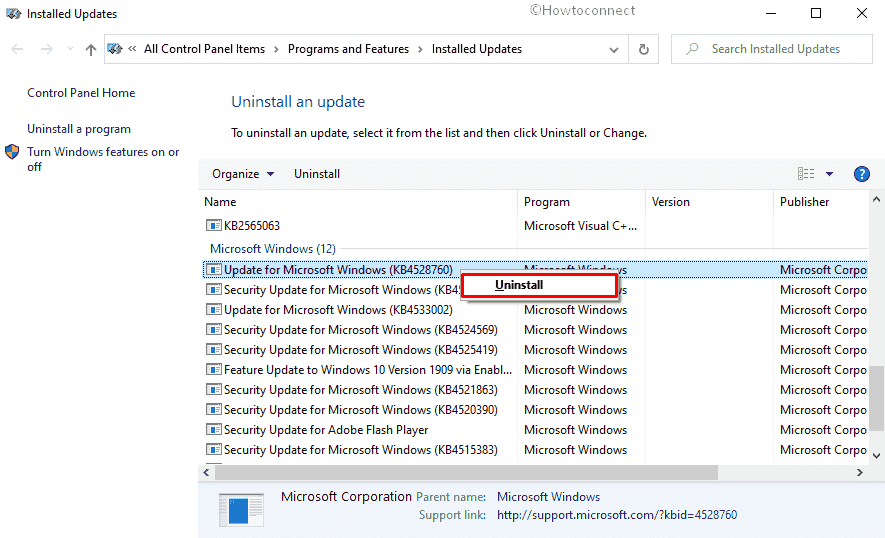
- WIN32K ATOMIC CHECK FAILURE – uninstall faulty Windows update
- Move down to Microsoft Windows section.
- Choose the most recent received patch and right-click on the same followed by choosing Uninstall.
17] Check BIOS version moreover get the latest one
“Basic Input/Output System” in short BIOS has a great role of Hardware initialization at the time of Booting process. It also provides runtime services for the OS and applications in use. BIOS firmware comes pre-installed with the PC and actually this is the first software to run when you power up a device for the first time. Once the BIOS is outdated, BSOD error emerges in the system as well. To update it, proceed with below guidelines –
- Pressing Win+R and type msinfo32 in the blank text box.
- Click OK button to access System Information window.
- Upon appearing, type BIOS version in the search bar and click the Find button.
- Once the system presents all information about the developer as well as the version of BIOS, note it down and close that window.
- Later on, launch a web browser and visit the manufacturer website for your BIOS using the information you got.
- Finally, download the file and install them as well.
18] Start Windows 10 in Safe Mode to fix WIN32K_ATOMIC_CHECK_FAILURE
Windows produced various issues from time to time, some are complex while most are pretty easy to resolve. But one solution that remained unchanged and serving as one-shot resolution for all issues occurred from the ancient times. This is to Boot the Computer in Safe mode and loading only the basic programs.
Safe mode mainly starts with basic programs, loading limited set of files and drivers. Once accomplished, if you don’t come across the issue, it means to say the default programs or settings are not responsible for the error, thus the troubleshooting gets easier.
- Open Run Dialog box and type msconfig followed by pressing Enter key.
- When System Configuration window appears, jump into the Boot tab.
- Reach to Boot options segment and check the box of Safe boot to activate all the grayed out options.
- Select the radio button set for Minimal to continue.
- Hit the Apply button first followed by clicking OK to save these changes.
- Now, restart the PC and upon completion of the first cycle of rebooting, continuously press F8 key until the next page becomes visible.
- From the subsequent page, select the Safe Mode option.
19] Bring Blue Screen Troubleshooter into play
Blue Screen error has brought up largely and causing mass fatality among users. To do something internally, Microsoft introduced blue Screen Troubleshooter. Here is how to run the same –
- Visit Microsoft site which holds inside information of troubleshooter for blue screen error.
- Move down to When did you get the error? segment.
- Call to mind the time you got WIN32K_ATOMIC_CHECK_FAILURE.
- Choose between After an update was installed or While using my device.
- System will now proceed with advance steps moreover offer helpful links to eradicate the BSOD.
20] Go back to the previous state
When you install anything like programs in device, it usually overrides the default settings and leaves a trace in Windows Registry.
Not all changes come out useful; rather end up tweaking the registry reversely. These sorts of changes may bring in blue screen error like WIN32K_ATOMIC_CHECK_FAILURE. If you too having same BSOD after installing or removing a program, can revert the machine’s state to a previous Restore point where the error was not prevalent. The guidelines are as follows –
- Press Windows key and type rstrui in the taskbar search.
- After viewing the result, hit Enter.
- Click Next button when System Restore wizard turns up.
- Opt for the last restore point and again hit Next.
- Lastly, click Finish button to commence the procedure of restoring Windows.
Methods:
1] Check for latest Windows 10 patches
2] Clean existed threats with Windows security
3] Update device drivers if necessary
4] Disable or Rollback incompatible driver
5] Repair corrupted system files
6] Clean junk files from computer
7] Check for bad sectors in RAM
8] Turn off fast startup
9] Eliminate the chance of security programs confliction
10] Remove hardware that is connected externally
11] Settle upon defective Windows image files
12] Go for Windows 10 automatic repair
13] Perform a clean boot
14] Uninstall unwanted programs
15] Take help of disk checking utility
16] Put an end to faulty Windows Update Files
17] Check BIOS version moreover get the latest one
18] Start Windows 10 in Safe Mode
19] Bring Blue Screen Troubleshooter into play
20] Go back to the previous state
That’s all!!