For Windows 11, we have already covered the solutions to Camera not working problem. Now, needless to say, microphone is one of the most useful hardware accessories in laptop. Starting from recording audio to talking with someone over the internet, you need a mic always. But several users around the world complaining Windows 11 microphone not working problem on their system. For them, either there is no sound from the mic absolutely or it isn’t audible.
Microphone problems are the most annoying issues and they mostly get incorporated with hardware trouble, often initiated with loose connection only. Furthermore, the errors can also come up due to driver incompatibilities or invalid settings too. In this write-up, we have listed all plausible solutions that generally work to fix Microphone associated issues.
Windows 11 Microphone not working
Here is how to fix Windows 11 Microphone not working –
Way-1: Check the connection for Microphone
An external microphone renders connection trouble for a variety of reasons starting from a loose plugging of cable mostly. Additionally, applications cannot access it sometimes due to damaged wire or if the microphone itself is a faulty one.
Initially, the first troubleshoot would be to check the connection for any trouble. You can try re-reconnecting the microphone to this device or connect the same with another machine. If the microphone doesn’t work after this, you have to replace or repair it. Oftentimes, the jack can also be faulty and it stops working. To check a jack, try to connect the microphone to another device to check its functionality. You can try a Bluetooth-enabled microphone also to check if it works.
Way-2: Adjust Microphone’s privacy settings
Microsoft has already introduced a new privacy feature in Windows for offering more precise control over applications accessing default microphone in a device. This is really a great step to prevent some unauthorized programs from accessing mic. Unfortunately, some other programs may also be blocked or restricted from using the microphone after enabling this privacy feature as a side effect.
If Windows 11 Microphone not working problem occurs in your case due to privacy settings, the resolution is pretty easier. Only changing settings will do, follow the below guidelines for accomplishing –
- Press – Windows key and I to open Settings.
- Click – Privacy & security.
- Scroll down to App permissions section.
- Click on – Microphone.
- Turn on the toggle switch for – Microphone access.

- Also, enable the switch present under – Lets apps access your microphone.
- On the list down there, check the application you are having problems with microphone has access positively.
- Make sure all the application has access to use the microphone.
Way-3: Ensure Microphone is not disabled
There are a few ways for which a Microphone can be disabled by mistake and you may experience the device is not working problem. It can be from BIOS settings, privacy settings, or from the device manager. In the previous workaround, we have discussed Privacy settings, hence, we can check BIOS and Device Manager this time.
Disabling Option for Microphone from BIOS Settings is not available in all devices but only in certain laptop brands. If it is available in case you, try checking if the microphone is disabled from BIOS Settings and enable the same. If you don’t find any option like this, proceed to check in the Device Manager. Here is how to check if the Microphone is enabled from Device Manager –
- Press – Windows key and R together.
- Type – devmgmt.msc in the Run dialog box.
- Press – Enter key to open Device Manager.
- Look for – Audio inputs and outputs.
- Double click to expand this device.
- Right-click on your Microphone device.
- Select Enable device option.
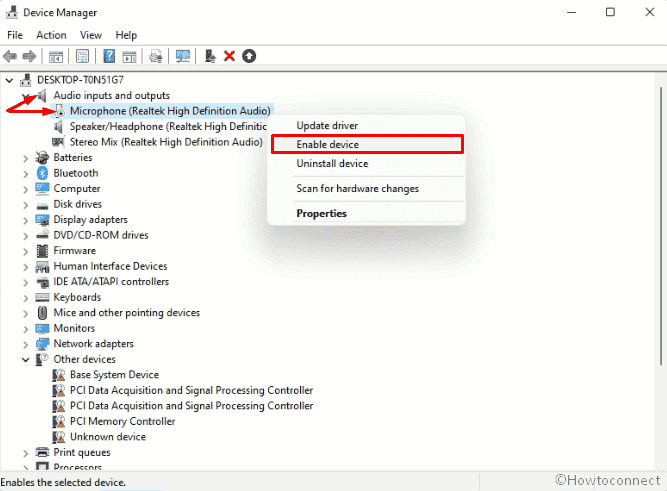
Note – If the microphone is already enabled from before, the system will show only Disable device option.
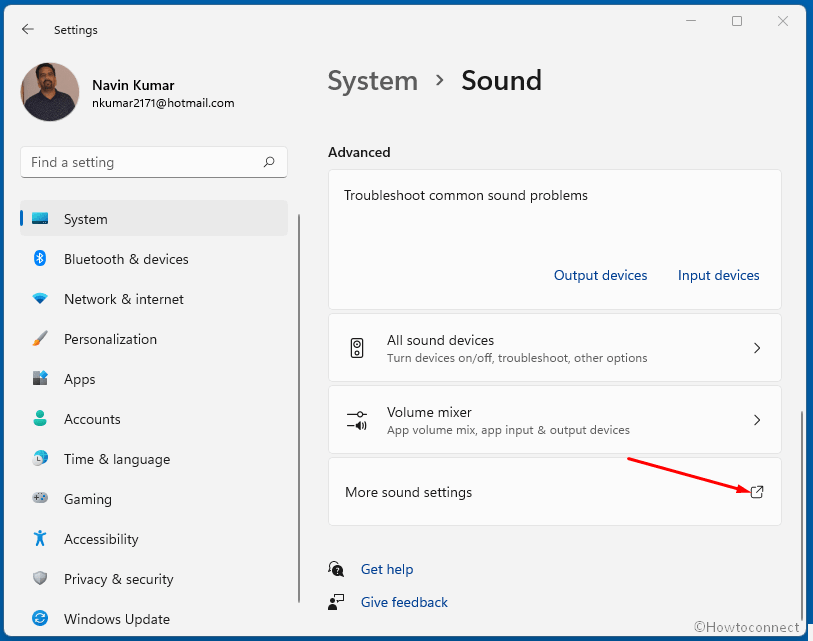
Way-4: Set Microphone as default device
Any users oftentimes connect an additional microphone to the laptop in spite of the presence of the internal one. Windows can select the other microphone instead of the mic you are opting to use. In this case, you may experience Windows 11 Microphone not working problem frequently.
In order to fix this trouble, you need to make sure Windows or a specific program has selected the correct microphone as the default device. For that, follow the below guidelines –
- Open Windows Settings app (Win+I).
- Click on Sound from the right pane.
- Scroll down and click the link for More sound settings.
- From the appearing wizard, enter into Recording tab.
- Look for the desired microphone in the list.
- Select the microphone and then click Set Default button.
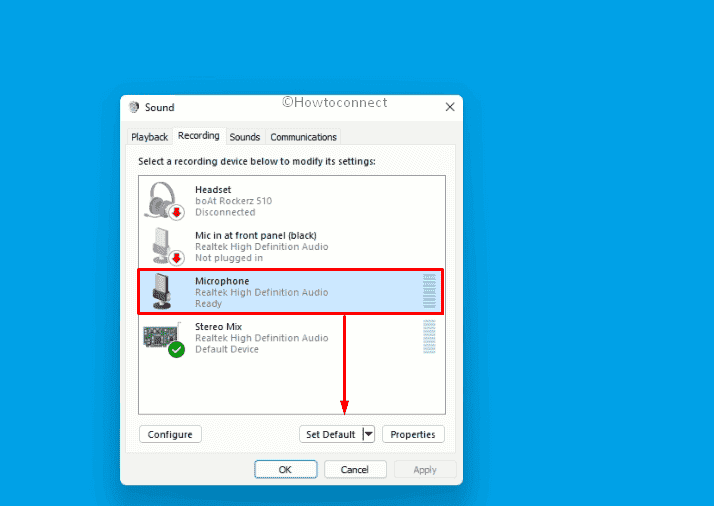
- Click Apply followed by OK to save the changes.
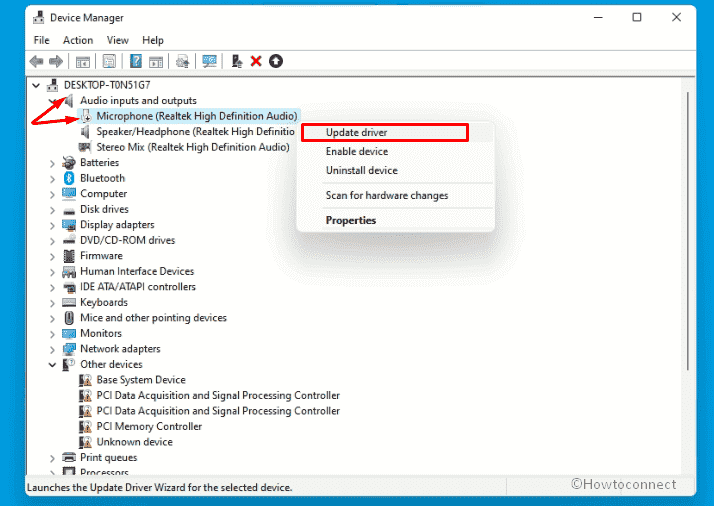
Way-5: Update driver to fix Windows 11 Microphone not working
We have come across most hardware devices giving trouble because of their driver having incompatibilities. Windows 11 Microphone not working error can be also a result of outdated driver since its prime task is to maintain the interaction between hardware and software driving it.
Updating driver is a bit easier in Windows 11 as of having device manager if there is a stable internet connection. Here are the guidelines to update the driver –
- Open the Start menu by pressing Windows key.
- Type – device manager.
- Hit – Enter.
- In the Device Manager app, look for – Audio inputs and outputs.
- Double click the device to expand the branches.
- From the various audio devices, right-click the driver (such as Realtek High Definition Audio in the below screenshot).
- Select Update driver option from this context.
- On the next window, you will find two options to update the driver. Select – Search automatically for drivers.
- Follow the on-screen guidelines to update the driver.
- Restart Windows 11 once the task finishes.
Note – if there is no actual update file given on the manufacturer’s website, Windows oftentimes cannot find the driver for updating it in this way. The reason is, many vendors sometimes don’t upload the later driver file on the official website. In that case, search manually for the driver and download it from official website. Later on, install it manually on the system. Check for the error once the task ends successfully.
Way-6: Make Sure That Microphone Is Not Muted
Several times, we keep the microphone sound level to minimum or mute it for diversified of reasons. This might be another prominent factor of Windows 11 Microphone not working issue. The issue will persist unless you put back the sound level to normal or unmute the mic. If you are a bit confused about the cause, go through the below guidelines and check the sound level –
- Right-click on the Speaker icon from Taskbar.
- Select – Sounds settings from context.
- From the Settings app, click on – More sound settings.
- Sound wizard will appear.
- Move on to the Recording tab.
- Right-click Microphone from here.
- Select – Properties option.
- Open the Levels tab.
- Make sure the speaker icon here doesn’t have any red indication standing for mute. If there is any, click the same sign for unmute.
- Set the volume to 100.
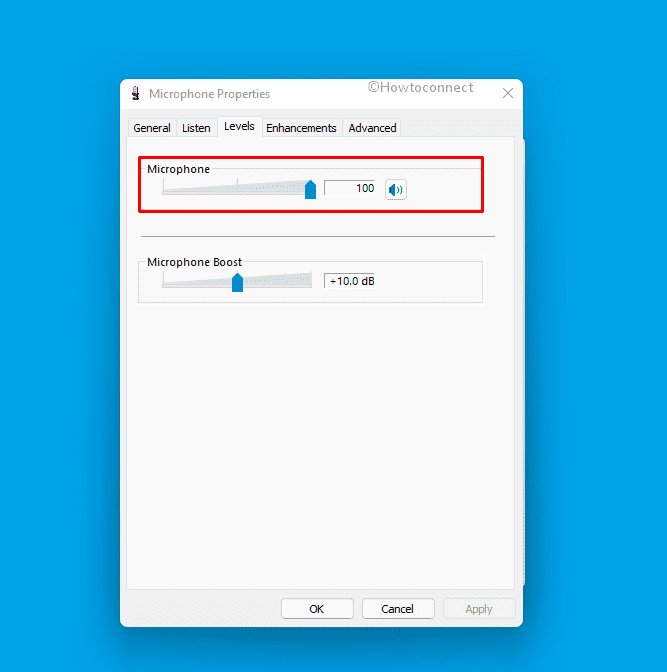
- Finally, click Apply and then OK button to save the changes.
- Restart the device and check if the error is resolved.
Way-7: Reinstall Microphone driver
Updating driver is not always the ultimate solution to fix trouble coming from externally connected hardware devices like microphones. The reason is pretty clear as software vendors often release a buggy update or a partially broken one. If you have installed that update to the device, the issue may turn adverse instead of fixing it.
In order to fix Windows 11 Microphone not working problem, you may need to reinstall the driver in case updating doesn’t work properly. Windows Device Manager has got options to uninstall a device from where you can accomplish this task. Later on, a new driver will be installed automatically once you restart the PC. You can follow the below steps to reinstall a driver –
- Open Run dialog pressing – Win+R.
- Type – devmgmt.msc.
- Click – OK.
- Once Device Manager opens up, look for – Audio inputs and outputs.
- Expand the driver list by making a double click on it.
- Right-click the driver for your microphone.
- Select – Uninstall device option.

- Follow the on-screen guidelines until the task finishes.
- Once finished, Restart Windows to make the changes effective.
Way-8: Run Hardware and device troubleshooter
Microsoft has always offered the users built-in tools and troubleshooters in order to resolve problems coming on to the Operating System. Hardware and Device Troubleshooter is one of the inclusions in the list and comes pretty effective to fix problems incorporated with the externally connected devices.
Windows 11 microphone not working issue can also be easily fixed by running the hardware and device troubleshooter. Here is how to run this default tool –
- Press – Windows + S.
- Type – cmd.
- Right-click Command Prompt when appears.
- Select – Run as Administrator option from the context.
- When the command prompt appears, enter the below command –
msdt.exe -id DeviceDiagnostic
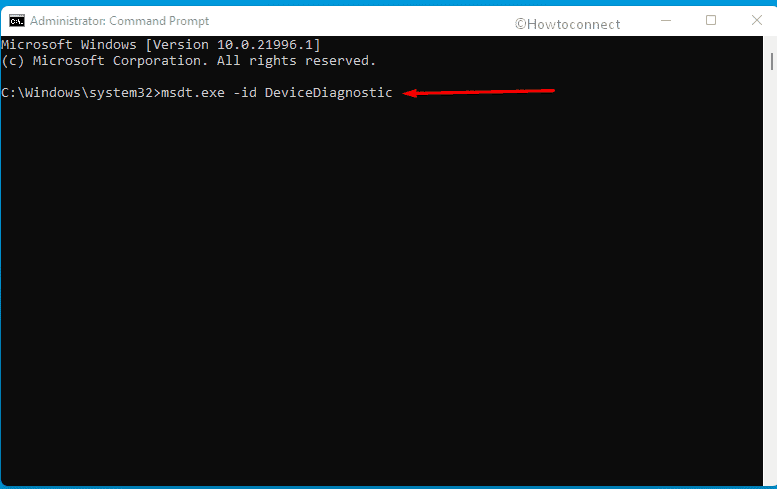
- Hit – Enter.
- Click – Next when the Hardware and Device Troubleshooter prompts.
- After scanning, the utility will show devices having issues in the system.
- Select Microphone as you want to carry out troubleshooting in this device.
- Click – Next option.
- When the tool shows Automatic Repair, click – Apply this fix.
- Hit – Next.
- Restart Windows once the troubleshooting ends.
Way-9: Restart Windows Audio Service
Services are solely responsible for operating available applications as well as manages various system resources along with their settings. Microsoft provides users with complete access to modify the service settings for reasons like providing security, troubleshooting, and enhancement of performance.
Audio service is provided in Windows 11 for managing audio for programs. By any chance, if this service is stopped, it will affect the sound devices and those peripherals will not work properly. In the end, you might encounter Windows 11 mic issue as well. Therefore, it’s worthy to check the services are enabled and running properly. To accomplish this, follow the below guidelines –
- Press – Windows key and S together.
- In the search box, type – services.msc.
- Hit – Enter key.
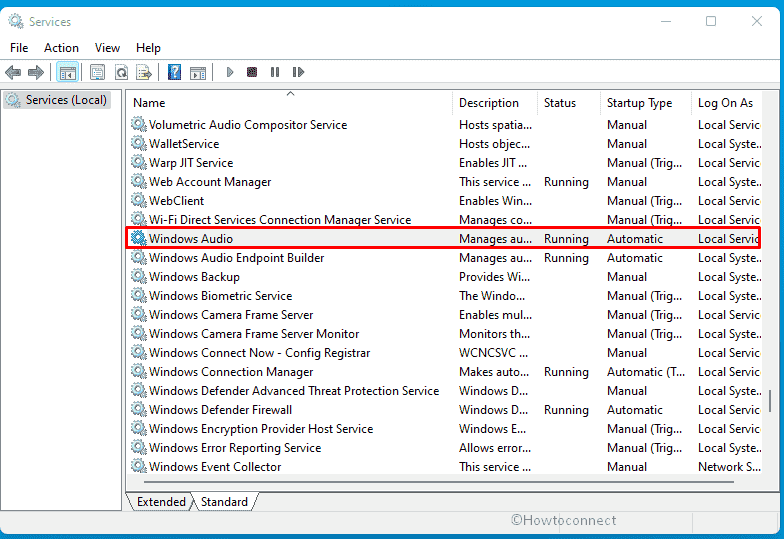
- When the Services window opens, look for – Windows Audio.
- Check the Status of the service and ensure it’s Running.
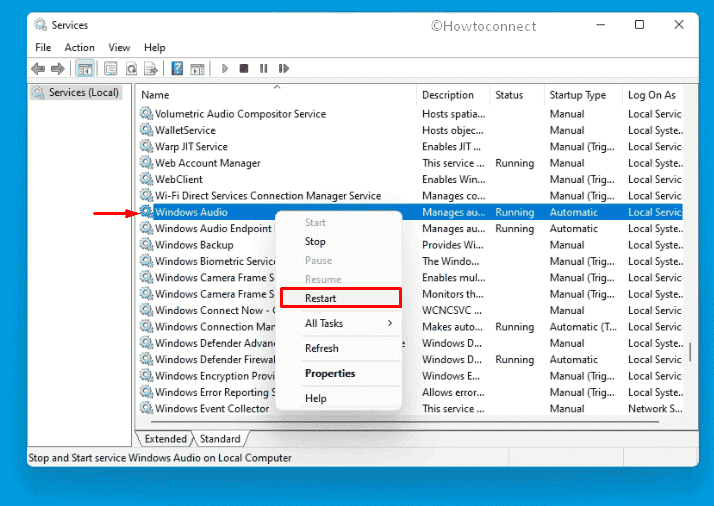
- For additional assurance, right-click the service and select – Restart option.
- Restart Windows device and check if the error is gone.
Way-10: Take help of Audio Troubleshooter
Windows-operated devices are provided with a bunch of super functional troubleshooters by Microsoft. The idea is to resolve various issues troubling users using built-in resources. Windows Audio troubleshooter is such a powerful utility to fix the problems coming in Audio devices like microphones, speakers, etc.
Try running this troubleshooter in order to fix Windows 11 Microphone not working issue. To do that, follow the below guidelines –
- Press Windows key.
- Type – troubleshoot settings.
- Click the best-matched result once appears.
- When a Settings page opens, click on Other troubleshooters link from the right pane.
- Scroll down and find – Recording Audio.
- Now, click – Run.
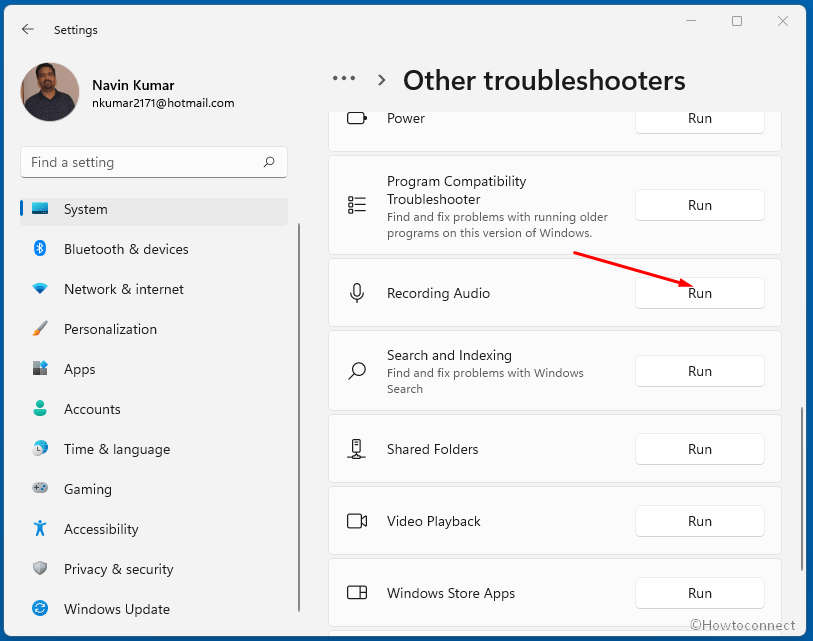
With this, Audio troubleshooter will start scanning for any problems for which microphone is not functioning properly. Having found out any issue, the utility will come up with guidelines on the screen to be followed. Follow that and once finished, check if the error has been resolved.
Way-11: Disable app-exclusive control
While using the default microphone in a Windows device, some applications take exclusive control of it. These settings will, later on, result in the non-functionality of the mic for another program attempting to access it. In the end, users will encounter Windows 11 mic problem.
However, this problem can be fixed by tweaking the Sound settings a bit. For that, follow the below instructions –
- Right-click speaker icon from Taskbar.
- Select – Sound settings.
- Scroll down to bottom and click on “More sound settings”.
- Switch to Recording tab in the popup window.
- Right-click Microphone and select Properties option.
- Jump into the Advanced tab in this window.
- Reach to Exclusive Mode area.
- Remove the Tick Mark from the box set for Allow applications to take exclusive control of this device.
- Another option Give exclusive mode applications priority will be unchecked automatically.
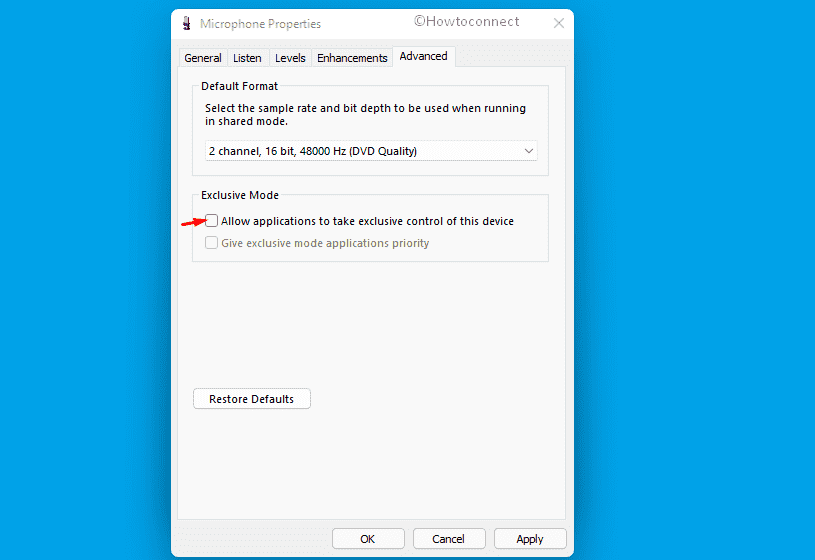
- Click Apply option followed by hitting OK.
- Close the settings window and check if there is any error relating to the microphone.
Way-12: Uninstall the microphone
Irrespective of USB connected or Bluetooth, some of the microphones, as well as headsets, might appear in the list of Devices and Printers in the Control Panel. If the same happens in your case followed by having Windows 11 microphone not working issue, you can remove the device or unplug it from the USB port.
Reconnect the device once again for reinstalling it properly in Windows eventually resolving the problem. To accomplish this, you have to go through the below guidelines –
- Right-click on ‘Start’.
- Choose – Run.
- Insert – Control in the empty box of it.
- Press – Enter.
- Make sure the View by option is set to Large icons.
- Select – Devices and Printers.
- Next, right-click on the microphone, USB device, or the headset attached to the LAPTOP.
- Select – Remove device option from the context menu.
- Click on Yes once prompt.
This will uninstall the device and you can disconnect it now from the computer. Reconnect the same and check if the error is resolved.
Way-13: Remove suspicious VOIP apps
Voice Over Internet Protocol in short VOIP applications are those programs widely used for calling overseas. These applications use microphone and speaker in the device for communication with users from another end. In the past, we have discussed some of the applications using default mic exclusively restricting access for others. If you have a good number of VOIP apps like Zoom and other installed on the laptop, may also lead to cause Windows 11 Microphone not working issue.
In order to resolve the error, you can uninstall a few of these including Skype though it comes pre-installed on many devices. Here are the instructions to completely uninstall a program –
- Press – Windows key and I together. This will open up the Windows Settings.
- Click – Apps from the left pane.
- Move on to the right side where you can find the list of installed apps after clicking Apps & features.
- Locate a suspicious VOIP app and make a click on it.
- Select – Uninstall.
- Click – “Uninstall” once asked.
- Follow the on-screen instructions and complete uninstalling the program completely.
- Restart the computer to make changes effective.
- Later on, you can install one by one and check if microphone is working properly.
Solutions here may be helpful for you in this concern – Fix: Zoom Audio not working in Windows 10
Way-14: Install Windows Update to solve Windows 11 Microphone not working
Microsoft releases patches for the Operating System on regular basis comprising of the latest modifications, built-in tools, and a lot more comprehensive features. In order to make Windows properly functioning and lucrative, we must install every rollout in time.
On the contrary, an outdated operating system renders series of bugs and issues consistently. Having said that, we recommend you to install Windows update in order to fix the Windows 11 Micissue issue. Here is how you can do this task –
- Press Windows key and click the gear icon from the Start menu.
- Once the Settings app comes in, click – Windows update.
- Move to the right of the coming page.
- Click – Check for updates.
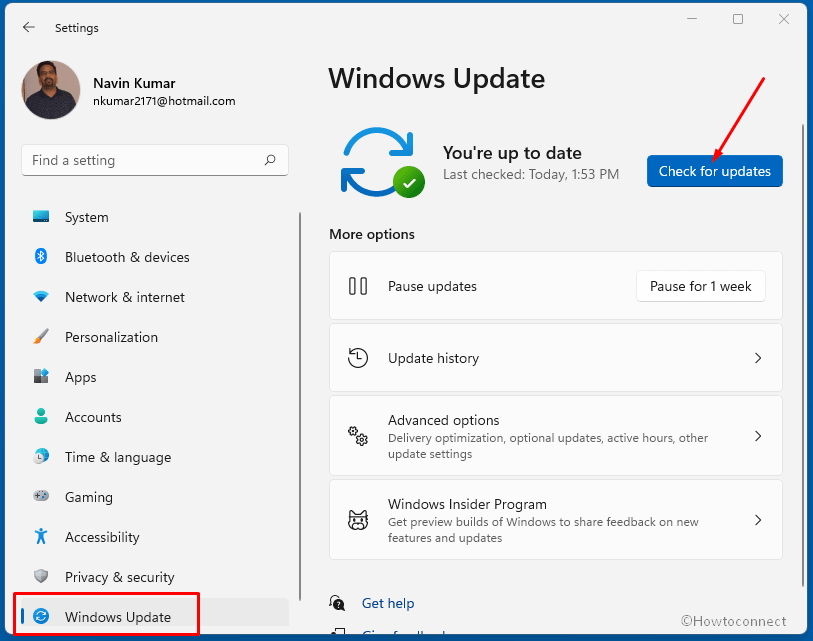
- If there is a stable internet connection available with the device, Windows will start looking for a newly released patch for your device.
- Downloading followed by Installation usually takes place automatically.
- Once done, Restart the Windows and check if the error is gone.
Methods list:
Way-1: Check the connection for Microphone
Way-2: Adjust Microphone’s privacy settings
Way-3: Ensure Microphone is not disabled
Way-4: Set Microphone as default device
Way-5: Update Microphone driver
Way-6: Make Sure That Microphone Is Not Muted
Way-7: Reinstall Microphone driver
Way-8: Run Hardware and device troubleshooter
Way-9: Restart Windows Audio Service
Way-10: Take help of Audio Troubleshooter
Way-11: Disable app-exclusive control
Way-12: Uninstall the microphone
Way-13: Remove suspicious VOIP apps
Way-14: Install Windows Update
That’s all!!
I got my problem fixed. Sound settings/More sound settings/ Recording/right click on microphone/Properties/General/Properties/General/Change settings/Driver/Roll Back Driver (that fixed my problem!)