Automatic Windows update is no doubt a convenience but some users find problems when installing a patch or build through this process. 2149842967 is one such error which is haunting people and we are going to discuss here and provide solutions. When you attempt to conduct the installation via “Check for updates” this issue will most frequently appear. The error message is “Windows update could not be installed because of error 2149842967”.
Most probably the update you are attempting to install is already in place or it’s incompatible with system and this is quite confusing because circumstances don’t necessarily have to be that way. Fortunately, you have the ability to manually “force” the update installation by downloading and installing it from the Microsoft Update Catalog. Also, running the updated troubleshooter or reverting the Windows update components back to default settings are additional methods you can try to fix the issue. Let’s see the workarounds for this Windows 11/10 update error.
Windows update could not be installed because of error 2149842967
Here is how to Fix Windows update could not be installed because of error 2149842967 –
Way-1: Bring Windows Update Troubleshooter into use
Windows update troubleshooter is a native tool to rescue error messages generated when any glitch occurs due to failed installation. The utility will detect problems, check pending restart and registry keys, initialize diagnostic, stop and start auxiliary services and repair the issue. So, follow the steps and bring the tool into use –
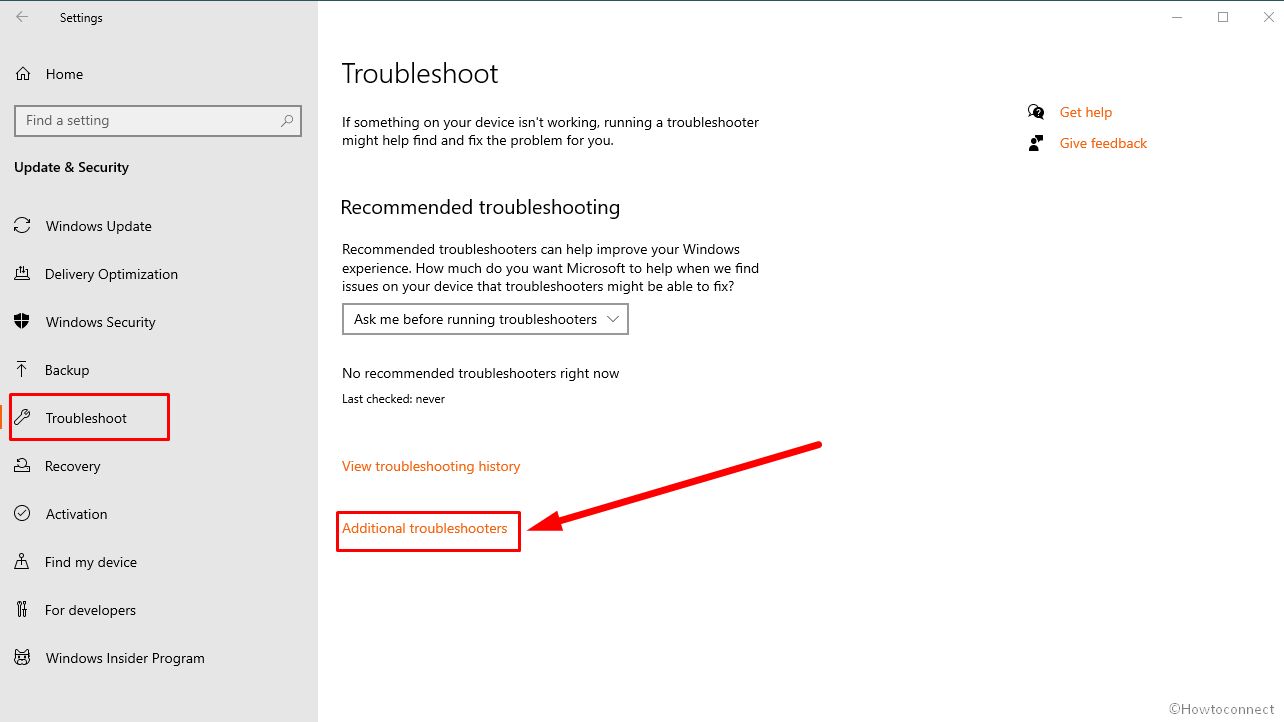
- Press Win+Q.
- Type – Troubleshooter
- Hit – Enter.
- From the Settings app, click on Additional troubleshooters link from the right pane. If you’re on Windows 11, select – Other troubleshooters.
- Go to Windows Update and click on it.
- Select – Run the troubleshooter. In case of Windows 11, click – ‘Run’.
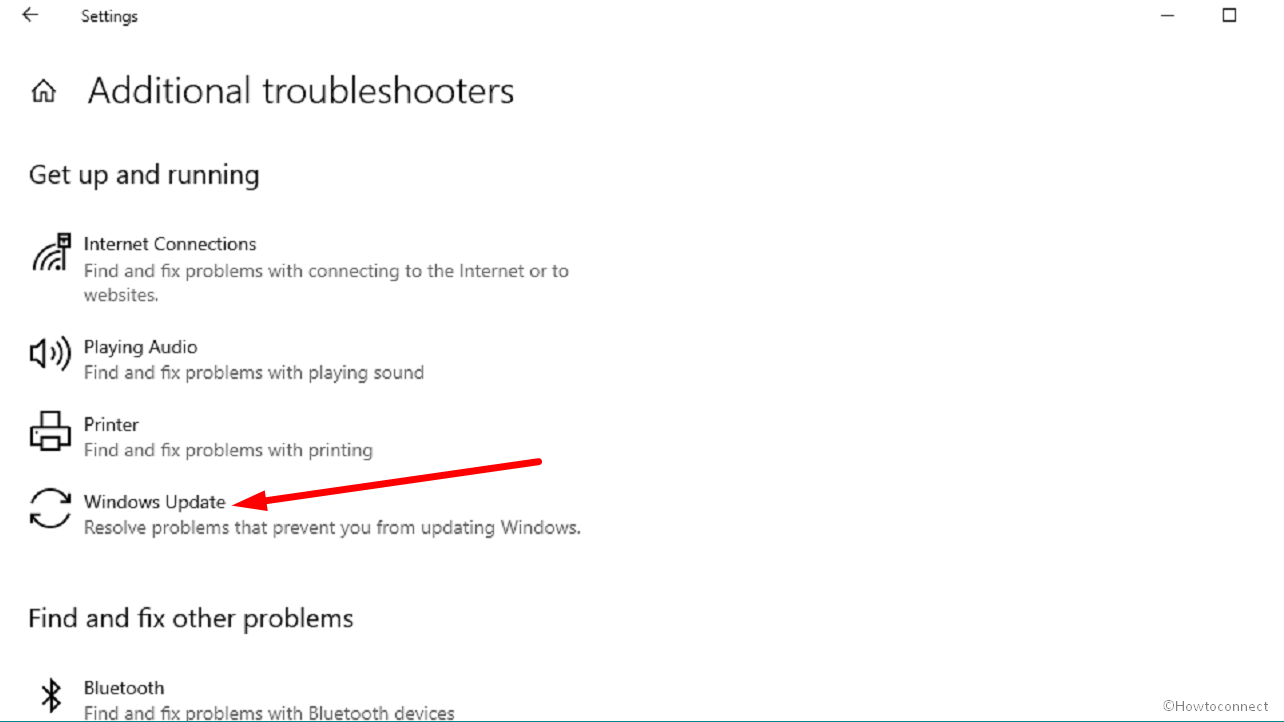
- The troubleshooting wizard will open checking for the problems, automatically find out the error and solve this.
After completing the procedure, Check for updates once more to verify if “Windows update could not be installed because of error 2149842967” error reappears.
Way-2: Manually Install the Update
Failing process makes a way to attempt to manually install the rollout after downloading the same from “Windows Update Catalog”. This website hosts every single file of all the updates in variants of architectures. This is a recommended fix if the error happens to show up when the Window tries to search and install a build or patch. Examine the effectiveness of this method and give it a try to clear the error message. Find out which Windows update is the most recent for installation by visiting the Settings app by advancing with the steps –
- At first, know the KB number of the problematic update by going to “Settings > Update & Security > View update history.
- Now, navigate to Microsoft update catalog.
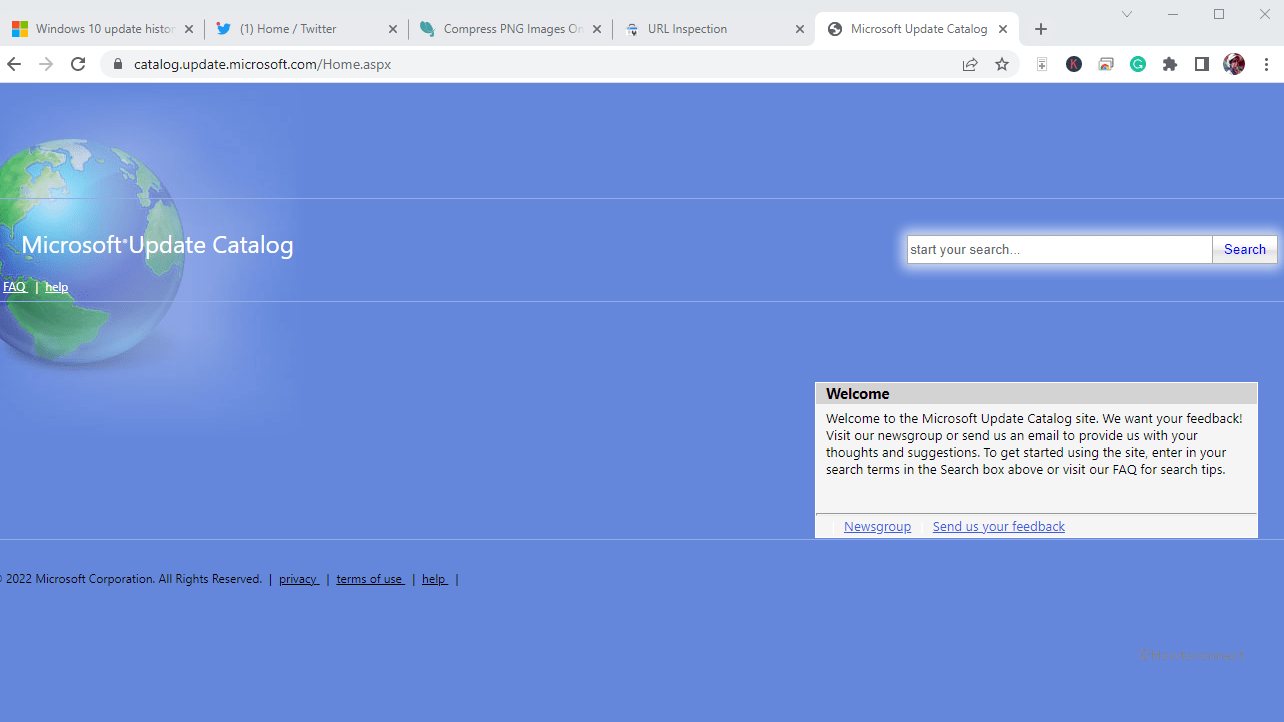
- Paste – KB number on the search box and Enter.
- You will see the update available in a list. Download the file based on your Processor (32bit/64bit)
- Double click the standalone file of the update.
- Click on Yes.
See – How to Download and Install Update from Microsoft update catalog on Windows 11/10.
Way-3: Reset the Components of Windows Update
Starting Windows Update components from scratch is generally recognized as the best option to resolve the majority of errors. We have made every effort to keep it as well defined as we can, given that it has a lot of varied and rather intricate components.
- Click on – Start.
- Type – “cmd.exe“.
- Select – “Run as administrator“
- Now copy the below commands successively, paste into command prompt, and press Enter for each one separately.
net stop bits
net stop wuauserv
net stop appidsvc
net stop cryptsvc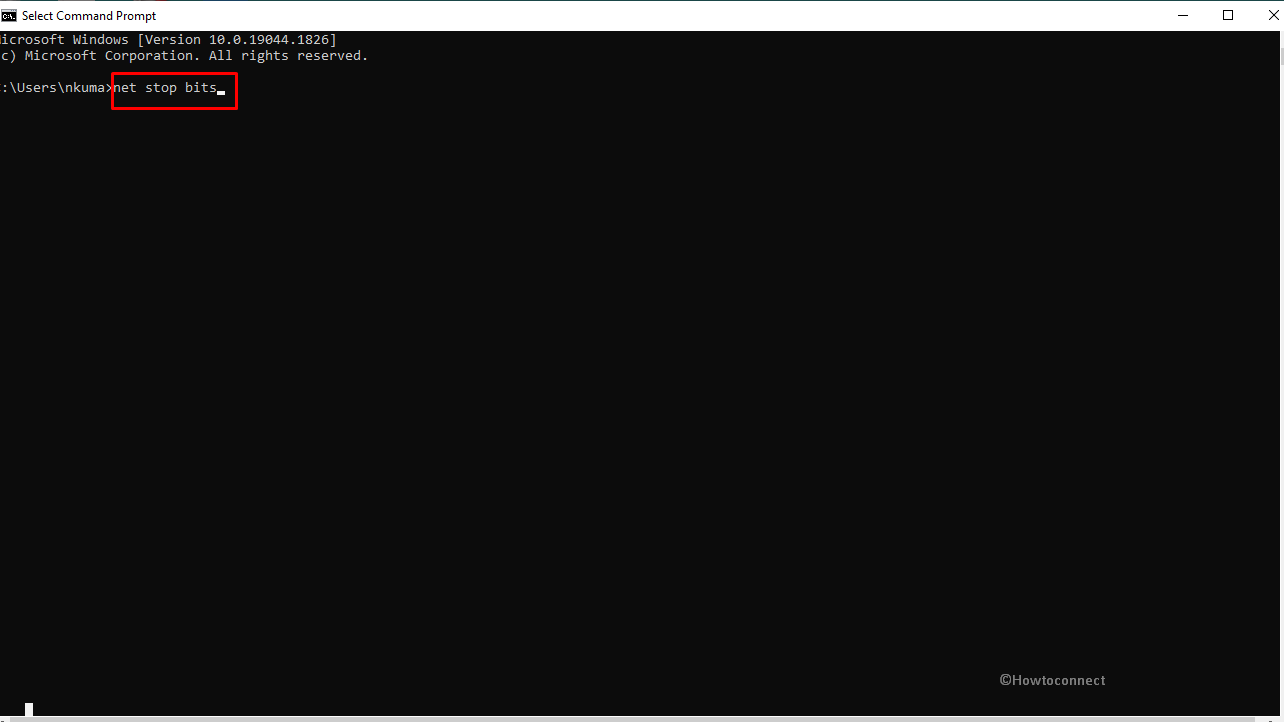
- Now, press Win+R.
- Type – C:\Windows\SoftwareDistribution\Download.
- Press – Enter.
- Now, again go the command prompt and click run the following command as you have done before –
net start bits
net start wuauserv
net start appidsvc
net start cryptsvc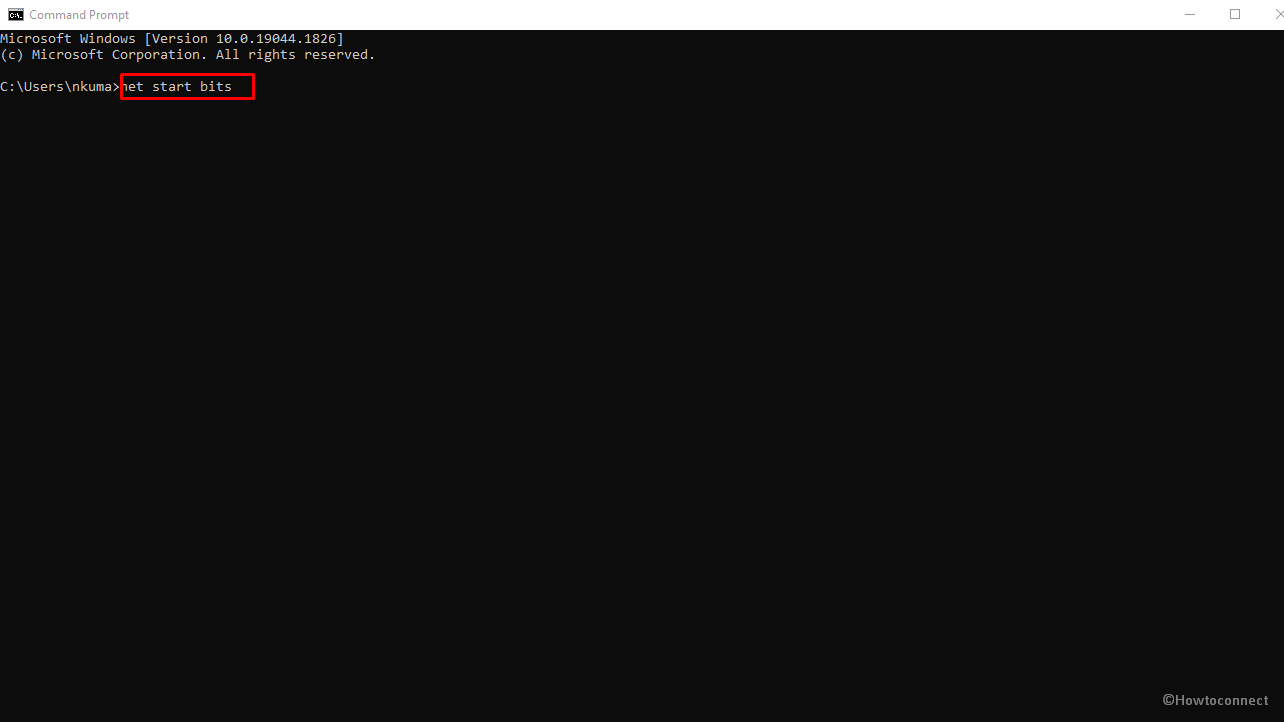
- Restart the system and check if the error is fixed.
You can also take help from – How to Reset Windows Update to Default in Windows 10.
Way-4: Activate the BITS Service If It Isn’t Already
BITS stands for Background Intelligence Transfer Service and sometimes this is found disabled when this problem arrives. And without enabled BITS service, you may even not imagine to install all a build or patch. Use these steps to activate it –
- Press – Windows + R
- Type – services.msc
- Press – Enter.
- Find Background Intelligence Transfer Service by scrolling down the list.
- Double-click on it.
- Ensure that it’s an Automatic selection for the Startup Type.
- Check to make sure the service status is Running as well.
- Clicking the Start button will enable the service if its status was set to Stop.
Way-5: Run a full scan of Windows Defender and remove third party programs
External programs such as antivirus often cause conflicts with the core system files and trigger error when trying to install an update. They don’t let any task run easily and slow down the system as well therefore when you encounter Windows update could not be installed because of error 2149842967 error the files need removal. Most common thing that is worth attention when a problem occurs in Windows 11 or 10 is malware, virus, or adware. Because of these nasty threats, you might be getting this weird Windows update error. But you can use up Windows Defender, the built-in threat and virus protection tool to detect and quarantine harmful files.
- Click on – Search.
- Type – Windows security.
- Hit – Enter.
- Choose Virus & threat protection from the app.
- Click on Scan options.
- Select Full scan” and let this complete.
- Restart the system and press Windows and R.
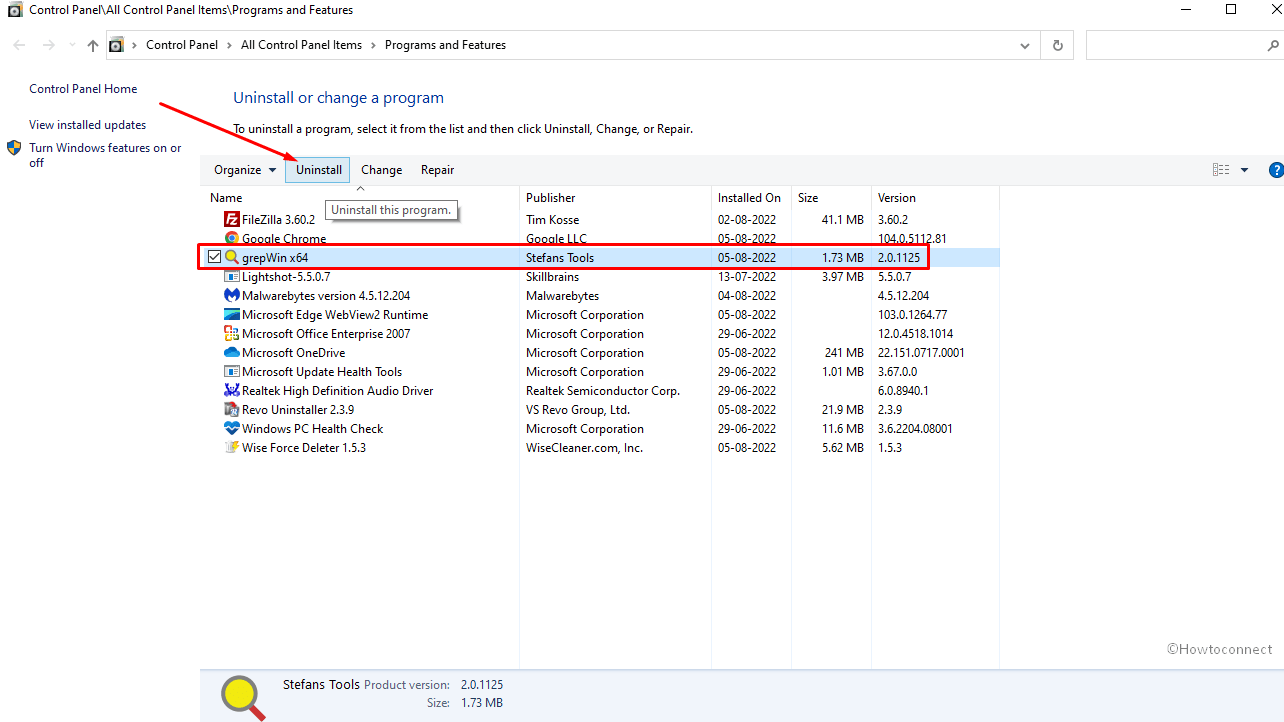
- Type – ‘appwiz.cpl’.
- Find the third party app and highlight it.
- Click on – Uninstall.
- Follow the onscreen instruction until the removal is over.
Way-6: SFC and DISM tools might do wonder
When the annoying error Windows update could not be installed because of error 2149842967 appeared there could be likeliness of corruption in System Files or .WIM. To remediate the issue occurring due to these reasons SFC and DISM tools are pain relievers. Only move ahead with steps –
- Click on Search from the taskbar.
- Type – cmd.
- Select – Run as administrator.
- Type
SFC /Scannow- and hit – Enter.
- Once the Scanning and repairing are completed reboot the system
- Again Open Command Prompt as administrator.
- This time type –
DISM /Online /Cleanup-Image /RestoreHealth - Hit Enter and allow the command to complete the task.
- In the end reboot the device.
Way-7: Use In-place upgrade to fix Windows update could not be installed because of error 2149842967
In-place upgrade is system to take you directly to the latest version of Windows 11 or 10 including the most recent security patch or LCU and this means you don’t need to take an action separately to install that. This method will keep your personal programs and files as it is, moreover, get through the current edition. Media creation tool will help you in this work when you follow the below guidelines –
- Go to Official site and navigate to ‘Create Windows 10 installation media’ section.
- Click – Download the tool now.
- In case of Windows 11, visit this page. Reach ‘Create Windows 11 Installation Media’ field.
- Select- Download now.
- Double click on “MediaCreationTool.exe”.
- Select Accept for Terms & conditions.
- Click on – Upgrade this PC now.
- Select – Next.
- Again click on ‘Accept’.
- Next window will check for update; allow it to complete.
- In Choose what to keep window, select – Keep personal files and apps.
- Select – “Next”.
- Finally, click on Install.
Way-8: Perform clean install
If nothing works then you should be ready to perform clean install because this will set up absolutely new copy of Windows 11 or 10 where there is no room for errors and glitches. But be cautious, you will need to save all your personal files and programs into a different drive before starting this task.
- Follow 1-6 steps same as in the previous method.
- Check the option saying – “Create installation media (USB flash drive, DVD or ISO file) for another PC“.
- Select correct Language, Architecture, and Edition.
- Click – Next.
- Click on Save to store the file in a pen drive.
- Later, run install the version using the pen drive.
- Alternatively, you can also Use Rufus to create the bootable media.
Methods
Way-1: Bring Windows Update Troubleshooter into use
Way-2: Manually Install the Update
Way-3: Reset the Components of Windows Update
Way-4: Activate the BITS Service If It Isn’t Already
Way-5: Run a full scan of Windows Defender and remove third party programs
Way-6: Way-6: SFC and DISM tools might do wonder
Way-7: Use In-place upgrade
Way-8: Perform clean install
That’s all!!