wmpnetwk.exe in Windows 10 error is an annoying issue. Task manager showing that some of the programs taking lots of Disk space and therefore end up making the machine slower. The problem is based on Windows Media Player and this stubborn error keep on striking the System time and again even you attempt to disable it somehow. In such a scenario, we are presenting a few workarounds that can heal you effectively in the next write up.
In the past, we have talked already about the EXE files and its functionality. These Executable files contain step by step instruction for any a program in the Windows operating system. Basically, they are Windows components and a must needed elements too. Once the User clicks on the .exe extension, the computer reads the program according to the instruction put in here during the development of the program. Being so important, Virus developers finally got something to do the trick. They start inserting malware in these files and spread them through suspicious websites and links through Spam E-mails. When you click on those links or visit such a website, the system gets affected. The error has become a burning issue and we need to resolve it ASAP. Read –
wmpnetwk.exe in Windows 10
Before we hang on to the Workarounds, let’s get ourselves introduced abut wmpnetwk.exe.
What is wmpnetwk.exe?
Microsoft took the Network Media Sharing at the front with the introduction of Windows Media Player 10. With the time passed by, the program stayed along and eventually got coupled with Windows Media Center. Users can exercise this useful app for sharing Music, Videos to access devices such as Computers, Mobile Phones as well as Xbox 360. The only necessary thing here is a Host who actually conducts the sharing process. And here is the space wmpnetwk.exe comes into the play. The process name actually is “shares Windows Media Player libraries to other networked players and media devices using Universal Plug and Play.” It keeps itself running in your machine throughout the day and eventually takes over huge disk spaces.
Is wmpnetwk.exe in Windows 10 a virus?
This is indeed confusing and very hard for a general user to distinguish between an original EXE file or the same having malicious codes. Therefore, users are always in a dilemma that whether they will resolve it somehow or keep it on the computer as a System resource. However, there is a simple trick to end up this doubt. You can easily check the program either a system component or a Virus as disguise using the following few steps –
Step-1: Launch the Task Manager by Pressing Ctrl+shift+esc together.
Step-2: When it opens up In Window, hit on More details.
Step-3: Moving ahead in the Processes tab, scroll downwards and in the process, reach out to wmpnetwk.exe in the list.
Step-4: Once found, make a Right-click this and then select Open file location.
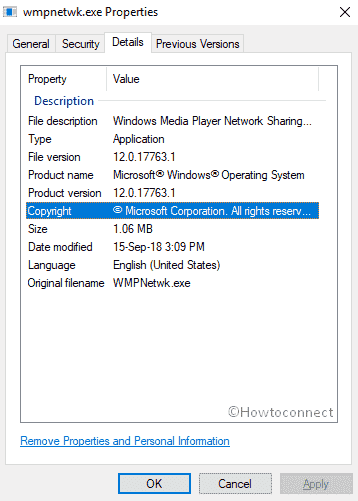
If the file location shows C:\Program Files\Windows Media Player\wmpnetwk.exe, then you are safe. The file is a system component. If the location is somewhere else or looks suspicious, you can be sure that it’s malware in your computer as a disguise.
How to fix wmpnetwk.exe in Windows 10 if it is a virus?
In case wmpnetwk.exe is a virus, you should take the following steps –
- Restart your computer in Safe Mode with Networking.
- When the computer restarts, click on Cortana and type full scan in the search box. Once the result shows up, hit Enter.
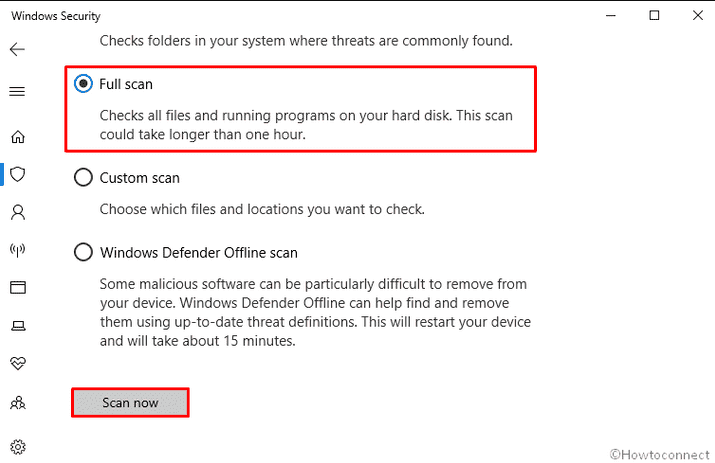
- On the running page, click on Scan options.
- Select the radio button of Full scan and then Press Scan now option to initiate the process.
- When the scan completes, a list of identified malicious files (if any) will appear on your screen. If you find wmpnetwk.exe in that list, quarantine or remove it completely.
Finally, restart your computer.
When your computer restarts, it will be free from the virus named wmpnetwk.exe. Now, you can take further steps to fix other problems caused by wmpnetwk.exe in Windows 10.
Fix wmpnetwk.exe in Windows 10
If you have keenly followed the above method, you can be sure that the wmpnetwk.exe in your system is no longer a malicious threat. But you need to work out a little as it may still consume more resources of your PC. For that, you need to follow below workarounds.
Remove Media from Library
If you are also the one who uses Windows Media Player to keep all the media, now is the time to remove everything out from the monitored folder(s). After removing, move files individually or in small groups to find out where the problem exists.
The best method is to pull off all the Windows Media Player’s monitored folders, and then transfer all media files to another location on your hard drive. Now, you should again add those monitored folders (note that this time they need to be empty). Check the CPU usage, is it high?
If not, the problem is with any file in the library. You should now slowly move them back to their original location (monitored folders) and find out which file is the culprit.
Note that this is a very time-consuming process (if your media library has many files), your patience is required.
Change wmpnetwk.exe Service to Manual
- Press Win+R to open the Run dialog. When it rolls out, type services.msc in the text field located next to Open and hit Enter.
- When the Services window opens, scroll downwards and find Windows Media Player Network Sharing Service, double-click on it.
- On the following wizard, set Startup type from Automatic to Manual.
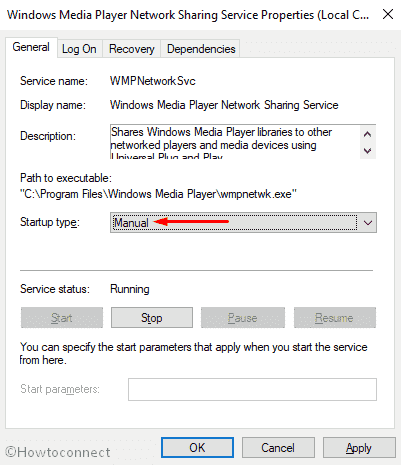
- Finally, click on OK to save the settings and close the window.
Now, reboot your computer and when it restarts, you will find that the wmpnetwk.exe in Windows 10 issue is resolved. In case the problem is not solved, follow the same steps mentioned above but this time select Disabled, not Manual.
Disable wmpnetwk.exe in Windows 10 using Registry
When all else fails, or if you just want to be sure that you’ve rid yourself of the process, we can do the same using the windows registry.
- Press Win+S at a time and type regedit in the search box. When the result appears, Press Enter on your keyboard.
- If a UAC prompts up, click on Yes to give consent.
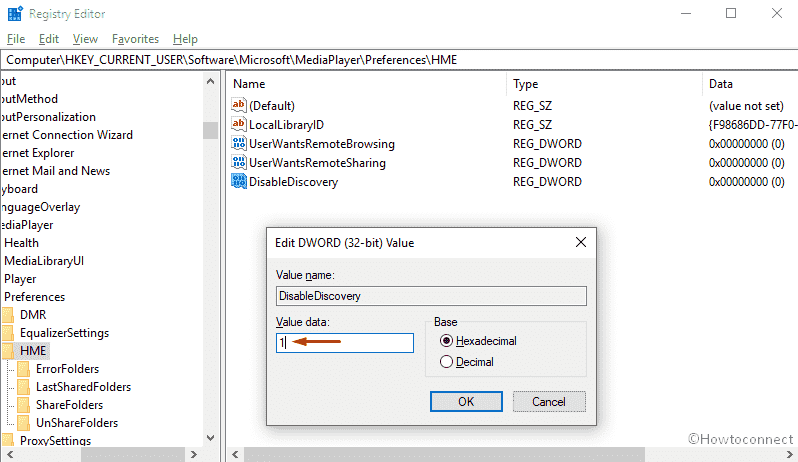
- On the Registry Editor window, browse the following path –
HKEY_CURRENT_USER\Software\Microsoft\MediaPlayer\Preferences\HME- In this key, you’ll likely find a DWORD called DisableDiscovery, if not you can create it. Read, .
- Set the Value of the DWORD to 1 and you’re good to go.
One last place to check
wmpnetwk.exe can be agitated to start from some other location in your computer. To view the exact place, you need to proceed through the following path in the Registry Editor –
HKEY_CURRENT_USER\Software\Microsoft\Windows\CurrentVersion\Run
Now there may or may not be a key here related to Windows Media Sharing, but if you see one just go ahead and Delete it.
That’s all!!!