BSOD PAGE FAULT IN NONPAGED AREA is an annoying error with bugcheck 0x00000050 value. This stop code indicates that the referenced system memory address is either wrong or pointing at freed one. Once the System confronts the issue, the desktop shows blue with irregular flashing. The PC might also freeze multiple times making it inaccessible to work along. Furthermore, the computer keeps rebooting automatically and prevents you from deploying any workaround to fix PAGE_FAULT_IN_NONPAGED_AREA. Usually, these symptoms manifest automatically while starting a program or ending it.
PAGE FAULT IN NONPAGED AREA BSOD error occurs all of a sudden especially when the operating system is under heavy load. Memory problems, automatic paging file, low space in Hard Disk and bad RAM usually bring forward blue screen related symptoms. Furthermore, faulty hardware, buggy system service, third-party antivirus program, and a corrupted NTFS volume also generate such stop code.
PAGE_FAULT_IN_NONPAGED_AREA Error in Windows 10 Solutions
Here is how to fix PAGE_FAULT_IN_NONPAGED_AREA error in Windows 10 –
1] Diagnose memory issues
Poor segments in the RAM and wrongly allocated memory often become dangerous moreover cause PAGE_FAULT_IN_NONPAGED_AREA BSOD error. To stay safe from these consequences, Microsoft came up with the Windows Memory Diagnostic tool. Here is how to use this –
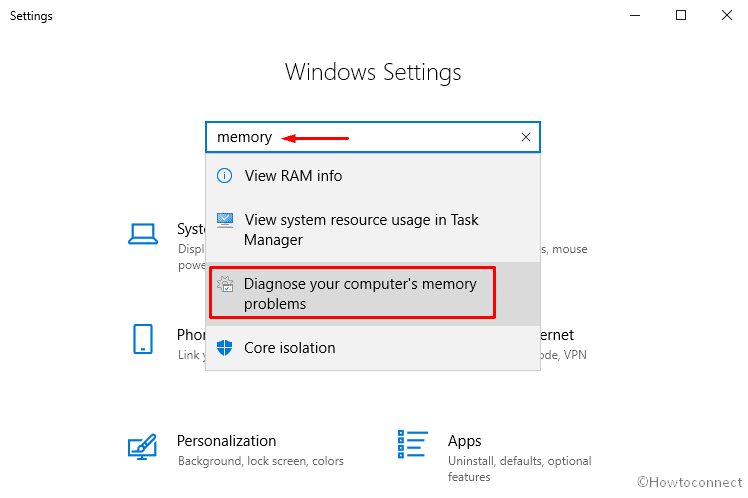
- Press Windows and I keys in one go and let the system open the Settings app.
- When in the app UI, write down Memory in the search box and select Diagnose your computer’s memory problems after the result is visible.
- In the corresponding Windows Memory Diagnostic pop up, click Restart now and check for problems (recommended) option to move ahead.
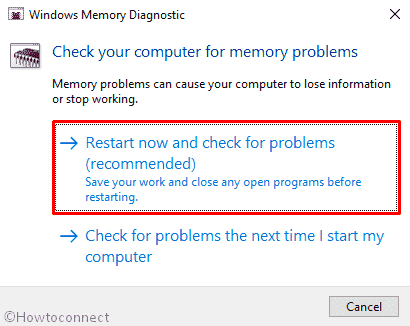
- Doing so will prepare Windows for the first cycle of rebooting.
- When the OS gets back in action, a blue screen will turn up detecting the memory issues in the whole system.
- Upon completion, the system will prompt to Restart for the second time.
- Once it powers up, you can check the result of diagnosis in the Notification area of System Tray.
2] Run SFC /Scannow command to fix PAGE_FAULT_IN_NONPAGED_AREA
System File Checker is a utility that explores the integral system files that are malfunctioning or missing restores them as well. Furthermore, the tool looks for any corrupted components and fixes them.
- Open Run dialog box and write down cmd.exe in the void text bar.
- Press Ctrl+Shift+Enter simultaneously to open Command Prompt with admin privilege.
- Go ahead with the UAC prompt by clicking the Yes button.
- On the black panel, simply type the below command and press Enter –
SFC /Scannow
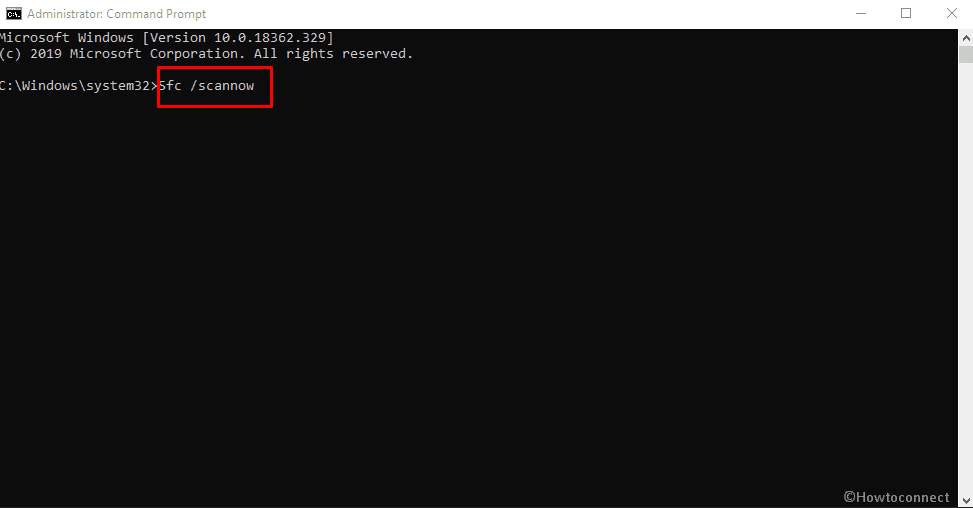
Let the system complete the scanning process without making any interruption.
3] Put Automatic Restart out of action
Your operating system leads to reboot without prior notice when it is diagnosed with BSOD error. This is so annoying as it doesn’t really allow smooth working while sorting out causes and resolving those. Hence, you need to disable automatic restart first in order to deploy other resolutions without any hustle. Let’s see the process below –
Before, proceeding forward, make sure to save and close the ongoing processes. If the numbers are many, you can also minimize them temporarily.
Step-1: Press Win+D keyboard shortcut at once to head over the desktop area directly.
Step-2: Upon reaching there, right-click on the This PC and select Properties.
Step-3: System window will come up immediately, select Advanced system settings from the left pane.
Step-4: Once the System Properties popup rolls out with Advanced tab, click Settings located under Startup and Recovery section.
Step-5: On the imminent wizard, hover the cursor to System failure and uncheck the box before Automatically restart option.
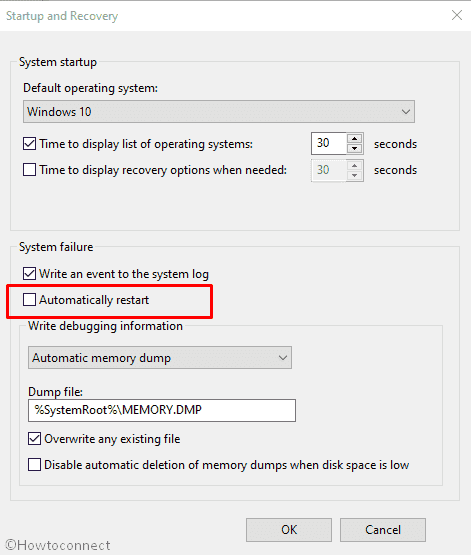
Step-6: Hit the OK button from the bottom to save the changes.
After that, Windows will not prompt to reboot automatically thereby you will get ample time to try another workaround.
4] Turn off Automatic Paging File Size Management
Paging file size is a memory management scheme that lets you adjust the space when you have logged into. The less extent in it often causes the PAGE_FAULT_IN_NONPAGED_AREA Windows 10 BSOD error. Hence, change the paging management by following these steps –
- Click the search icon from the Taskbar and type This PC in the text bar.
- When the resultant window shows up, click Properties option from the left overlay.
- From the upcoming wizard, choose Advanced system settings located in the left pane.
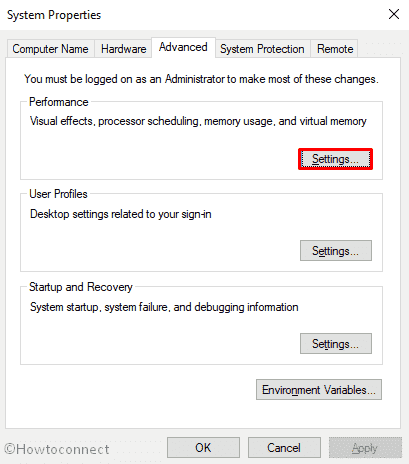
- Once System Properties window becomes visible, make sure that you are in the tab labeled as Advanced.
- Click the Settings button residing under the section called Performance.
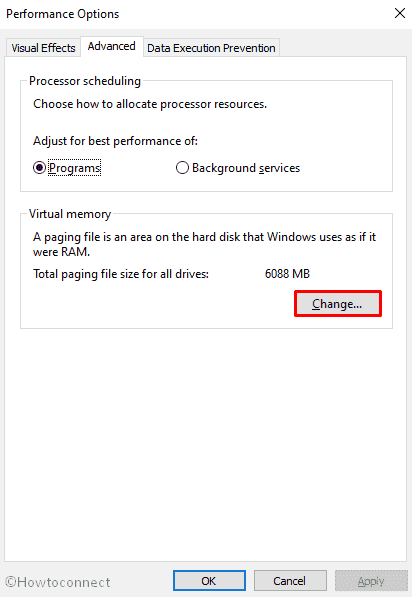
- Next, the Performance Options wizard will make an appearance, navigate to its Advanced tab as well.
- Hover the cursor to the Virtual Memory area and then click on Change.
- On the impending wizard, uncheck the box assigned for Automatically manage paging file size for all drives.
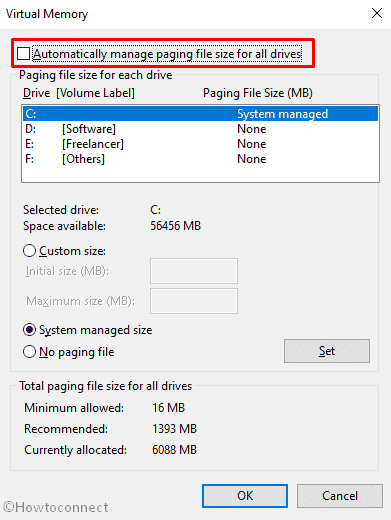
Upon accomplishing the above steps, you need to increase the page file size. To do so, double the amount of memory allocated by default inside of the text field.
Lastly, click the OK button from the bottom and reboot your computer for the changes to take effect.
5] Update all the problematic drivers and solve PAGE_FAULT_IN_NONPAGED_AREA
In case, you have any device driver that is faulty or not up-to-date might cause PAGE_FAULT_IN_NONPAGED_AREA Windows 10 BSOD error. Therefore, you need to look into the drivers to know which one is causing the problem furthermore uninstall it. Mostly, the system reinstalls the latest and trouble-free version of the same automatically after performing a reboot. However, let’s see the procedure of uninstalling obsolete device drivers –
- Call up Taskbar search by pressing Win+Q and type devmgmt.msc in the bar.
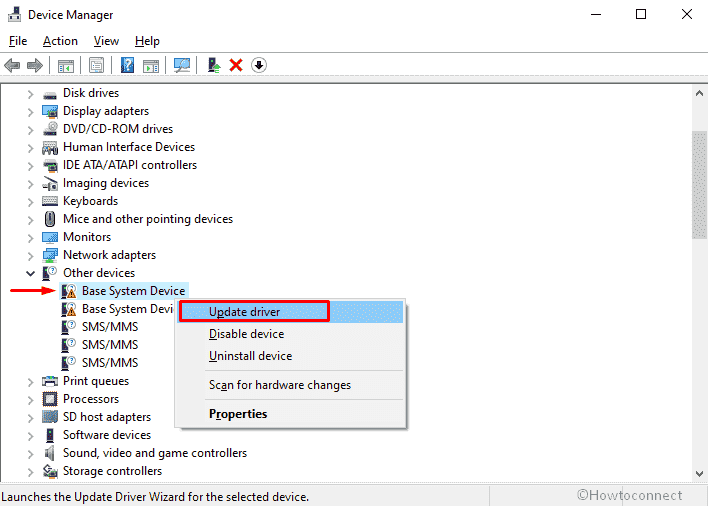
- When the result turns up, select Device Manager from the top.
- On the succeeding window, scroll through and see if any of the devices carry a yellow exclamation mark alongside its name.
- Once found, double click on that particular device to view the driver’s list.
- Thereafter, right-click on the faulty item and hit Update driver from the fly-out.
- Upon completion, Restart your PC and check whether the exclamation mark is gone. If not, again right-click on the obsolete driver and this time, choose Uninstall device option and follow the on-screen instructions to complete the procedure.
6] Update the available Windows 10 patches
An outdated Windows 10 PC is comparatively slower and weaker as well, therefore, allow BSOD bugs such as PAGE_FAULT_IN_NONPAGED_AREA inside the system. Most of the time, this type of issue gets eliminated automatically with a major update and cumulative patches. Here is how to get them –
- Press the Windows key to invoke the Start menu and select gear icon from the bottom left.
- When the Settings app rolls out, click on Update & Security.
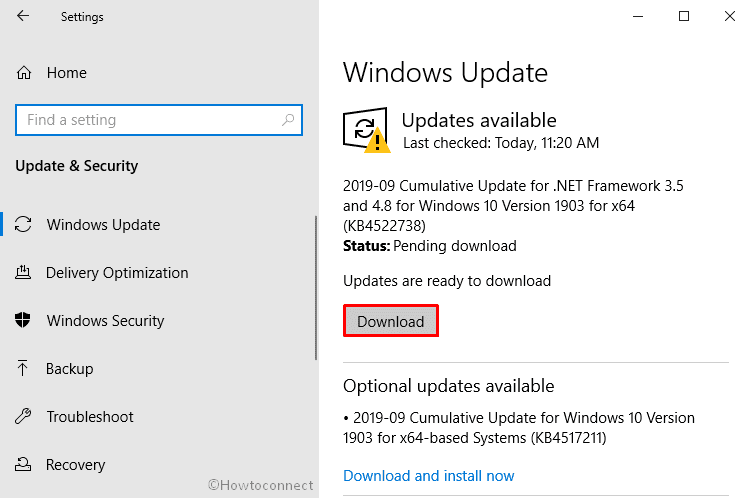
- On the following page, jump to the adjacent right and click Check for updates button even though it shows You’re up to date.
- If any patches found, click Download to get it immediately.
7] Execute CHKDSK Utility to fix bad sector of Hard Disk
After using your PC for a very long period of time, bad sectors get assembled in Hard Disk that eventually calls up PAGE_FAULT_IN_NONPAGED_AREA Windows 10 BSOD error. To fix up this mess, you need to run disk checking utility in elevated Command Prompt. Here is the guideline to follow through –
- Press Win+S keyboard shortcut and type cmd.exe in the Windows search bar.
- When Command Prompt appears in the result, do a right-click on it and select Run as administrator.
- If a UAC prompts on your screen, click on the Yes button.
- Once the Command Prompt shows up, type the following line after the blinking cursor –
chkdsk C: /f /r /x
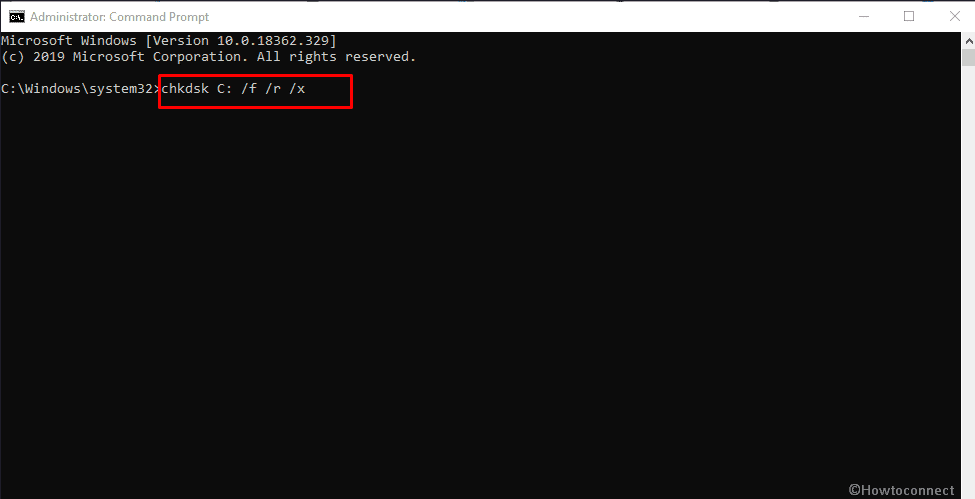
Where,
- C: is the drive letter where your operating system is installed. In case of using other drivers for the same purpose, replace the letter with D:, E: and so on.
- “f” will force the utility to fix up found issues from the volume.
- “r” parameter works to detect the poor sectors in the Hard Disk.
- And “x” will make the whole volume to remove from its support before initiating the process.
8] Boot the device into Safe Mode to fix PAGE_FAULT_IN_NONPAGED_AREA
Most of the serious issues that Windows 10 encounters, go away while booting the OS in Safe Mode. This is basically a special Startup approach where the system loads only basic applications and programs. If PAGE_FAULT_IN_NONPAGED_AREA generates from the advance settings or additional apps, it might disappear while running the OS in Safe Mode. For that –
- Press the Win+I hotkeys to bring forward Windows Settings app.
- Once it comes into the sight, click on Update & Security.
- From the subsequent page, choose Recovery from the left column and move along to the right side.
- Hover the cursor to Advanced startup area and click Restart now button located under it.
- When the Windows restarts, it will come up with some options to choose from, select Troubleshoot.
- Next, click Advanced Options and subsequently on Startup Settings.
- Thereafter, you will view a piece of information in the desktop screen that conveys your machine can be restarted with the use of additional settings which is Enable Safe Mode. Hit Restart.
- While signing back in, Press f4 continuously until you enter into Safe Mode.
9] Wipeout malware using Window Security
While surfing on the web, the virus can enter into your system and cause BSOD errors like PAGE FAULT IN NONPAGED AREA. Mostly they hide inside a suspicious site or a malicious link coming in spam email. Moreover, inserting a USB without checking can be risky as well. Whenever a malware gets chance to barge into the security, it deletes lots of necessary system resources and leads to several stop codes. As a safeguard, you need to scan your full PC with the help of Windows Security and take necessary steps if any hazardous threat found. Here is the process below –
Step-1: Take your mouse pointer to the bottom right corner of Taskbar and click Show hidden icons arrow.
Step-2: Select the shield icon to open Windows Security separately.
Step-3: When the app unrolls, click Virus & threat protection thumbnail lying in the right-hand side.
Step-4: On the consequent page, click the link saying Scan options.
Step-5: Next, select Full scan radio button followed by hitting a click on Scan now.
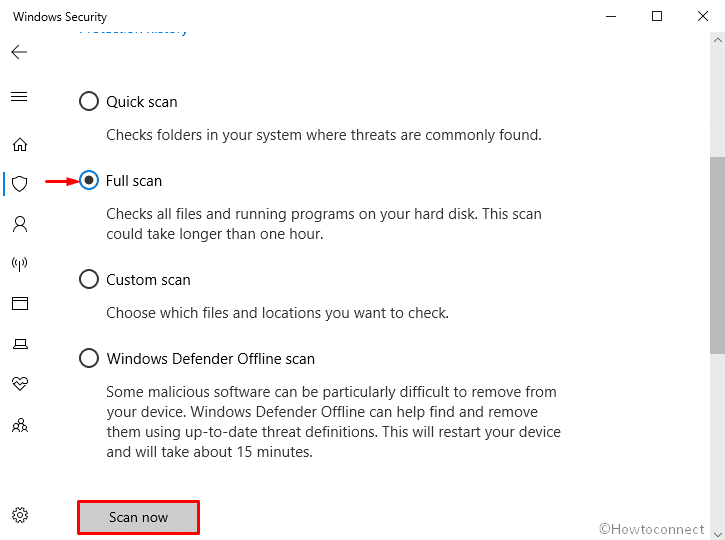
Step-6: Now, Windows Security will start detecting if any virus component available in the system. Once the process ends, the result will be displayed on the screen.
Step-7: If the built-in antimalware program finds out any mischief, click the Clean threats button to get rid of them.
Step-8: On the next page, you will view three actions for the threat, select Remove first and then Start actions to dispel the malware.
10] Eliminate the Junk files
Windows create temp files and store them in the hard disk for the execution of various tasks. Once they become large and holds huge space, the device runs on low storage. Thus the immediate effect is slow operational speed along with PAGE_FAULT_IN_NONPAGED_AREA BSOD Error. However, you can easily delete temporary files using the Disk Cleanup tool to free up some extra memory. The process is as follows –
- Open Run command pressing Windows key and R together.
- When the wizard shows up, write cleanmgr in the blank text bar and click the OK button.
- A small dialog box will appear from where you need to choose a drive to carry out cleaning. Make sure the driver is C: and then hit OK.
- When the Disk Cleanup utility arrives, move down and click Clean up system files button.
- Again the same popup dialog box will come into the view, Choose C: and also click the OK button.
- Once the Disk Cleanup for (C:) becomes visible, reach out to Files to delete section and put a checkmark in all the boxes except Downloads.

- Lastly, click the OK button to start the removing process.
11] Make use of built-in Blue Screen Troubleshooter
After getting so many reports about BSOD error, Microsoft introduced Blue Screen Troubleshooter in the Settings app. In order to use this tool, you must have an operating system greater than the Fall Creators update. Follow the below procedures to use the fix –
- Right-click on the Start button and select Settings from the Power user menu.
- From the following page, choose Update & Security tile.
- Next, select Troubleshoot from the left column and then switch to the corresponding right.
- Scroll down to find out the Blue Screen option eventually click on it and select Run the troubleshooter button.
12] Uninstall programs to fix PAGE_FAULT_IN_NONPAGED_AREA
Often you install two or more programs in Windows 10 device that carries out the same task in the OS. As a result, those apps conflict between each other to perform the same functions and end up causing many problems including PAGE FAULT IN NONPAGED AREA. Therefore, the best possible way is to uninstall those programs –
- Press Win+X hotkey together and choose Apps and features option from the top.
- This will bring forward the Apps Settings page on the screen.
- On the right pane, you will see a list of installed apps. Go through it to find the suspected ones.
- After getting it, click on the program and hit the Uninstall button from the extended tray.
- Then follow the on-screen directions to remove it completely from the device.
13] Cut off the connection of external accessories
As per reports, connecting an external drive to the PC often leads to PAGE_FAULT_IN_NONPAGED_AREA BSOD error. Though these drives are important to have a great user experience, you need to detach them for a while to check which one is creating the issue.
After cutting off the connection, Restart Windows 10 PC and then inspect for the occurrence of the BSOD error. If no stop code shows up, you are safe enough to attach the external hardware again. To provide more stability to the device, navigate the manufacturer’s website to download the latest related drivers and install them as well.
14] Diverge troublesome Windows Update Files
Usually, Microsoft provides the available updates automatically but there is a time when it ends up in the corruption or termination at midway while installing. Though the scenario is rare, if happens may lead to PAGE_FAULT_IN_NONPAGED_AREA Windows 10 BSOD error. To eliminate the risk, you need to uninstall these dreadful files immediately by following the below method –
- Open Windows Settings app and click Update & Security from the main UI.
- On the next page, move to the corresponding right and then click View update history.
- Thereafter, select the Uninstall updates link and let the system bring forth installed updates.
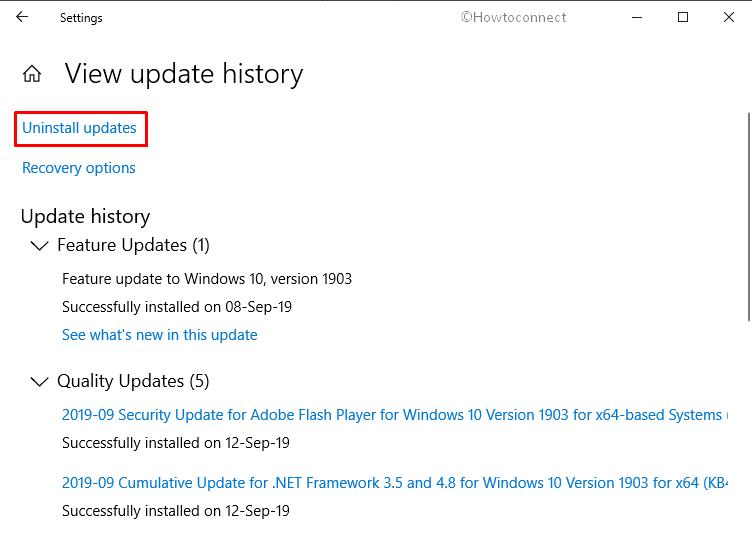
- Reach to the latest received patch and do a click on it eventually Select Uninstall option loaded in the top ribbon.
- Lastly, keep following on-screen instruction until they get removed completely.
15] Uninstall third-party antivirus application to avoid a clash
When you install a third-party antivirus program often it conflicts with Windows security and creates issues. Sometimes, PAGE_FAULT_IN_NONPAGED AREA BSOD error in Windows 10 is also a result of using them. While the built-in utility is providing better security, you can easily go for uninstalling the third-party one to escape hassles. Here is the process –
- Press Win+R at a time to launch the Run dialog box.
- In the specified bar, type appwiz.cpl and click the OK button.
- On the following Program and features page, locate the third-part antivirus from the appearing list and do a click on the same.
- Hit the Uninstall button from the top and follow the ongoing instructions that are coming on the screen.
16] Perform System Restore to undo the changes occurred recently
If you are getting PAGE_FAULT_IN_NONPAGED_AREA BSOD error after making any change, then you can go with System Restore. Deploying this workaround will take back the system to the point when there were no errors. Here is the sequence of steps that you need to follow –
- Go to the taskbar search and type rstrui in the specific field.
- Upon appearing the result, hit Enter.
- When System Restore wizard comes into the view, click Next.
- Choose the last restore point and again hit the Next button.
- In the end, click the Finish button to initiate the procedure of restoring Windows.
17] Rectify the defective Windows image files
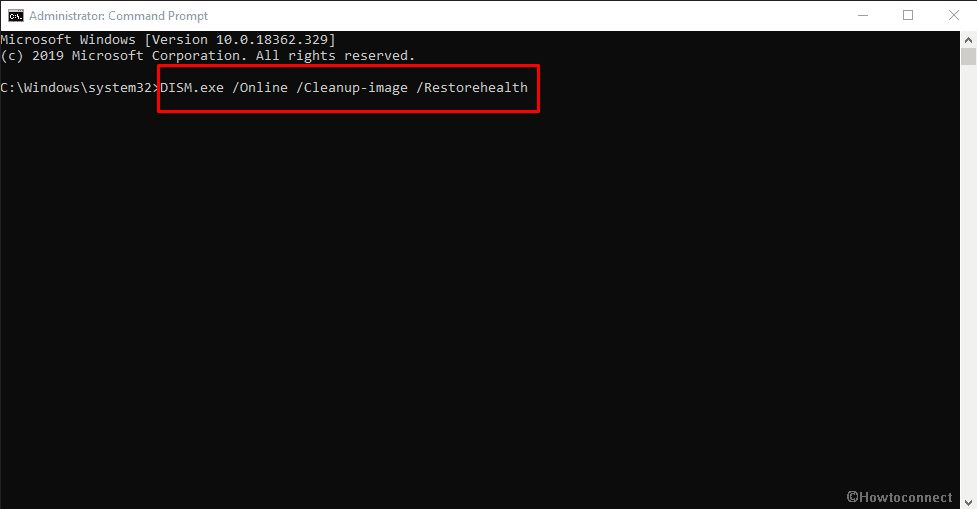
Damaged Windows image can bring up PAGE_FAULT_IN_NONPAGED_AREA BSOD error in the system. Deployment Image Servicing and Management (DISM) is Microsoft’s ultimate tool for this kind of issue. It can recover images and solve issues that occur as a result of damaged files.
- First of all, open
- Once it appears, type the exact command after the winking cursor followed by hitting Enter –
DISM.exe /Online /Cleanup-image /Restorehealth
18] Disable fast startup to solve PAGE_FAULT_IN_NONPAGED_AREA
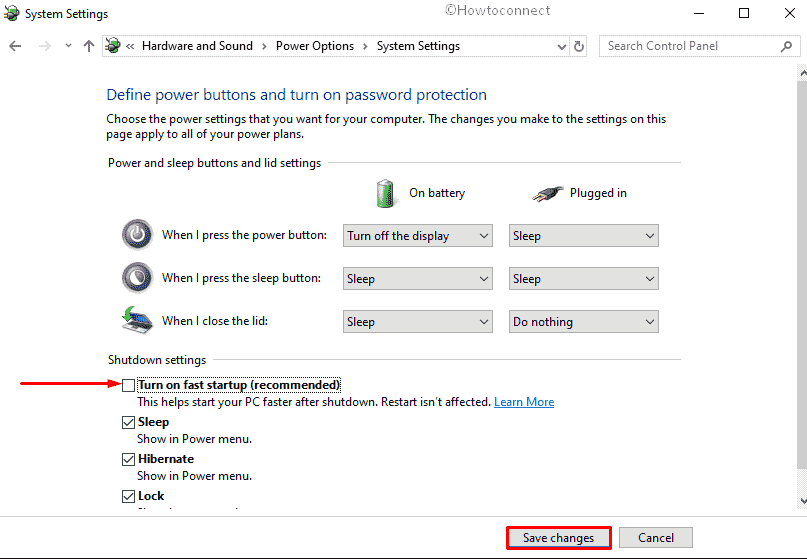
When Fast Startup is turned on, Windows stores the information of your system in its memory while turning off the device. When you power it up, the OS uses those data to resume your PC. Therefore, you can disable Fast startup if you don’t want the operating system to remember any information about PAGE_FAULT_IN_NONPAGED_AREA. Here is how to proceed –
- Right-click on the battery icon located in Taskbar and select Power Options.
- When it makes an appearance, select Choose what the power buttons do link from the left-hand side.
- On the forthcoming page, click Change settings that are currently unavailable to unveil the hidden options.
- Hover the mouse pointer and uncheck the box located beside Turn on fast startup (recommended) option.
- Finally, click Save Changes button to make the modifications effective.
19] Try for automatic repair
To fix PAGE_FAULT_IN_NONPAGED AREA error, you may try to perform an automatic repair. Let’s see the process –
- Click the quick actions button from the Notification bar and choose All settings.
- Once the page shows up, click Update & Security.
- From the subsections on the left pane, choose Recovery.
- Shift to the right side and click Restart now button that appears beneath the Advanced startup.
- Now, wait for a couple of seconds for the device to get restarted.
- When it powers up, choose Troubleshoot =>Advanced options => Startup Repair.
- The moment you get into the Automatic Repair, provide the credentials of your account and click Continue to initiate the procedure.
20] Update BIOS to deal with PAGE_FAULT_IN_NONPAGED_AREA
An outdated BIOS often put forward PAGE_FAULT_IN_NONPAGED_AREA BSOD error in Windows 10. BIOS is one of the most sensitive components of your PC and many hardware items are entirely dependent on this. So, while tweaking this, you need to be extra cautious as any wrong attempt can damage your system.
- Invoke Run command by pressing Win+R and type msinfo32 in the blank text box.
- Hit Enter key to bring forward System Information page.
- Once it comes across, type BIOS version in the search bar and click the Find button.
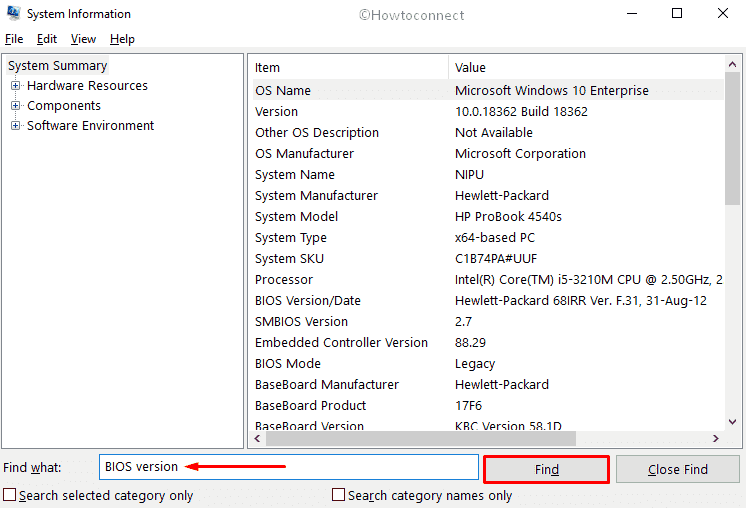
- After viewing the information about the developer as well as the version of BIOS, close that running page and open a web browser.
- Later on, visit the manufacturer website for BIOS using the information you have got before and download the file followed by installing the same.
21] Perform a clean boot
There may be some programs or services in your PC that is causing PAGE_FAULT_IN_NONPAGED_AREA BSOD error. You need to deactivate them by going through the Clean Boot. Follow the steps below to do it –
- Initially, open System Configuration.
- When it becomes visible with General tab opened, click the radio button of Selective startup and uncheck the box assigned for Load startup items.
- Thereafter, shift to Services tab and click on the checkbox of Hide all Microsoft services followed by hitting Disable all button.
- Afterward, go to the Startup tab and click on the link Open Task Manager.
- This will launch the Manager with the Startup tab. Right-click on an item listed here and choose Disable. Do the same for all apps available there.
- Now, get back to the System Configuration window and click on Apply and then OK to implement the modifications.
Methods:
1] Diagnose memory issues
2] Run SFC /Scannow
3] Put Automatic Restart out of action
4] Turn off Automatic Paging File Size Management
5] Update all the problematic drivers
6] Update the available Windows 10 patches
7] Execute CHKDSK Utility
8] Boot the device into Safe Mode
9] Wipeout malware using Window Security
10] Eliminate the Junk files
11] Make use of built-in Blue Screen Troubleshooter
12] Uninstall programs having same aptness
13] Cut off the connection of external accessories
14] Diverge troublesome Windows Update Files
15] Uninstall third-party antivirus application
16] Perform System Restore to undo the changes
17] Rectify the defective Windows image files
18] Disable fast startup
19] Try for automatic repair
20] Update BIOS
21] Perform a clean boot
That’s all!!