SYSTEM_PTE_MISUSE is a Windows 10 BSOD error that occurs mainly at the time of starting a program or ending. Along with this stop code, the affected devices also receive a bug check code 0x000000DA. It specifies that a page table entry (PTE) routine has been used in the inappropriate method. In addition, the computer also faces random reboots in order to reduce the effect of damage to the OS.
Major causes behind SYSTEM PTE MISUSE blue screen error are actually outdated and incompatible drivers. Usually, that does not only end rather missing System resources play a bigger role. Furthermore, malware or virus attacks, presence of programs with the same purposes, memory issues, bad sector in hard disk and running in low disk space all together cause BSOD as well. Here, in this article, we will discuss the effective resolutions to fix blue screen Windows 10 error. For your easy navigating to them, they are listed below –
SYSTEM_PTE_MISUSE BSOD Error in Windows 10 Solutions
Here is how to fix SYSTEM_PTE_MISUSE BSOD Error in Windows 10 –
1] Turn Down Automatic Restarting of Device
People find difficulties to work along with a device affected with SYSTEM_PTE_MISUSE BSOD Error. The reason behind is, Windows tends to undergo restarting regularly without notice. Thus, resolving this issue seems too tough as you need time to deploy the workarounds. But, tweaking default settings a little, we can disable automatic restart in Windows 10. Here is how to do it –
Step-1: Go to the Desktop area making sure that all the ongoing processes are saved. You can press Win+D hotkeys together and head to the place immediately.
Step-2: Once in the ground, perform a right-click on This PC icon and select Properties option.
Step-3: When the System window opens up, select Advanced system settings from the left pane.
Step-4: In a moment, System Properties popup wizard will appear. You will be headed to its Advanced tab.
Step-5: Go little down in the tab and reach to Startup and Recovery region. Click Settings button from this place.
Step-6: Prior to opening a new wizard, move on to System failure part. Uncheck the box beside “Automatically restart” and hit the OK button to implement these changes.
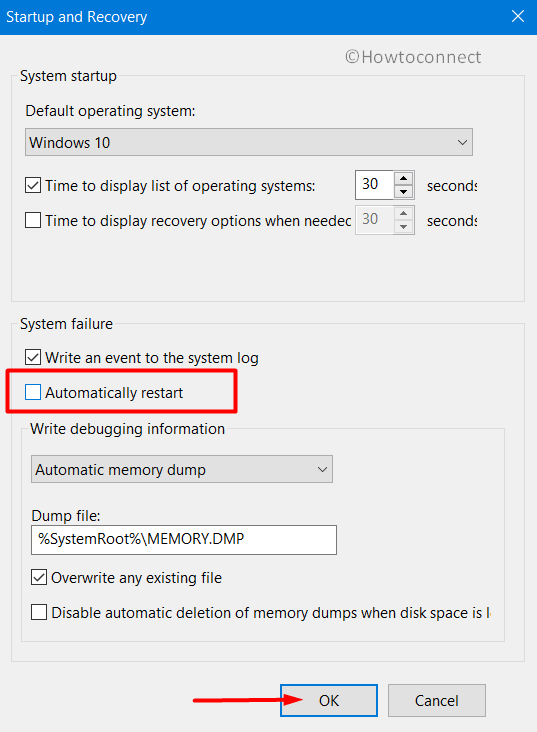
After these changes effective, Windows will not go for automatic restarting onwards. Thus, you can have enough scope for deploying other workarounds smoothly.
2] Rollback drivers to resolve SYSTEM_PTE_MISUSE BSOD Error
Keeping drivers updated always is very necessary to maintain an Operating System flawlessly. However, sometimes a newly updated driver can cause BSOD error codes too. Therefore, we can roll back them to an earlier version as a resolution. The process is as follows –
- Invoke the Run Command pressing Win+R keyboard shortcuts.
- When the wizard appears, type devmgmt.msc in the text space.
- Press Enter key and Device Manager will open up.
- Find the problematic device and expand its drivers by clicking.
- Make a right-click on selective driver and choose Properties option.
- In the appearing window, shift into the Drivers tab.
- Move down and make a click on Roll back Driver option if available. Hit the Yes button finally.
With this, the faulty driver will be replaced with an earlier version. Thus, the SYSTEM PTE MISUSE error might resolve immediately.
3] Malware Check in Windows Security
We are no longer safe from Malware these days as the bugs and problems are present everywhere. People often visit malicious sites or clicks links containing them are the easiest prey. When the viruses enter a system, they attack the necessary files. In the process, deteriorates them and DLL files also go missing. A system with missing DLL files is a probe to get SYSTEM_PTE_MISUSE BSOD Error. Windows Security offers the best way to find them and dismiss eventually. To use the tool, the process is as below –
- Take the pointer to the rightmost bottom of Taskbar and do a click on Show hidden icons arrow.
- Select the Shield icon from there once menu unrolls.
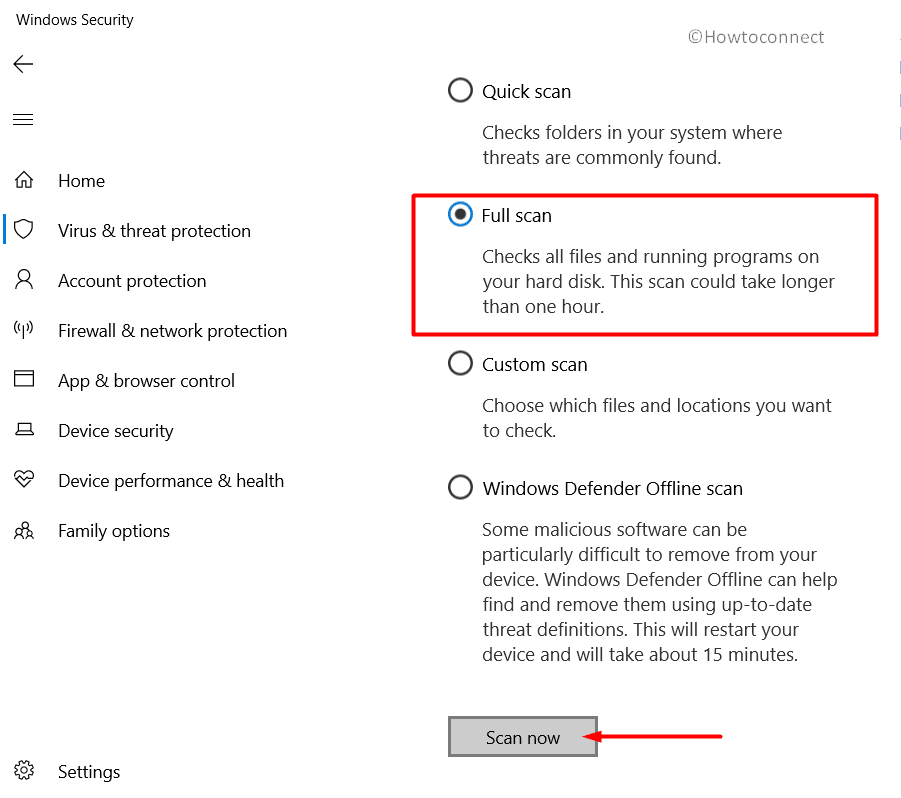
- Windows Security once opens in a separate page, select option Virus & threat protection from the left side.
- Jump to the corresponding overlay, select Scan options to see all the available processes.
- Select the radio button for Full scan and finally hit Scan now button to let the process begin.
- Once scanning ends, the app will show the result in the display. Select Clean threats if any malware present.
- From the succeeding page, you will see three options available. Select Remove and later on Start actions button to start the removal.
4] Use Windows Blue Screen Troubleshooter
With BSOD error codes spreading at a very faster rate, Microsoft needed to step out. They have truly introduced a new default tool in Windows 10 for this. A utility named Blue Screen Troubleshooter made its way out Fall Creators Update version. While using any updated version of Windows 10, you can access it going through the Settings app. Here is how to apply the tool-
- Open the Start menu and click the Gear icon to launch the Settings app.
- From app UI, move on to Update & Security section and click it.
- After succeeding page loads, choose Troubleshoot from the left pane.
- Jump to the corresponding right side and find Blue Screen option here.
- Click the button Run the Troubleshooter from the extended pane.
Now, the tool will start to detect and fix the BSOD error in the system. In the end, you can get rid of SYSTEM_PTE_MISUSE BSOD in Windows 10.
5] Update all the drivers
Outdated device drivers are very much like to cause SYSTEM_PTE_MISUSE BSOD Error. Updating these will reduce the probability to have the issue. In Windows 10, usually, drivers are updated automatically. Yet some might leave along and cause vulnerabilities. Windows Device Manager is the right platform to update them. In the console, corrupt drivers are indicated with a yellow indication mark. Follow the below guidelines to accomplish the task –
- Do a combined press of Win+S hotkeys and invoke Windows search bar on display.
- Type Device Manager in the empty search box provided here.
- Select the same when appears in the result.
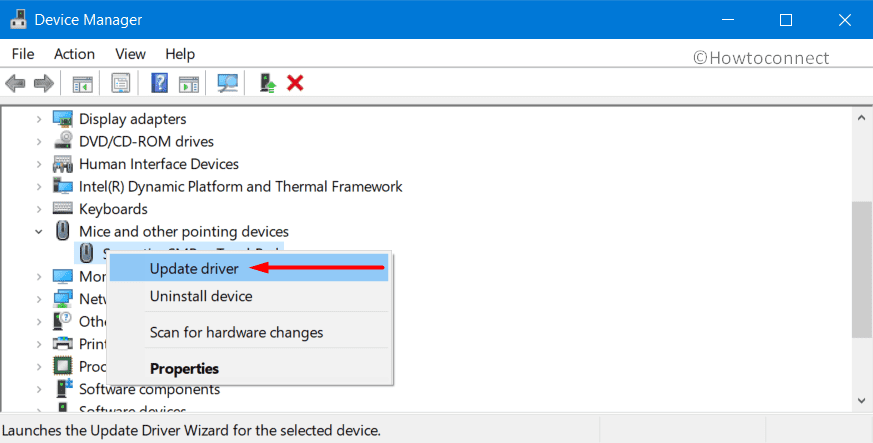
- Moving ahead to the console, look closely for a yellow exclamation mark in device manager.
- If there is any, select the same to expand and view the driver list.
- Make a right-click on the drivers one by one and choose Update driver option from the appearing menu.
- Follow the instructions shown in display afterward to update these drivers.
- Do the same with all defective drivers having a yellow indication.
6] Disable PIT security in BIOS
Users coming across SYSTEM PTE MISUSE BSOD Error in their Dell computers might have issues with PIT security in BIOS. The problem resolves when you disable it following the below guidelines –
- Open the Windows Settings app pressing “Windows key + I” hotkeys together.
- From the app window, move ahead to Update & Security and click on its tile.
- When the additional page loads, choose Recovery located at the left pane.
- Jump on the corresponding right and make a click on Restart now under Advanced startup section.
- On the subsequent Startup screen next, select the “Troubleshoot” option.
- From the consequent page, choose Advanced options.
- When the following page cuts your view, do a click on UEFI Firmware Settings.
- Alternatively, in case you don’t see this option, do a click on Startup Settings. When the Windows completes rebooting, press F2 to access BIOS directly.
- Now click Restart from the next page. When the system reboots, you will be guided to BIOS directly.
- When in the BIOS, move into the Security tab.
- Reach out to PIT Security section and remove the checkmark from PIT option to disable it.
- Finally, reboot the Windows and while returning back, check if there is any BSOD error codes in the system.
7] Update Windows by installing all latest patches
We all know that an outdated operating system can easily be affected by bugs and issues. To keep it safe, Microsoft releases cumulative updates quite regularly. All these files consist of bug fixes. Installing these will add strength to the system and you can avoid SYSTEM_PTE_MISUSE BSOD Error. Before proceeding, try connecting with high-speed internet to limit time consumption while downloading files. Disable Metered Connection, if you choose to do it from Mobile Hotspot. Once ready, move with below proceedings –
- Launch the Windows Settings app using the same guide as the last workaround.
- From the app UI, head to Update & Security and perform a click on it.
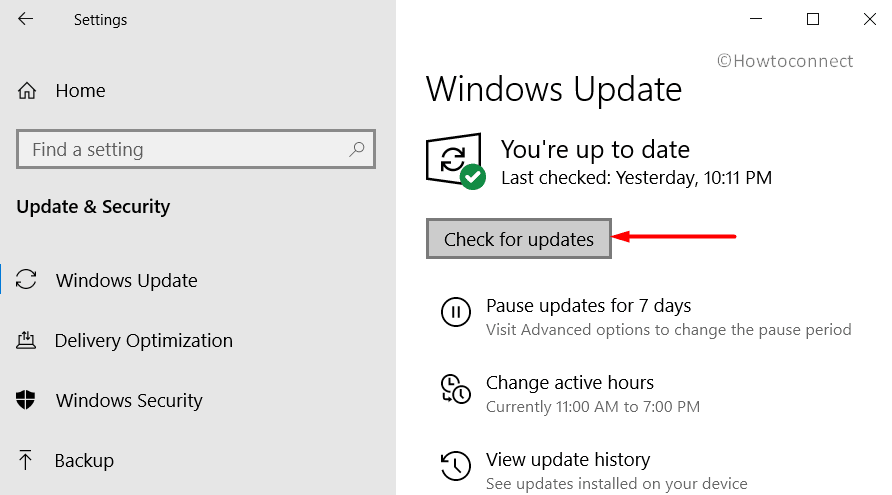
- After the succeeding page unrolls, select Windows Update located at the left-hand side.
- Move on the right and click the Check for updates button. If you see “You’re up to date” dialog, ignore that.
- When the available patches are up here, do a click on Download under them.
- Once files are already in the system, the installation will take place automatically.
- Keep the desktop manned to attend restarting when required.
8] Make free the Disk Space from Junk files
Windows create junk files for the execution of various tasks. These are usually temporary and stored in Hard Disk. Once they grow large, occupy huge space in it. As a result, the device runs on low storage. The immediate effect is a slow operational speed along with SYSTEM_PTE_MISUSE BSOD Error. Well, we can easily delete temporary files using the Disk Cleanup tool. On completion, you can recover some space as well. The process is as follows –
- Invoke Run Dialog box by pressing Windows key and R together.
- When the wizard shows up, write cleanmgr in the blank space.
- When you press the Enter key, a small dialog box will appear asking you to choose the drive where you want to carry out cleaning.
- Select C: by clicking on the dropdown menu and eventually press the Enter key.
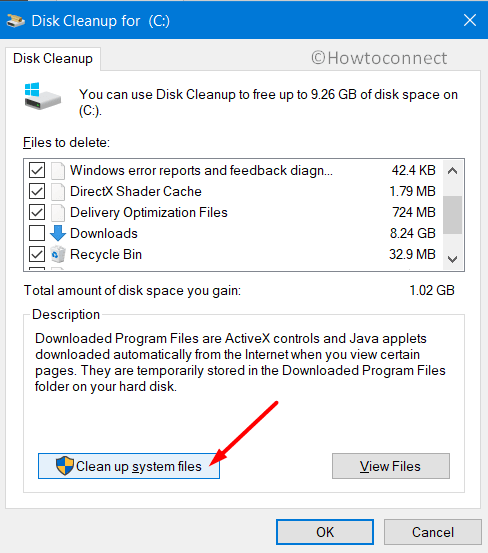
- When the Disk Cleanup utility arrives, move down and click Clean up system files button.
- A same small popup dialog appears again, Choose C: and also select OK button.
- Once the Disk Cleanup for C: comes into your view, reach straightly to Files to delete section.
- Now, put a checkmark in all the boxes here only except Downloads.
- Moving ahead to the bottom, hit OK button to start the removing process.
9] Rectify corrupted Windows files using System File Checker
Through various means, System resources can get corrupted so as the DLL files go missing. The ultimate outcome is SYSTEM_PTE_MISUSE BSOD Error. As a part of recovering these components from corruption, System File Checker will be super handy. The utility is executed in the Elevated Command Prompt. To proceed, follow the below guidelines –
- Press Win+Q hotkeys to open the Taskbar Search.
- When it shows up, type cmd.exe in the box provided here.
- After results appear, make a right-click on Command Prompt and select Run as administrator.
- Once the UAC prompts for permission, give authentication by selecting Yes.
- Being in the black window, enter the following code at the winking cursor –
sfc /scannow
- Execute the duty of System File Checker by pressing Enter.
- Now, this utility will start working and fixes system file corruption automatically.
- Once the task finishes, Restart Windows 10 device to make this resolution effective.
- When the device powers up, check if there is any BSOD error present in the system.
10] Overclock or underclock the RAM to Resolve SYSTEM_PTE_MISUSE
BSOD error codes might prompt up if you are having problems with RAM modules. In that case, you need to check the unit and tweak settings. People sometimes get the issues while using RAM modules having a 1600MHz frequency as default. Out there are a few motherboards that fail to support this frequency and give away SYSTEM_PTE_MISUSE BSOD Error. As a fix, you need to change the frequency to 1333 MHz on the contrary, you can stay with the default frequency but need to increase the voltage used by RAM from 1.5V to 1.6V.
This is a gentle reminder that overclocking and underclocking can be dangerous potentially to the system. To some extent, it can damage permanently. So, carry out the task at own risk.
11] Roll back to the previous state performing System Restore
User can have SYSTEM_PTE_MISUSE BSOD Error after making changes in Windows by installing or uninstalling a program. Any changes make trace in Windows Registry which in most cases very sensitive. Well, to escape from the dangerous BSOD error, you can perform System Restore. This process usually guides you back in the earlier state. To use the method, the instructions are here –
Note – Without having a previously created Restore point, you cannot accomplish this task. If that is the situation with you, ignore this workaround and pass to the next resolution.
- Make a right-click on the Start menu icon and select Run from the Win+X menu.
- In the wizard appearing, type rstrui to its empty search box.
- When you press the Enter key, System Restore wizard will hit on the screen immediately.
- Click on Next from the bottom of this appearing wizard.
- On the succeeding page, choose Show more restore points to reveal all past points.
- Select the recent one in the list and hit the Next button again.
- From the window appearing next, select Finish to start the restoring process.
12] Resolve all Memory problems
Presence of incorrect allocating Memory and Bad RAM takes an active part in causing SYSTEM_PTE_MISUSE BSOD Error. Therefore, we have to resolve these existing issues without any delay. Windows Memory Diagnostic is a perfect utility to deal with these cases. Here is how you should move on –
Step#1: Press Windows key and I to invite Settings app.
Step#2: When the app unrolls, type memory in the empty search box located in UI.
Step#3: Choose “Diagnose your computer’s memory problems” when visible.
Step#4: When the tool launches, select “Restart now and check for problems (recommended)” option.
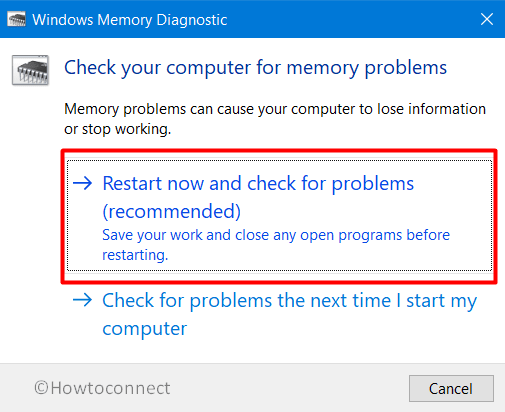
Step#5: Windows will prepare for rebooting and when it’s done, you will see tool detecting memory issues in the system.
Step#6: Device will restart automatically when it hits 100%.
Step#7: Once Desktop loads back, you can find the result of this diagnosis in the notification area of System Tray.
13] Uninstall Third-Party Antivirus to Fix SYSTEM_PTE_MISUSE
Antivirus applications deal with malware and you really need one beside. In the past, people used to access third-party antivirus programs quite a lot. But coming to this time, Windows Security has become the best ever utility in this case. Other Third-party antimalware programs usually unnecessary and can cause SYSTEM_PTE_MISUSE BSOD Error also. It’s wise to delete these programs to avoid the BSOD issue. To complete the task, instructions are as following –
- Open Run dialog using any of the above guidelines.
- Enter the command “appwiz.cpl” in the empty search box provided here.
- Choose OK button to unroll the Programs and Features window in display.
- Find out third-party antivirus application in the appearing list.
- Make a right-click on it and choose the Uninstall option.
- If User Account Control asks permission, hit Yes to proceed.
- Follow the further guidelines until the app uninstalls successfully.
14] Delete Problematic Windows Update files
Windows Updating process moving through Settings app is usually autonomous. There is a sleek chance of ending up in disruption or abnormal termination. When that happens, BSOD error may take place. To eliminate this risk, we need to uninstall these corrupted files immediately. Here is how to delete them –
- Open the Start menu and select the Settings cog.
- When the app arrives on display, head to Update & Security region.
- When the consequent page arrives, select Windows Update residing in the left pane.
- Jump on to the corresponding side and choose link saying View update history.
- From the following page, select Uninstall updates link available here.
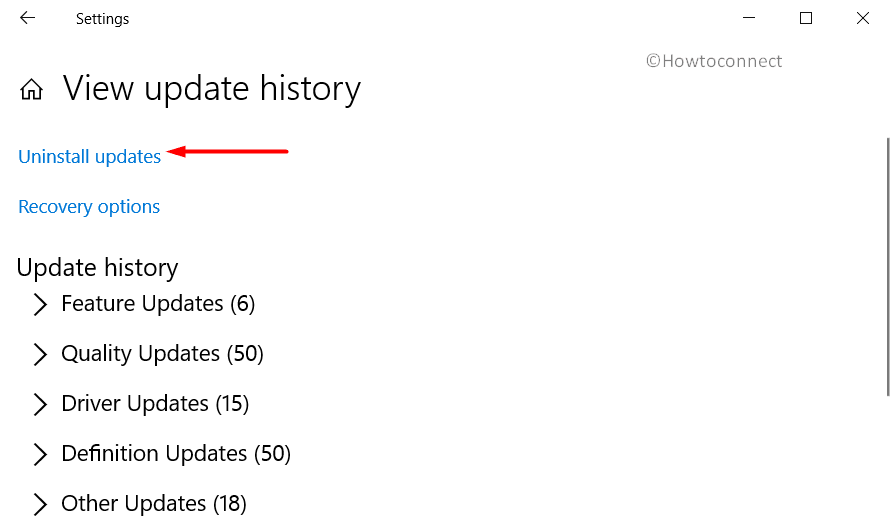
- By default, “Installed Updates” will be visible in a separate window.
- Reach out to the latest received patch in the appearing list.
- Select it and also click Uninstall option showing in the top ribbon.
- Keep following the tasks shown in desktop until these are deleted completely.
15] Disconnect additional hard drive for some time
Some people have already come across SYSTEM_PTE_MISUSE BSOD Error in Windows 10 after started using an additional Hard Disk. Nowadays, we need these types of devices to carry loads of files and necessary data to distant places. Though the scenario is pathetic, the resolution is quite simple. Only disconnecting it for a while fixes the issue.
After disconnecting, restart the device and when it signs back, check for the issue again. If it comes out successful, reconnect the device. Finally, download and install the latest driver from its Official website loading in the default browser.
16] Fix up Windows Image files using DISM tool
Corrupted Windows image files call in SYSTEM_PTE_MISUSE BSOD Error mostly. We need to fix these files immediately and for that, the DISM tool can be deployed. To access the utility, proceed with the following –
- Open the Run dialog box pressing Windows key and R at once.
- Type cmd in the text box provided here.
- Now tap Ctrl+ Shift+ Enter combined to load Elevated Command Prompt directly.
- When in the black window appears, type following command-line tool at winking cursor –
DISM.exe /Online /Cleanup-image /Restorehealth
- Hit the Enter key to activate the DISM tool.
- The tool will thereafter start working and fixes all the defective Windows image files automatically.
- Once the task finishes, restart the Windows to make these resolutions effective.
17] Remove programs colliding with each other
Similar types of programs in a system cause collision between them. As a result, many important data go missing and altogether causes SYSTEM_PTE_MISUSE BSOD Error. However, we can stop this collision by removing one of this similar application. Here is how to uninstall an app from the system –
- Get access to the Settings app in Windows using any convenient method.
- Once the page loads, proceed to Apps tile and make a click on it.
- From succeeding page loads, move on to the alongside right and reach to programs colliding with each other.
- Select the culprit app once and hit Uninstall visible in the expanded pane.
- If UAC prompts for permission, choose Yes to continue.
- Once the uninstalling finishes, reboot the device.
- Prior to signing back, check if the error resolves successfully.
- Reinstall these apps if you feel necessary.
18] Deploy Disk Checking tool to rectify bad areas in HDD
Due to prolonged use, bad areas might form in the Hard Disk itself. As a result, SYSTEM_PTE_MISUSE BSOD Error evolves eventually. You can easily clean up this mess using Disk Checking tool. We need to enter into Elevated Command Prompt first to execute the utility. Later on, move with the below guidelines –
- Make a together press of Win + Alt + Del keys until a new page hits on display.
- Choose Task Manager from the appearing window.
- In the UI, select File option located at the top left corner.
- Choose Run a new task option from the appearing menu.
- A dialog will appear sharply and type “cmd” text in its typing box.
- Moving down, put checkmark before “Create this task with administrative privileges”.
- Now, hit the Enter key to get in the Elevated Command Prompt directly.
- When in the black window, type following command at the base of the blinking cursor-
chkdsk C: /f /r /x
- Once you press the Enter key, the Disk Checking Tool will start taking action against bad areas.
- This might be a lengthy process, hold the nerve until finishes.
- Restart the device when the process ends normally.
- Once return back, check if there is any BSOD error present.
19] Boot the device in Safe Mode to Resolve SYSTEM_PTE_MISUSE
Booting in the Safe mode is considered as the most common fixes for all problems evolving in Windows starting from ancient times. When accomplished the task, the affected device will load only the basic programs. This cures most of the errors including SYSTEM_PTE_MISUSE. To boot in Safe Mode, guidelines are as follows –
- Get access to the Settings app and navigate to the Update & Security tile.
- Choose Recovery subsection on the left sidebar.
- Move to the adjacent right, click Restart now located under the section “Advanced startup”.
- After Windows completes the first cycle of rebooting, you will be asked to select the next step. Click Troubleshoot from appearing screen.
- Moving ahead, hit Advanced options and then Startup Settings.
- Once Windows notifies that device can be restarted with the use of additional settings one of which is Enable Safe Mode, select Restart.
- At the startup coming next, press f4 in order to Enable Safe Mode.
By now, you have probably used all the workarounds and resolved SYSTEM_PTE_MISUSE BSOD Error in Windows 10. There are still sheer chances where you might fail to do so. In that case, we are presenting another last resort. You can perform a clean installation of Windows 10. If done accurately, there shall not be any more issues evolving next.
After coming to a decision to do the task, make sure to connect the device with the internet initially. But before that, backup important files to avoid losing them. In case of being nervous, seek help from skilled professionals.
Methods:
1] Turn Down Automatic Restarting of Device
2] Rollback drivers for resolving
3] Malware Check in Windows Security
4] Use Windows Blue Screen Troubleshooter
5] Update all the drivers
6] Disable PIT security in BIOS
7] Update Windows by installing all latest patches
8] Make free the Disk Space from Junk files
9] Rectify corrupted Windows files using System File Checker
10] Overclock or underclock the RAM
11] Roll back to the previous state performing System Restore
12] Resolve all Memory problems
13] Uninstall Third-Party Antivirus
14] Delete Problematic Windows Update files
15] Disconnect additional hard drive for some time
16] Fix up Windows Image files using DISM tool
17] Remove programs colliding with each other
18] Deploy Disk Checking tool to rectify bad areas in HDD
19] Boot the device in Safe Mode
That’s all!!