Here, in this article, we will show you all possible ways to enable or disable DNS Client Service in Windows 11 or 10. Main work of this service is to cache Domain Name System names and register the full computer name. If you disable the same, it will continue to resolve the DNS names. At the same time, dnscache service will stop catching the queries of DNS and will not register the computer’s name anymore. Moreover, any services depending on DNS Client Service will become unable to run correctly.
dnscache service is a pre-installed program of Microsoft that helps on DNS resolution when you browse the internet. It also works to translate domain names to IP addresses. Furthermore, it caches the results to provide quicker DNS resolution for frequently visited servers. To do so, it links directly to the DNS servers. When you start this service on your PC, DNS runs as a service on the computer.
Ways to Enable or Disable DNS Client Service in Windows 11 and 10
Here is How to Enable or Disable DNS Client Service in Windows 11 or 10 –
Way-1: Take the help of System Configuration
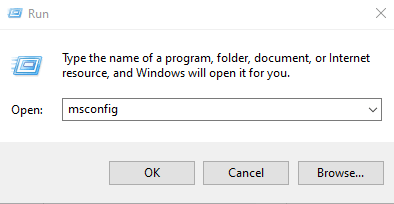
Step-1: Press Windows and R on the keyboard simultaneously to invoke Run dialog box.
Step-2: Once appears, type msconfig in the text box located next to Open and hit Enter.
Step-3: System Configuration wizard will show up now. Here, click on Services tab.
Step-4: Locate DNS Client from the available services. If you wish to Disable DNS Client Service, untick the checkbox of the same.
Step-5: To keep the service enabled, simply click on the checkbox to keep the tick mark.
Step-6: Subsequently, Click Apply and then OK button.
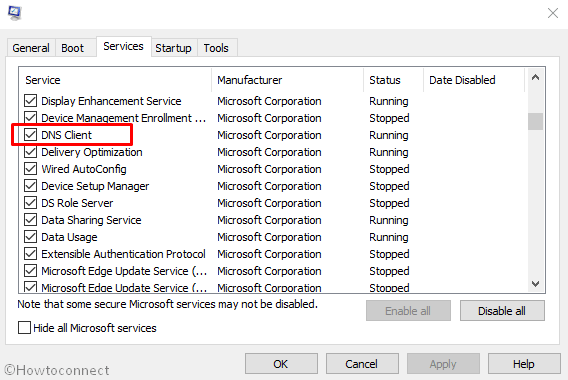
Step-7: Reboot the device otherwise the changes will not take place.
Way-2: Enable or Disable DNS Client Service using Services Console
- Press Win+Q to bring up the Windows search bar.
- Type services.msc in the text field and hit Enter when the result rolls out.
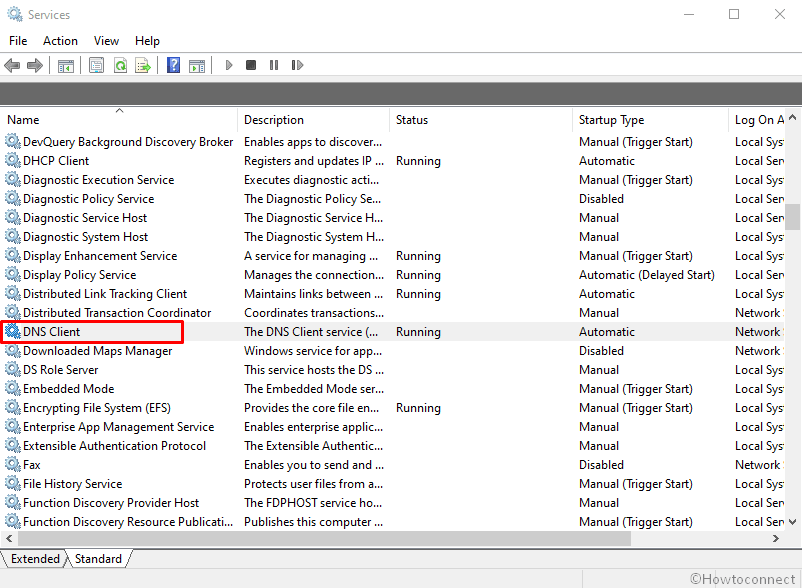
- On the console, find out DNS Client located under Name column.
- Make double-click on the same to open its Properties.
- Go to Startup type segment and use the drop-down menu to choose Automatic.
- Now, click on the Start button to enable DNS Client Service in Windows 11 or 10.
- To disable the same service, simply hit the Stop button.
- Finally, click Apply followed by pressing the OK button to make the changes effective.
Way-3: Use Registry Editor
You can Enable or Disable DNS Client Service in Windows 11 or 10 by changing the value of registry entries. But, keep in mind that if you do it incorrectly, your PC may get affected by a serious issue.
- Click on Start menu icon and type regedit.
- When the result comes up, hit Registry Editor option.
- A UAC will prompt up, click on Yes for positive consent.
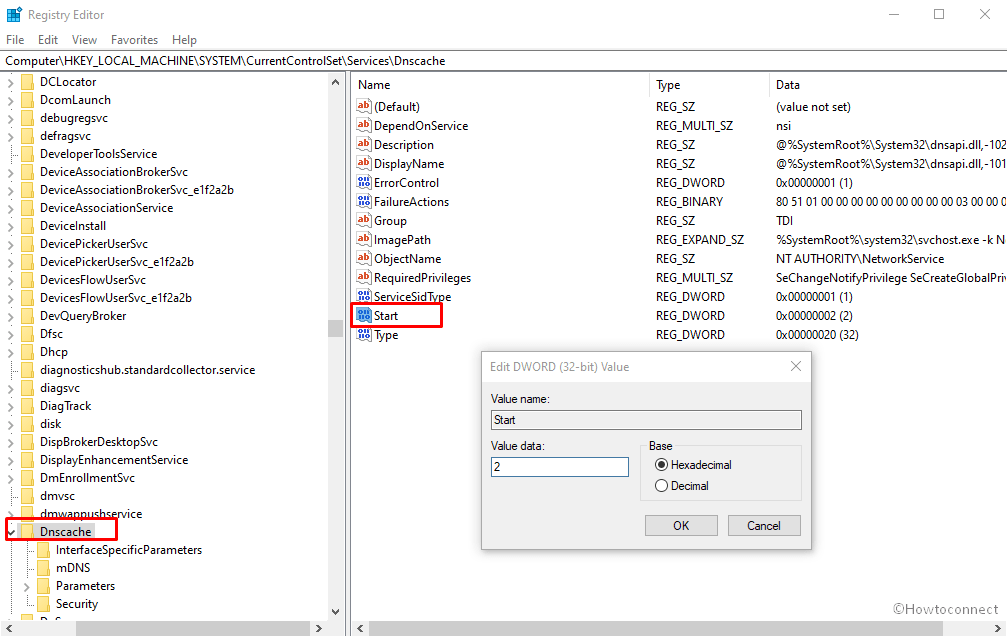
- Once Registry Editor page comes into the view, navigate the following path from the left pane –
HKEY_LOCAL_MACHINE\SYSTEM\CurrentControlSet\Services\dnscache
- Once you reach there, shift to the adjacent right side. Double click on the Start DWORD to modify its value.
- In the Value data box, put preferred value followed by clicking OK button.
Automatic – 2
Manual – 3
Disabled – 4
Automatic (Delayed Start) – 2
Way-4: Via Command Prompt
The procedure to Enable or Disable DNS Client Service in Windows 10 or 11 using the Command Prompt is given below –
Step#1: Open Run dialog box.
Step#2: Type cmd.exe in the empty text bar and hit Ctrl+shift+Enter shortcut at the same time.
Step#3: If a UAC turns up, click Yes to run Command Prompt as admin.
Step#4: To disable DNS Client Service in Windows 11 or 10, run the below command in elevated Command Prompt –
net stop dnscache
Step#5: To enable the same, type the following and hit Enter to execute –
net start dnscache
This will Enable DNS Client Service instantly unless otherwise, the Startup type of this service is Disabled.
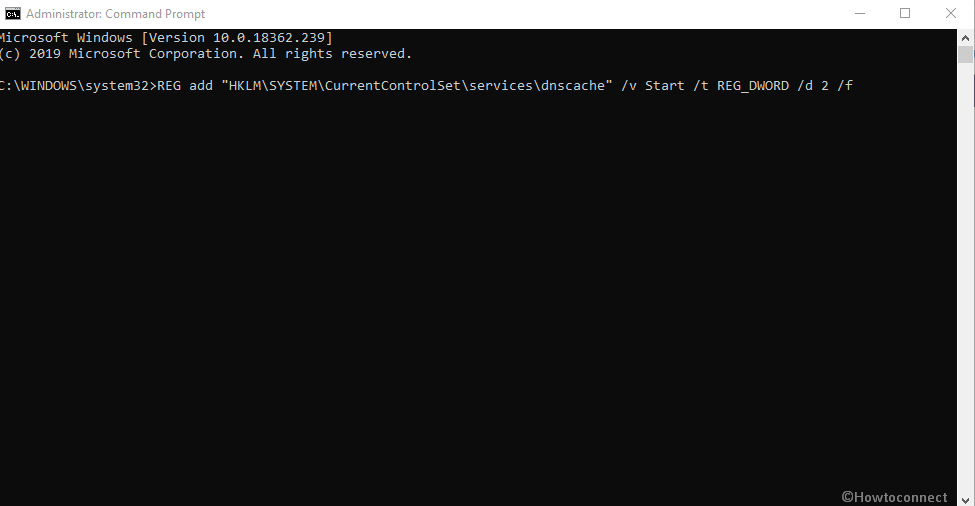
Step#6: To change the Startup type, execute the preferred command listed below –
Automatic –
REG add “HKLM\SYSTEM\CurrentControlSet\services\dnscache” /v Start /t REG_DWORD /d 2 /f
Manual –
REG add “HKLM\SYSTEM\CurrentControlSet\services\dnscache” /v Start /t REG_DWORD /d 3 /f
Disabled –
REG add “HKLM\SYSTEM\CurrentControlSet\services\dnscache” /v Start /t REG_DWORD /d 4 /f
Automatic (Delayed Start) –
REG add “HKLM\SYSTEM\CurrentControlSet\services\dnscache” /v Start /t REG_DWORD /d 2 /f
That’s all!!