Microsoft’s OneNote has become extremely handy for taking notes, both typed and handwritten; and for incorporating audio & video files in a single interface, thereby, functioning as a digital handbook. It also comes with a spell check feature that automatically detects spelling mistakes and highlights them for you to change. So, let’s learn how to Show or Hide Spelling Errors in OneNote Windows 10.
When you Right click the highlighted or underlined word it displays a set of suggestions to choose the correct one on the note taking app. However, some of the users have experienced this feature as an annoyance hindering their work. So with the new update, OneNote App in Windows 10 has allowed for users to hide the errors within the document. Here are the simple steps instructing on how to go about it.
Show or Hide Spelling Errors in OneNote Windows 10
OneNote program is available both in the App format in Windows 10 and as a desktop version. Ensure which one you are using.
Show or Hide Spelling Errors in OneNote Windows 10 – App version
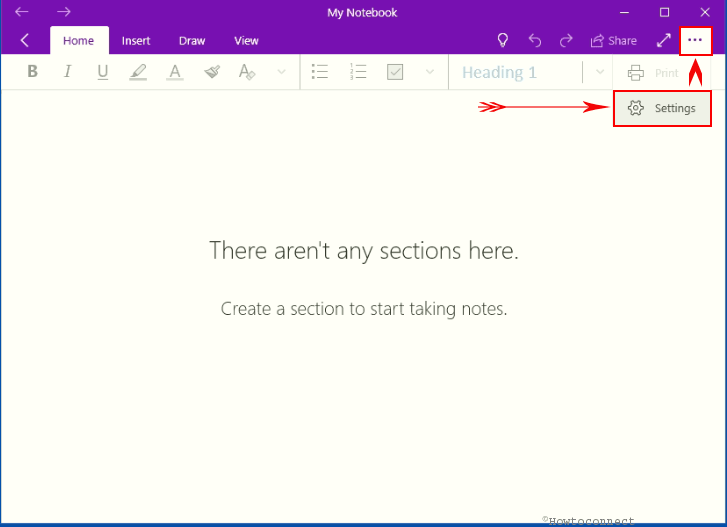
Step-1: If you opt to hide the spelling errors, head to the 3 dots menu at the top right corner of the OneNote App and select Settings.
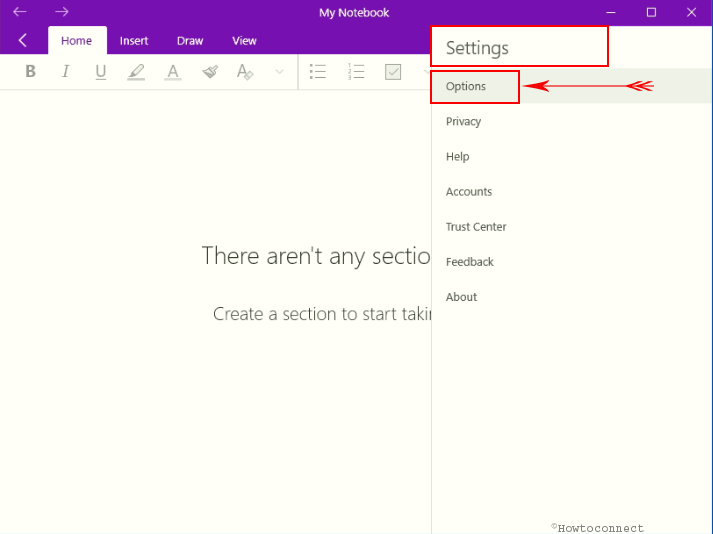
Step-2: Then Navigate to Options.
Step-3: In the options preview, find Proofing and toggle it Off to hide the spelling errors. Leave as it is (default setting) for showing.

Note: In case of involving texts from different languages, you can still check the spelling of each word in the specific one. Right-click the words you want to check and select Set Language. In the lack of any proofing tools in your system, you may be prompted to select.
Show or Hide Spelling Errors in OneNote Windows 10 – Desktop version
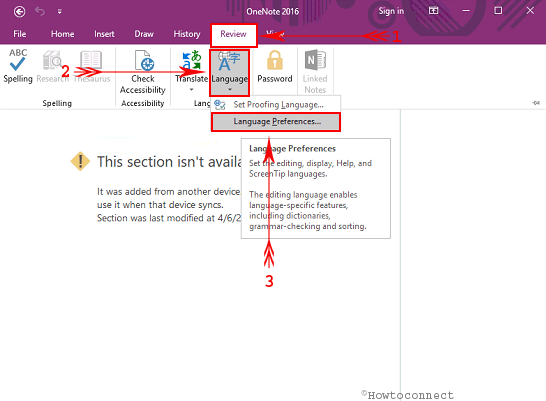
To hide the spelling or grammar errors in the desktop version of OneNote, select the Review tab from the top ribbon. Click on “Language” and proceed to Language preferences.
As the OneNote Options window opens, select Proofing, which appears the third row from the top. The right side displays an option Hide Spelling and grammar errors. Check this one and select OK.
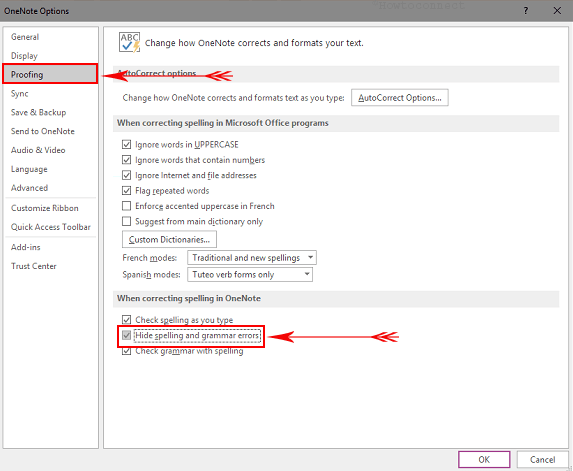
Close the currently running OneNote and reopen the document. To Show again follow the same instructions but uncheck the box next to the Hide Spelling and grammar errors button.