Minecraft is the most played world wide game and people around the globe are still crazy about it. If you have the app, then very recently the team released an update for gamers to Download Minecraft 1.16 Nether Update to various consoles and PCs. The updates include some additional content to keep the gameplay more stable. Generally, to get Minecraft latest update in Windows 11 or 10, all you need is a proper internet connection with auto-update feature enabled.
The update takes place once you start the game but the feature may not work smoothly always. In certain situations, you may not receive the update no matter how many times you have restarted the game. Therefore, a need for a manual check arises and in this write-up, we will discuss some easy ways to update this amazing game in Windows 11 and 10. Let’s start –
Update Minecraft Windows 11 and 10
Here is How to How to Update Minecraft in Windows 11 or 10 –
1] Update Minecraft from Microsoft Store application
The best platform to get an update for any application including Minecraft in Windows 11 or 10 is the Microsoft Store app. Users who are playing this game in Windows 10 or 11 can look into the MS Store for updating. You can follow the below steps to accomplish the task –
- Double-click Microsoft Store icon that resides on the taskbar.
- In the Store UI, click three-dotted See more icon from the top right corner.
- Select Downloads and updates on the context.
- If Minecraft has released an update, you will see that in the pending download queue.
- To start downloading the update, click the down arrow located beside Minecraft.
- If you don’t find any pending update in the queue, click the Get updates option from the UI.
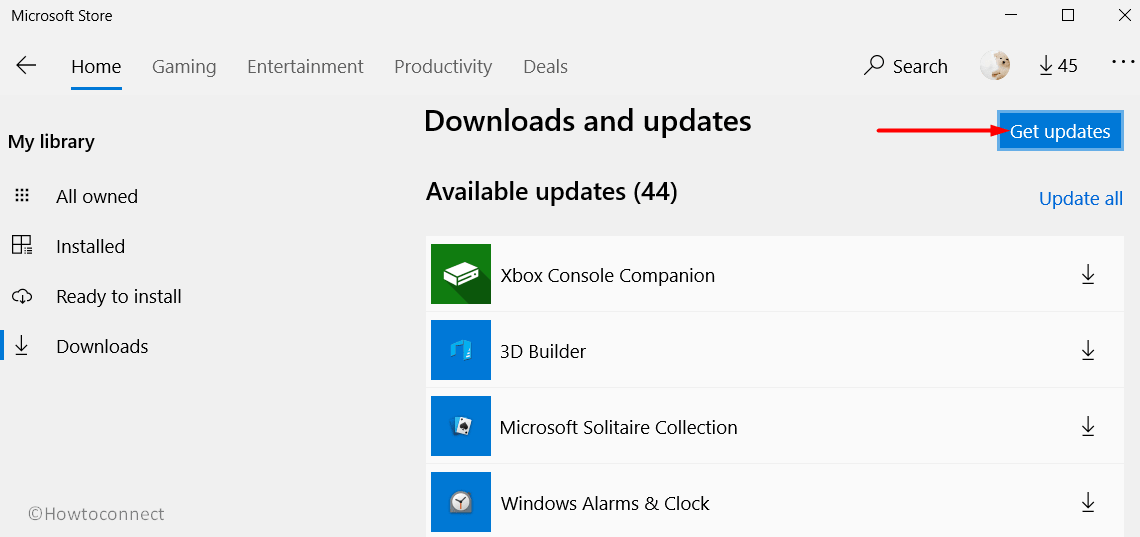
This feature will search for any latest update and you will see them after a while if there is any. Download the latest update once available in the queue upon finishing the search.
2] Update Minecraft in Windows 11 or 10 by Reinstalling Minecraft UWP app
Another easy way to Update Minecraft in Windows 11 and 10 is to reinstall the game itself. The latest version will be installed automatically and you can enjoy recent modifications in the game. To accomplish the task, follow the below instructions –
- Press Win+I hotkeys at once and open Windows Settings app.
- From the UI, click Apps.
- By default Apps & features section on the left pane is highlighted.
- Jump to the corresponding right and locate Minecraft in the list of installed apps.
- Click the app and hit Uninstall button. Hit Uninstall again when the confirmation popup rises.
- Follow the visible guidelines on display to complete the uninstallation procedure.
- Leave the Settings app and Restart Windows 11/10 PC.
- After Windows loads back in the next session, launch the Microsoft Store app.
- Search Minecraft in the Store and click Get button to download it.
- The installation will be followed upon finishing the downloading and you can have the updated version.
3] Use the Force Update feature from the Minecraft: Java Edition
Gamers who are playing the Java edition for Minecraft in Windows 11 or 10, can use this alternate method. The guidelines to have Force Update are as follows –
- Open the Minecraft Launcher first.
- Click the Options button and then select Force update.
- Hit the Login button in order to update the game.
- Finally, press Done.
4] Reinstall the Java Edition of Minecraft
Reinstalling the Java Edition of Minecraft is yet another idea to receive it’s updated version. For that, follow the below steps –
- Press Windows key and R to open Run dialog.
- Type appwiz.cpl and press Enter to proceed ahead.
- When the Programs and Features window arrives, locate the game in the list.
- Right-click on the app and select Uninstall to remove the game from OS.
- If you don’t find the game in the list, press Win+E hotkey together and open File Explorer.
- Click the Search bar on the top right corner and type %appdata% in it.
- Press Enter key to navigate to AppData => Roaming folder.
- Right-click .minecraft folder and choose Delete.
- After finishing the uninstalling process, Reboot Windows 11/10.
- Once the system becomes operational, open the Minecraft Launcher.
- Log in to Minecraft and click the Play button located on Update Notes tab in for installing the latest version.
Methods:
1] Update Minecraft game from Microsoft Store application
2] Reinstall Minecraft UWP app
3] Use the Force Update feature from the Minecraft: Java Edition
4] Reinstall the Java Edition of Minecraft
That’s all!!