Multiple manners to Disable Automatic Restart When System Failure. – A setting exists on Windows 10 (also in earlier editions) which is when in enable state a PC automatically restarts after System failure. As a result, the System unexpectedly starts to reboot after a low voltage or short-lived issues.
This inconvenient situation confuses users often who is unable to detect the real culprit of sudden repeated Restart. So, multiple ways to Disable Automatic Restart When System Failure in Windows 10, we are going to elaborate in further paragraphs.
In addition, when Windows 10 restarts a machine after system failure without a notification ongoing works always remain in danger.
Oppositely, this setting saves machine from possible damage since whenever machine guesses an error, instantly goes into restart mode. Still, the verdict of users indicates to disable it.
The main complicated situation is when the error note that comes with BSOD hardly remains on the screen (less than a second) and before the user can make a note of it, the machine reboots.
But, if you Disable Automatic Restart When System Failure in Windows 10, you can easily note down the error code which will eventually help you in adopting the necessary steps to rectify the crash.
Table of Contents
3 Ways to Disable Automatic Restart When System Failure in Windows 10
1. Control Panel
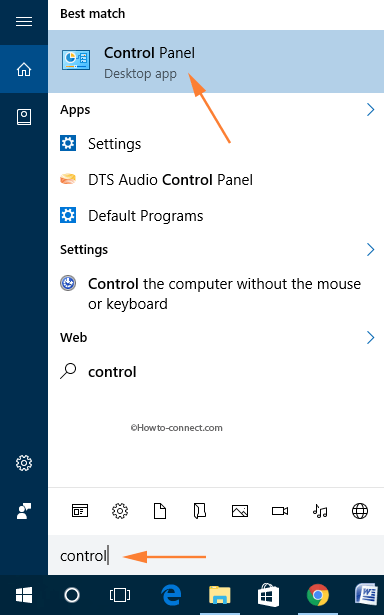
Step 1 – To begin with, open Cortana by tapping Win and S keys. When it arrives on the screen, write in Control panel in the text space. Soon, the Best match will exhibit Control Panel with its icon on the top, hit on it.
Reference – How to Open Control Panel on Windows 10 – Instant Ways
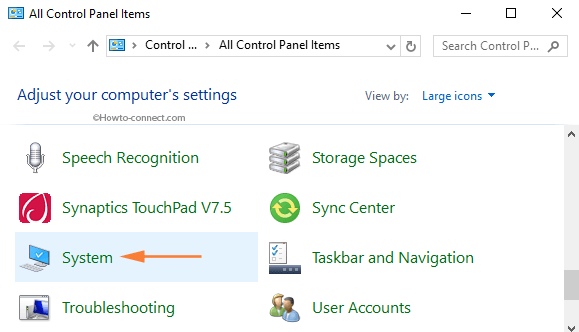
Step 2 – Make the control panel either into small or large icon view, locates System and hit on it.
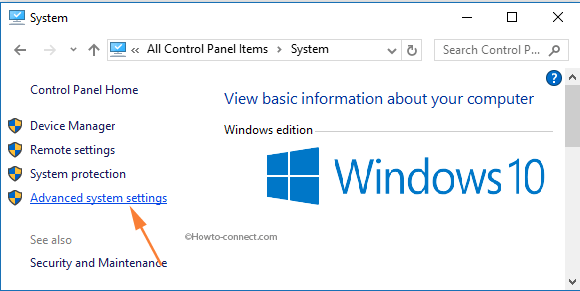
Step 3 – On the left-hand sidebar, click or hit Advanced system settings link.
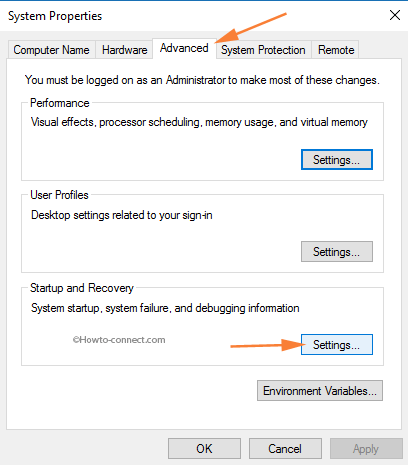
Step 4 – A separate box with a title System Properties will arrive with the Advanced tab on focus. Stay on that tab and move to the last section termed Startup and Recovery. Click or hit the Settings button, located in that section.
Step 5 – Another dialog of Startup and Recovery will arrive. Look at the second section named System failure. Two options are present in the section, clear off the tick mark from the cell Automatically restart.
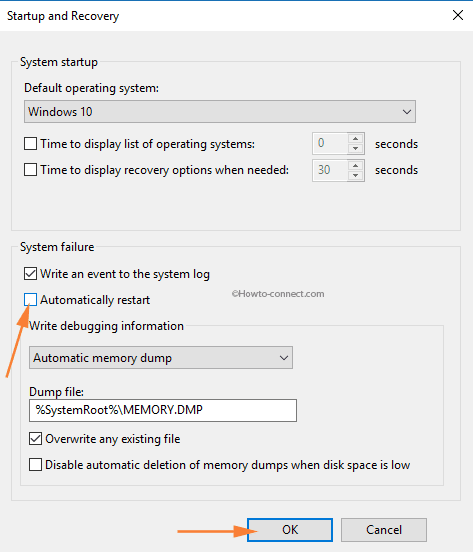
Step 6 – As the last effort, tap or hit Ok button.
Via Registry Editor
Step 1 – The first thing is to write out the code regedit on the Cortana text box. The code regedit Run command will arrive on the topmost part, hit on it.
Reference – How to Access Registry Editor in Windows 10 – 5 Simple Tips
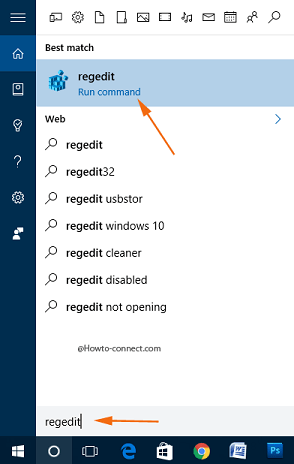
Step 2 – When the UAC prompt comes out on the screen, affirm it by tapping Yes button.
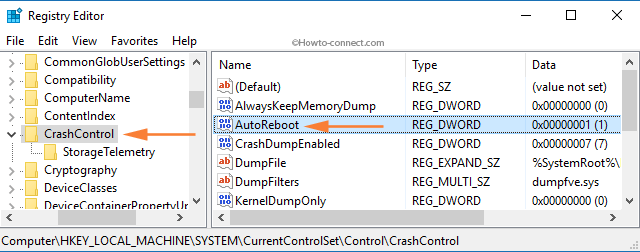
Step 3 – Once the Registry Editor expands on the screen, navigate to the below-written path – HKEY_LOCAL_MACHINE\SYSTEM\CurrentControlSet\Control\CrashControl
Step 4 – Move to the right pane of the CrashControl key, locate a DWORD labeled AutoReboot and double-click on it.
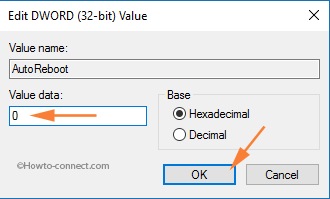
Step 5 – A tiny Edit box appears on the screen, clear off the number 1, type 0 (zero) in Value data text box, and tap Ok button.
Through Command Prompt
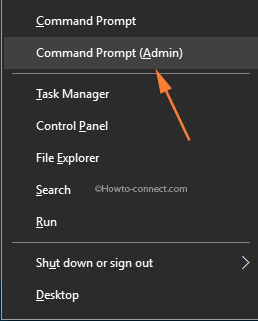
Step 1 – First of all, access an elevated Command Prompt with the technique you are convenient with. However, right-click Start and from the pop up that comes out, hit Command Prompt (Admin).
Reference – How to Launch Elevated Command Prompt on Windows 10
Step 2 – A UAC prompt will strike the screen, tap Yes, and give affirmation to its conditions.
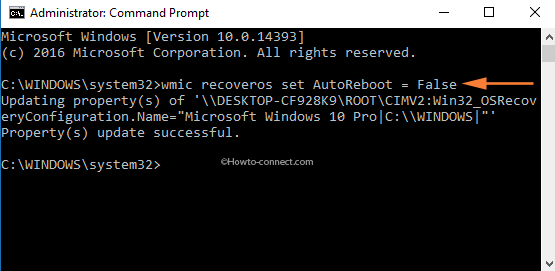
Step 3 – Copy and paste this line of code in the outspread elevated Command Prompt and to implement its effect, hit Enter – wmic recoveros set AutoReboot = False
In order to stay away from an abrupt and unexpected reboot, these are the three familiar methods to Disable Automatic Restart When System Failure in Windows 10.