DVD Drive Doesn’t Read Media in Windows 10 – A considerable number of people are unable to play outsider audio and video files on their devices powered with the newest edition of operating system. On clicking on the DVD drive in This PC area no response is shown. Sometimes the drive opens, but nothing is shown and at other times it hangs. Apart from this, so many diversified issues come and finally, users become unable to play media files. We are writing this article titled Fix DVD Drive Doesn’t Read Media in Windows 10 which will include the assorted solutions for all the issues together. So follow:
How to Fix DVD Drive Doesn’t Read Media in Windows 10
Fix 1 – Update or Reinstall the Driver
To update the driver, navigate to device’s creator web page, identify the appropriate driver there and obey the onscreen instructions on the website to install or update the driver.
You can accomplish it via your Windows 10, see how
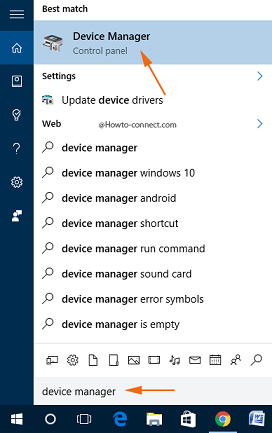
Step 1 – Expand Cortana to get at the search bar is visible at the taskbar, write device manager and soon you will notice an identical name at the uppermost part, click it.
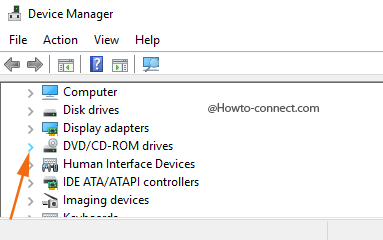
Step 2 – Device Manager will arrive on the screen and you have to expand DVD/CD-ROM drives by clicking the arrow that is located on its side.
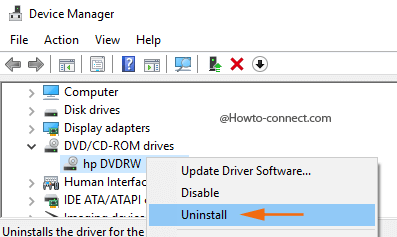
Step 3 – Right-click the CD or DVD devices that you see there and then tap or hit the choice Uninstall.
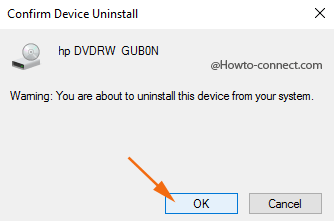
Step 4 – When you are asked to approve that you are sure to delete the particular device, click or hit the Ok button.
Step 5 – Reboot the system and the drivers will be installed all by itself.
If this doesn’t fix up the mess, try the next solution.
Fix 2 – Troubleshooting
On plural PCs, to defeat the mess up DVD Drive Doesn’t Read Media in Windows 10 it is necessary to troubleshoot the component titled as Hardware and devices.
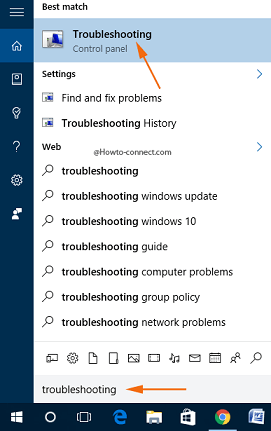
Step 1 – Launch Cortana and write troubleshooting in the box and as the Best result, you will notice Troubleshooting Control Panel is visible, click it.
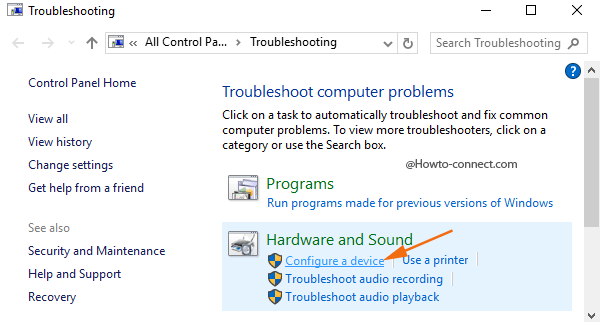
Step 2 – On the Troubleshooting window, look at the category entitled as Hardware and Sound and beneath it click or hit Configure a device link.
Step 3 – The Hardware and Devices wizard will arrive on the screen, pursue the guidelines that are exhibited on it and finish the troubleshooting.
Try the next if this doesn’t fix up your issue.
Fix 3 – Manually Fix Registry Entries
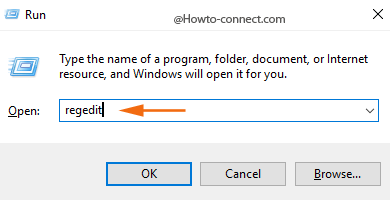
Step 1 – The method needs Registry Editor and hence hit Win & R and in the resultant box write regedit and hit Enter.
Step 2 – UAC will prompt up on the screen, give an affirmative response, i.e., click or hit Yes.
Step 3 – In the Registry Editor, navigate to this path –
HKEY_LOCAL_MACHINE\SYSTEM\CurrentControlSet\Control\Class\{4D36E965-E325-11CE-BFC1-08002BE10318}
Step 4 – In the right hand side portion, look for a registry entry entitled as UpperFilters and do a right-click on it and then click or hit the choice Delete.
Note – If you cannot see any registry entry with a title UpperFilters, you have to erase the registry entry that is entitled as LowerFilters.
Step 5 – When you are asked to affirm the deletion, click or hit Ok.
Step 6 – Now, look at the right portion and locate a registry entry entitled as LowerFilters, right-click on it and click or hit the choice Delete.
Note – If you don’t notice LowerFilters, no worries and see the next solution.
Step 7 – After the deletion is over, reboot the machine and fix up the mess.
Fix 4 – Create a Registry Subkey
Step 1 – Open Cortana and write the code regedit and you will notice the same as a result, click on it.
Step 2 – Navigate this path on the left portion of the opened Registry Editor –HKEY_LOCAL_MACHINE\SYSTEM\CurrentControlSet\Services\atapi
Step 3 – Right-click on atapi, follow New in the contextual menu and click or hit Key in the submenu.
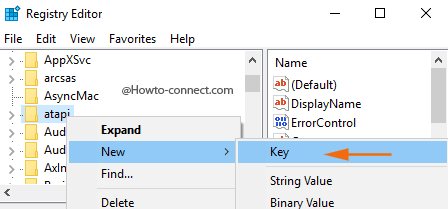
Step 4 – Name it as Controller0 and hit Enter.
Step 5 – Right-click on Controller0 key, point to New option in the emerged menu and then click or hit the choice DWORD(32-bit) Value in the submenu.
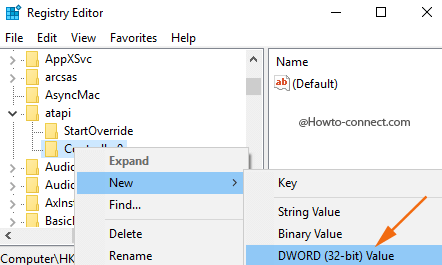
Step 6 – Label this DWORD as EnumDevice1 and hit Enter.
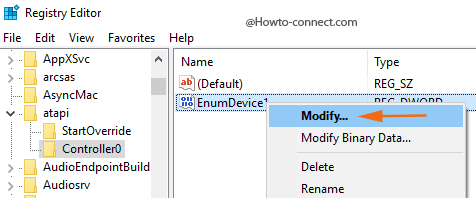
Step 7 – Right-click on EnumDevice1 and click or hit the choice Modify.
Step 8 – In the Edit box, enter the number 1 as its value and click or hit Ok.
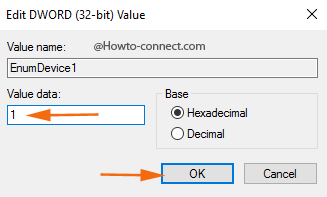
Step 9 – Reboot the machine at the end.
If you are successful to Fix DVD Drive Doesn’t Read Media in Windows 10 since either it gesticulates no response on clicking or hangs moreover manifests diversified flaws by deciphering the steps write your reaction and if you still getting any inconvenience to leave a note below.