Windows 10 April 2018 Update is finally here and is running on many devices like Personal Computers, Tablets etc. It has numerous small features which will go far in removing many issues and improving the OS without actually changing the platform in a big way. But users are reporting about various issues that they are facing during or after installing this latest version. So, here, in this article, we will discuss all the possible ways to Fix Bugs and Problems in 1803.
Whenever there is a new release in the market there will be potential issues in the weaning process as the restructuring of codes and programs may create new errors and compatibility issues even though you carry out many rounds of thorough testing and reviews. A new update can provide many benefits and improvement while there can be some negatives too.
There can be some problems which can be directly related to the version 1803 and there may be some issues which may be because of a configuration change that the user had made previously or drivers may be outdated etc. This article is a collection to Fix Bugs and Problems in 1803 Windows 10 April 2018 Update.
Bugs and Problems in 1803 Windows 10 April 2018 Update Solutions
Loaded with multiple features, this update includes an ample number of features but at the same time creates problem while functioning. There are areas like Camera, Microphone, System Restore where users are experiencing random issues. In addition to these, even errors related to Edge, Cortana also disturbs in the smooth working.
However, some of the interesting features are dictation, muting tags in MS Edge, and Bluetooth pairing. The Fluent Design System is also improved and tweaked. There are a lot of hover effects while using the mouse in the notification center and Start Menu. Furthermore, it also contains a feature of getting a blurred Taskbar. It has many such tweaks and add-ons included in the April Update which will surely make the Windows 10 OS a better platform to work on by increasing its performance, security, and productivity.
Let us now Fix Bugs and Problems in 1803.
1. Get Rid of April Update Error 0x88F0992 Downloading
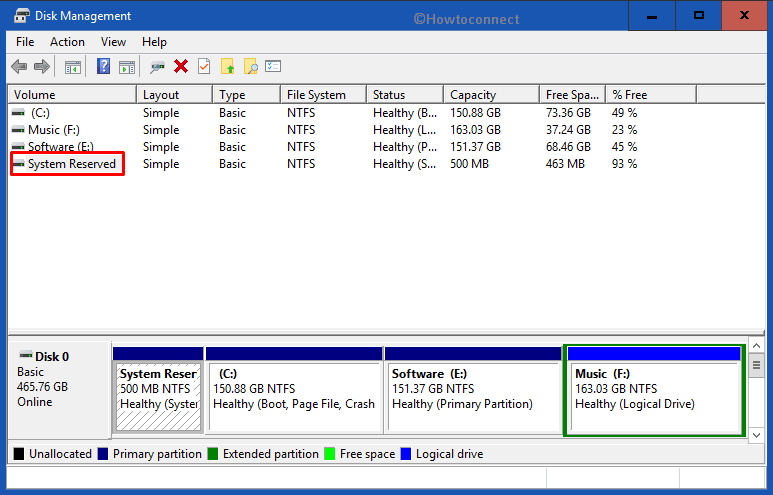
This error signifies that your device has a problem contacting Microsoft Servers for Update. Furthermore, it also signifies that there is no adequate room in the “System Reserved Partition”. These are steps you can follow to resolve this error.
#. Resize System Reserved Partition
It is very uncommon that the System Reserved Partition is small. However, certain third-party applications such as security software may secure data in this partition which eventually creates obstacles while updating Windows 10 version 1803.
So, to bypass this, find a third-party tool to make the size of the partition larger. Else you can also do a clean installation. This will create a partition enough for the running of the Windows Update without any issues.
For reference, read Windows 10 – How to Access Disk Management, Handle Partition.
#. Create Media Creation Tool
There can also be an error in the download of the upload which is error 0x80246007. You can solve the problem by using “Media Creation Tool” and perform a clean installation. Doing so will allow you to generate a separate partition by successfully installing “Windows 10 April Update”.
See: How to Clean Install Windows 10 1803 Latest April 2018 Update.
#. Disconnect VPN
Active VPN connection can be the culprit for this error. To resolve this, simply disconnect the VPN session and then attempt doing the update again.
Follow Windows 10 – How to Remove PPPOE or VPN Connection.
2. Fix Errors in Windows Update while installing April Update
The common way of upgrading your PC is to use Windows Update option. However, using this option may lead to the occurrence of some unwanted errors. But the error numbers or messages will definitely vary from user to user. So, the best way to bypass the problem is to run Windows Update Troubleshooter.
Step-1: Go to Windows Settings by combinedly hitting Win+I hotkeys.
Step-2: Click Update & security when the main interface of the app opens up.
Step-3: Select Troubleshoot section on the left pane of the following page. Jump to its corresponding right side, locate and click Windows Update.
Step-4: Click the button Run the Troubleshooter.
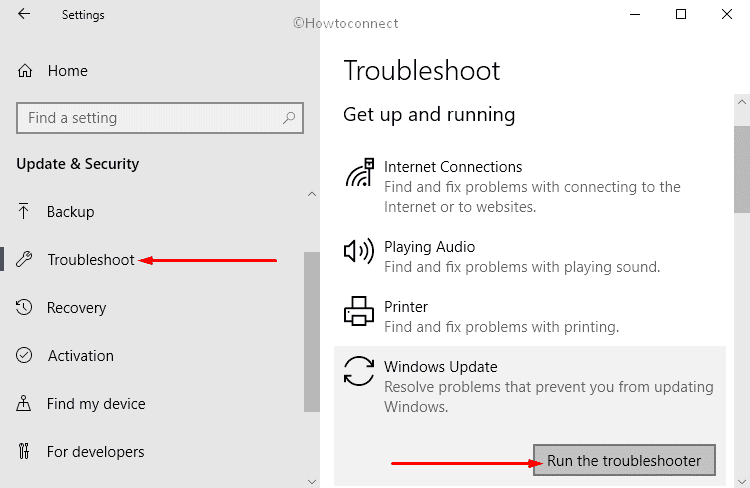
Step-5: Now, let the wizard detect and resolve the issue.
After completing the above-mentioned steps, navigate to Settings => Update & Security =>Windows Update.
Finally, click Check for Updates button so that it can attempt to upgrade for the second time without any further issues.
In addition, the problem may also lie with the Network Adapter too. Therefore, you can run the “Network Adapter troubleshooter” and make an attempt to Fix Bugs and Problems in 1803.
3. Solve Error 0x80070020 Problems in 1803 Windows 10 April 2018 Update
This error occurs mostly when the application user wants to update is conflicting with the mechanism of automatic update of Windows 10. It occurs when a third-party security software or virus is there. The only way to bypass this error is by first performing a “clean boot of Windows 10” and then upgrading the system to the latest version.
See: How to Clean Start Windows 10 PC.
As an alternative, you can also remove the security software, virus or some programs that may be the culprit. To uninstall an application, so the following:
• Launch Settings, the default application of Windows by altogether pressing Win+I keys.
• Go to Apps category and click on it.
• By default, Apps & Features will open in the left pane. Search for the application you want to remove and select it. Click on the Uninstall button.
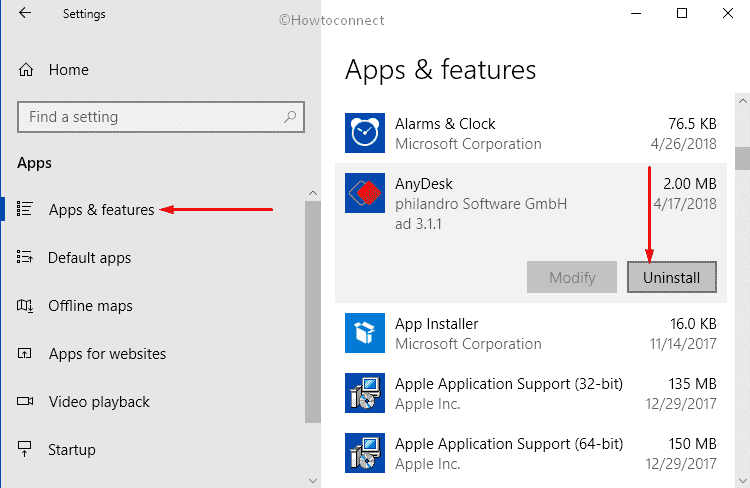
• Again click on Uninstall to confirm the removal.
Repeat the process for uninstalling some other applications and then try to upgrade the system once again.
4. Deal with error 0x80190001 Problems in 1803 Windows 10 April 2018 Update
This error occurs when there is an unexpected problem is encountered while the upgrade is happening.
You can easily bypass this by removing the temporary installation files. So you need to use “Disk Cleanup” to make this happen.
i. Go to Start Menu, type cleanmgr, and hit Enter to proceed.
ii. Select the Drive C: and click OK. Click Cleanup System File button (See image).
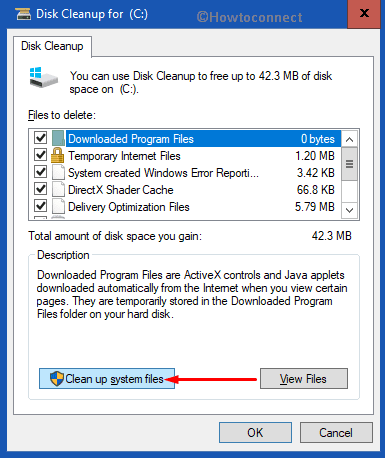
iii. Moving ahead, checkmark all the options including Temporary Windows Installation Files.
iv. Lastly, click OK button to remove all the items and free up space.
After wiping the junk, head to Settings => Update & Security => Check for Updates.
See: Fix Disk Cleanup Not working in Windows 10.
5. Repair the issue of Update not applicable to your device
While updating this OS, users face an error message that says ‘The Update is not Applicable to your device’. This note signifies that the required and mandatory updates are missing on your system which supports the new version of the update. When your PC fails to connect to the internet and you give an attempt to the “USB bootable” media for an upgrade then this error may arise.
To settle down this issue, you have to ensure that the required latest updates are installed before continuing with the April 2018 Update.
Open Start Menu and make a hit on the cog icon on the left sidebar.
Locate and select the category Update & Security.
By default, Windows Update section will appear on the left column of the following page.
Click Check for updates button and let the system scan for recently available updates (See snapshot).

6. Bypass the error 0x80073712 – Damage/Missing update files
While updating Windows 10 you can encounter an error numbers 0x80073712 or 0x80245006. These codes signify the presence of damage files or the missing of mandatory files.
To Fix Bugs and Problems in 1803, you can efficiently use Disk Cleanup tool to remove the temporary files. Once you do this, the update will carry on without any hindrance.
I. Open Run dialog box by jointly hitting Win+R hotkeys.
II. Type in the command “cleanmgr“, henceforth click OK button to launch Disk Cleanup as shown in the below screenshot.
III. On the Disk Cleanup window, click the drop-down and choose Drive C: and click OK.
IV. Click Cleanup System File button.
V. Again make sure to select C: drive and then select the checkboxes Temporary Windows Installation Files and Windows Setup Temporary Files along with others.
VI. Finally, click OK and choose Delete Files button.
Once you delete the files, head to Settings => Update & Security => Windows Update and then click on the Check for Updates.
7. Fix Media Creation Tool Problems in 1803 Windows 10 April 2018 Update
Users also face a various range of errors when they make an attempt to upgrade their PCs using Media Creation Tool. There is an issue related to Dynamic Update. However, here restarting the process will also not solve the trouble and will again interrupt the downloading of installation files.
So, the possible workaround is to launch the process manually by following these steps:
First of all, Open File Explorer.
Navigate to the below-given path –
C:\$WINDOWS.~BT\Sources
Here, double-click the file Setupprep.exe so that the process of upgrade starts all over again.
8. Damaged files on USB Bootable media Problems in 1803 Windows 10 April 2018 Update
While using a USB Bootable media to install the update, many users receive error messages which also leads to the failure of the installation process. The pen drive often contains corrupt files which can be the main cause of the problem.
However, the possible solution is to download the files once again from the Microsoft servers. Then using Media Creation Tool (in short MCT) quickly generate a new USB installation media.
• Visit the official site of Microsoft and click “Download tool now“.
• Next, double-click MediaCreationTool.exe file and access the tool.
• Click Accept button when license terms and notices will appear on the wizard.
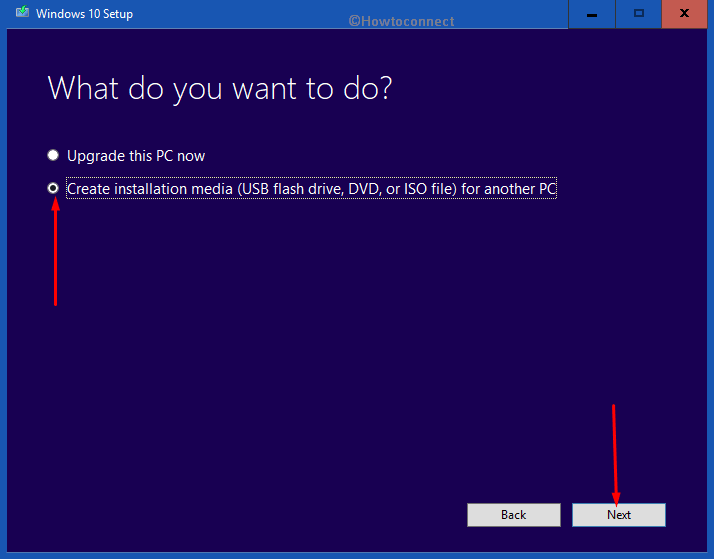
• Moving ahead, pick up the option Create Installation Media for another PC.
• Choose the right Architecture, Language, moreover Edition on the following window and click Next. However, by default, the tool picks up the correct details.
• Proceeding forward, select the option USB Flash Drive and hit the Next button.
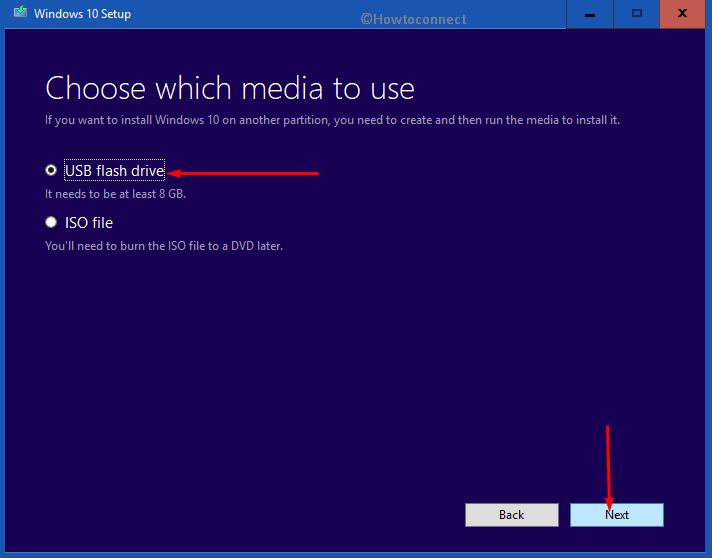
• Select one removable drive and click Next to write files into it.
For the entire instructions, read How to Install Version 1803 Windows 10 April 2018 Update from USB.
9. Solve Download Unable to Progress Using Media Creation Tool (MCT)
When the user tries to use Media Creation Tool (viz. MCT) for the Update, the tool stops in the middle while trying to download any updates before the installation process.
One can resolve this problem by starting the update all over again. Keep in mind that as soon as the Media Creation Tool completes the download of the mandatory files on the system, immediately disconnect the “internet connection” (either WiFi or Ethernet). This will help in creating a timeout for the tool and skip the update process which automatically will jump to the installation process. As soon as the new version is installed connect to the internet and complete the update.
For checking the updates navigate to “Settings > Update & Security > Windows Update” and then make a hit on Check for Updates so that you can immediately download and install the available patch.
10. Repair error 0x8007025D using an ISO file
This error occurs when the ISO file metadata is corrupt and thus the Windows 10 Update will fail.
One can figure out this trouble by creating a new ISO file using the “MCT (Media Creation Tool)”.
Head to Microsoft’s official website and grab the Media Creation Tool.
Once the download completes, double-click “MediaCreationTool.exe” to show it on the PC screen.
If you come across UAC, click Yes and then Accept the license terms and notices.
Next, pick up the radio button Create Installation Media for another PC and hit Next button.
Select the correct “Architecture, Language, and Edition” on the subsequent screen of the tool. Click Next.
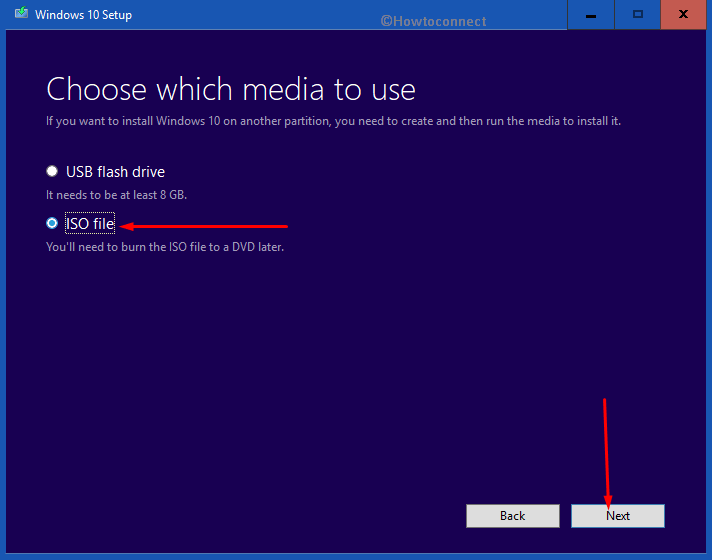
Go to ISO File option and select it. Click Next again.
See the complete tutorial here: How to Download Latest Windows 10 April 2018 Update ISO File.
11. Get rid of storage error during installation 0x80070070
For an upgrade of 32-bit version Windows 10 needs “16GB” free space and “20GB” of free space for 64-bit. If there is the unavailability of the required free space then there is a likelihood of errors to occur while update.
The errors may be as follows:
#. 0x80070070-0x50012
#. 0x80070070-0x50011
#. 0x80070070-0x60000
#. 0xC190020e
#. 0x80070008
To bypass these errors, take advantage of “Disk Cleanup Utility” and free up some valuable space.
Launch Start Menu, type cleanmgr and hit Enter when Disk Cleanup shows up at the Best match.
Select Drive C and hit OK.
When the utility will appear on the PC screen, click the Cleanup System File button.
Moving forward, again make sure that you select the right drive C: and click OK.
Now, select the following items moreover click OK to remove them –
– “Recycle Bin”
– “Temporary Files”
– “Temporary Internet Files”
– “Windows Update Clean Up”
– “Previous Windows Installation”
– “System Error Memory Dump Files”
– “Temporary Windows Installation Files”.
Noteworthy is do not delete the “Windows ESD Installation Files” or “Windows Set up Temporary Files” as without these there cannot be an update. These are mandatory for an update.
Lastly, click the Delete File button to finish the process.
Try installing the Windows 10 Update once again when all the steps are done.
12. Repair Windows 10 before a feature update Installation
This error occurs when you’re attempting to install the Windows 10 April Update on an existing Windows 10 Installation due to lack of maintenance. Usually, if the user has been running the same installation over a long period of time, there are bound to be performance issues.
You can solve this issue by using the “System File Checker” to repair the missing or the corrupt files.
If this does not bypass this, you can even use the DISM Tool.
See SFC /Scannow, DISM.Exe, CHKDSK Windows 10.
13. Resolve error 0x80070522 during Windows 10 April Update
This error occurs when the installation of Windows 10 version 1803 is done using an account which does not have administrator authorities.
The possible solution to Fix Bugs and Problems in 1803 to ensure that you sign in using your Admin account details. Moreover, you can ask a person who has the right privileges to sign in for the Windows 10 Update to take place flawlessly.
14. 0x800F0923 Compatibility Error Problems in 1803 Windows 10 April 2018 Update
0x800F0923 error occurs when there is an issue regarding compatibility of the Application or there may be a problem with a Device driver. This could be due to a compatibility problem with an old security application or software, or the outdated driver, or if there is an issue with the graphics driver.
Note: How to Identify if a Driver is Causing Issues in Windows 10 with Verifier.
If the device was working fine before the Windows 10 April Update then it is really difficult to understand the program or the driver which created the problem. Hence, you can use the “Media Creation Tool” for the update.
In case, the installation is not smooth then you will know the issue that is creating the problem in a report. If the issue is related to a driver then you can simply grab the latest driver from the respective “manufacturer’s website”.
When there is no problem with the driver and you still get compatibility error, then remove the driver temporarily for the installation of the update to take place. However, after finishing the update, you can re-install the driver.
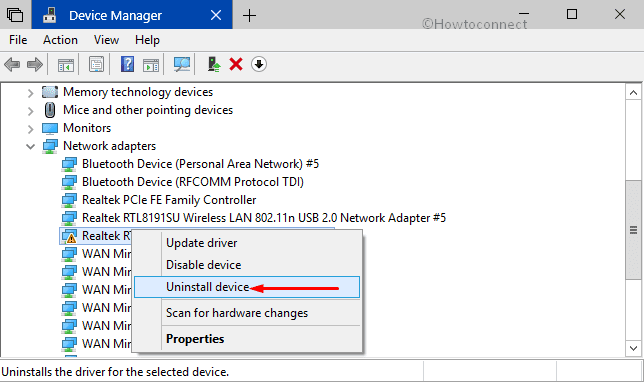
01. To remove the driver, first, jointly hit Win+I hotkeys. Locate and make a hot on “Device Manager“.
02. Go to the device that is causing the problem and expand it.
03. Right-Click and then go to Uninstall device and then click on it.
After completing the steps give a shot to the Windows 10 April Update on your computer.
Apart from the above-mentioned error, there may be other troubles which could automatically rollback the version 1803. For such situations, you must uninstall the drivers once again in a similar manner and then reinstall them later on. The errors are:
“0x80070490 – 0x20007”: Multiple device drivers incompatible
“0x80070003 – 0x20007”: Upgrade was unsuccessful during the Driver Installation Phase.
Regarding the compatibility issue, you can download the latest patches from the website.
In case there’s an app which is interfering with the April update, you can uninstall the particular app and continue with the update. Steps to remove the faulty app –
a. Open Settings by launching Start Menu and clicking the tiny cog icon.
b. Go to Apps category and click on it.
c. On the right pane of the following page, search for the application that you prefer to remove. Once you find the app, select it and click Uninstall.
d. To confirm the uninstallation process, again click Uninstall.
After doing these steps, try installing the Windows 10 April update on your computer once again.
15. Get rid of Accidental Restart error 0x80200056
This error occurs when there is an Accidental Restart during the installation. This is not a serious problem and so get ensure that you can easily fix it.
Therefore, you can restart the installation so that it completes successfully without further complications.
Also, read a fix to another restart trouble – How to Fix The Computer Restarted Unexpectedly Loop in Windows 10.
16. Problems in 1803 Windows 10 April 2018 Update when completing the installation
While installing a quality update or feature update, you may face two kinds of errors. They are:-
I. “Error: We could not complete the update. Undoing changes. Don’t turn off your computer”.
II. “Error: Failure configuring Windows changes. Reverting changes”.
Although these are common, you should take care of them immediately but you need to first locate the exact error to find a solution.
How to find the exact error? Go through the Windows update history. This information will help you pinpoint the trouble and once you find it, proceed to find a solution.
• Open Windows Settings and navigate to “Update & Security”.
• Click Windows Update on the left sidebar of the next page.
• Next click the link View Update History on the corresponding right side pane.

• Click the error code for the particular update which failed during installation.
17. Fix Software compatibility error 0xC1900208 during installation
This is an error of non-compatibility. When you see 0xC1900208 understand that one or more of the programs are not compatible with the present version of Windows 10.
Being a common problem, the fastest way to get around this compatibility problems while installing this Update is to “uninstall the application” that is creating the issue. The reason for the error is the presence of third-party antivirus or another type of security software.
To uninstall the application on Windows 10, first, navigate to Windows Settings. Then head to the Apps category.
Select the apps that are incompatible and hit the Uninstall button.
Click the Uninstall button again to complete the process
If you are uninstalling a classic desktop application (win32), take care to follow a few more additional steps as given by the uninstaller to Fix Bugs and Problems in 1803.
18. Solve Activation Problems in 1803 Windows 10 April 2018 Update
In general, Windows 10 reactivates itself when we install the OS. But it may not work perfectly all the time. In the unusual circumstance where activation fails after installation of Windows 10 April update, you will face a Windows Not Activated message with Error 0x803F7001 in the Settings app.
Now the good thing is you have “Activation Troubleshooter” in the Settings app to fix any glitches in the activation process of installation of Windows 10.
In uncommon situations, if the system still fails to activate, wait a few days to see your computer “reactivates automatically”.
19. Bypass errors 0xC1900200, 0xC1900202 – Minimum Hardware Requirements
In some cases, and almost rarely you come across errors 0xC1900200 and 0xC1900202. This means that your device lacks the minimum hardware requirements to install this new version of Windows 10 April 2018. Rest assured these codes will not occur when you upgrade from the previous release of Windows 10. But If you are installing on an older machine on which you had installed the original version of Windows 10 back in 2015/16, this error is sure to occur. Hence it is important that you keep updating your OS to Fix Bugs and Problems in 1803.
This makes it important to know the minimum hardware requirements of a system to install the Windows 10 version. See Windows 10 April 2018 Update System Requirements.
This error, therefore, occurs only on low-end devices. Hence the only way to solve your problem is via hardware upgrade or upgrading the RAM. This is the time to think of changing to a newer device.
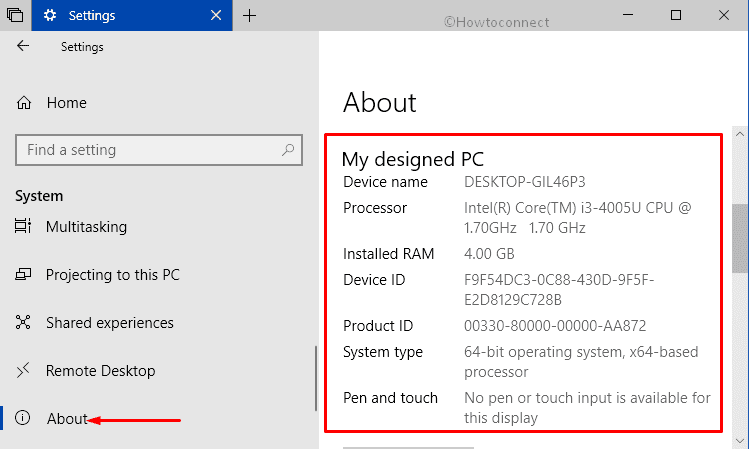
To find the hardware specifications of your device, follow the steps given below.
1. Go to Settings, the built-in application of the system.
2. Click the first category System.
3. Click About on the left sidebar and on the corresponding pane you will find the details of the system.
20. Repair Microphone Problems in 1803 Windows 10 April 2018 Update
After installing Windows 10 version 1803, few of the users find that their microphone does not pick up any sound although it is detected on their computer.
To solve this problem, the best way is to “enable Microphone” in the Privacy settings using the following steps.
# Open Windows Settings.
# Click on Privacy.
# Select Microphone on the left pane.
# Turn on the toggle switch “Allow apps to access your microphone“.
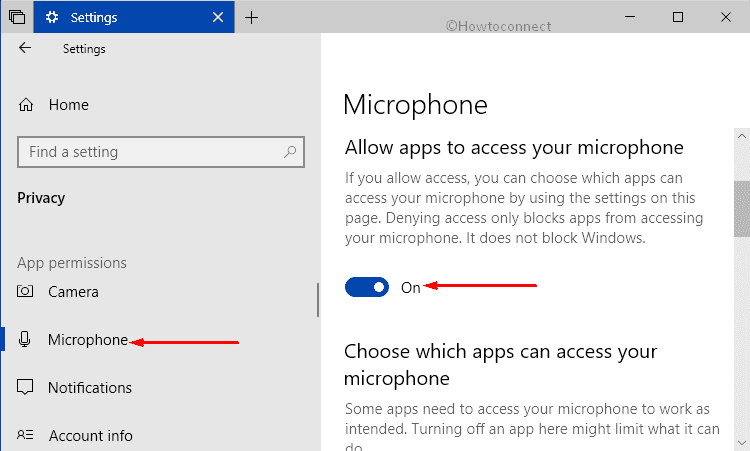
Next is to check the apps for checking if they are accessing the microphone, or Allow apps to access your microphone option is switched ON. If not, you need to change the toggle switch toFix Bugs and Problems in 1803.
21. Repair slowing down of Alt + Tab action during gaming after installing April Update
Once Windows 10 April Version 1803 is successfully updated, some users find that the shortcut “Alt+ Tab” on the keyboard works very slowly. The problem may be due to the Focus Assist Settings.
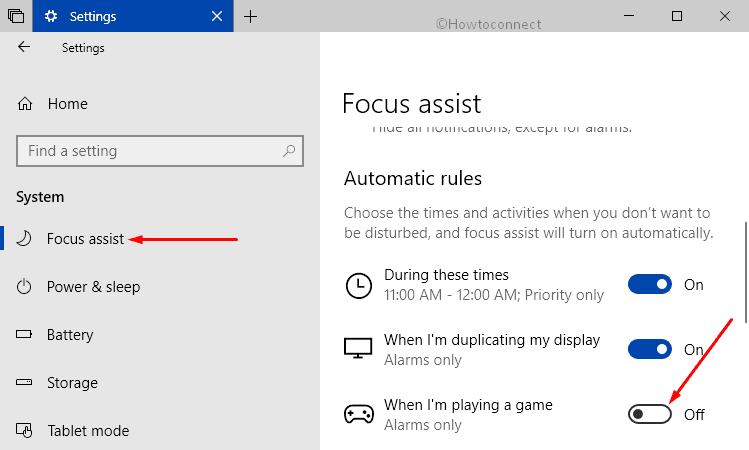
To overcome this, disable the gaming automatic rule by going through the following steps–
• Launch Settings on your system by using any of your preferred ways. However, the quick method is to hit Win+I hotkeys.
• Click on System, the first category.
• Choose Focus Assist on the left sidebar of the following page.
• Turn off “When I am playing a game” toggle switch under the “Automatic rules” section.
To know more about this feature, read How to Automatic Turn on Quiet Hours for Set Rules in Windows 10.
That must Fix Bugs and Problems in 1803 and you may enjoy gaming.
22. Resolve stuck Update Assistant Problems in 1803 Windows 10 April 2018 Update
What is an Update Assistant? This is a tool that Microsoft has designed to help users in updating their Windows 10 devices automatically. But unfortunately, this does not work in some cases.
Yet, if you use the assistant to update the system, it may sometimes stop at 76% progress or in some cases at 99% progress and gets stuck there for hours together. This can be quite frustrating for users.
When this happens, one has three alternative solutions to look at –
1. Disconnect the computer from the internet for a couple minutes, and reconnect it again to continue with the download.
2. Restart the device and use the Assistant again.
3. Conduct an in-place upgrade by using the “Media Creation Tool”.
23. Fixing New HDD Partition suddenly appearing post the installation of Windows 10 version 1803
After installing theWindows 10 update some users expecting to enjoy the newest Windows experience, find an additional drive running out of space in the File Explorer as reported on Windows Forms.
It happens to be a drive of 449MB with an empty space of just 49MB that classically uses the nomenclature as F Drive and marks itself as an OEM partition.
This is essentially a recovery partition and hence should not be deleted but it can be hidden. Here are the steps for hiding the partition.
i. Go to Start Menu and type cmd.
ii. When you find it, right click on it and Run as Administrator.
iii. Write the following command and hit Enter. This will start DiskPart (disk partitioning tool).
DiskPart
iv. Input the following command to list all the volumes and press Enter.
list volumeT
v. Proceeding forward, insert the below-given command to select the volume that is in question and hit Enter.
select volume FW
vi. Next, to hide the drive in question, type the below command and press Enter. Be cautious in this step so that you don’t delete the drive but just hide it.
Remove letter=FC
vii. Finally, close the Exit command by inputting the following command.
DiskPart
After all these commands, the drive F will disappear from the File Explorer but will typically be present in the computer.
It is believed that Microsoft is aware of this problem and will soon be releasing a cumulative update that will completely Fix Bugs and Problems in 1803.
24. Settle the problem of missing Nvidia settings after installing Windows 10 April Update
This is an issue that happens when Windows 10 April Update is installed successfully on the device in many cases causing some inconvenience to the users.
You can easily settle this by quickly downloading and installing the latest “Nvidia drivers” from its website. Input the correct details of your Nvidia graphics card to continue with the download.
25. Get rid of Black Screen Problems in 1803 Windows 10 April 2018 Update
This is an unusual kind of problem to cope with. Once the Windows 10 April Update is under installation, strangely, a black screen appears and interferes with the user experience. Although this is a very uncomfortable issue, one has to reconcile and find a solution.
This occurs during the installation process due to –
• A problem while installing the feature update.
• The quality update not installing in the right manner.
• Some problem with the graphics driver.
• Problem with a piece of hardware on the computer.
Firstly, one may decide to wait for some time so that the problem resolves on its own. But if it takes longer than a couple hours, in all probability, the installation process is stuck somewhere and may not complete ever.
If this happens, then shut the computer down completely. Mostly, as the processor is still running, the computer may have to be forced to ‘shutdown’ by holding the power button for 10 secs or till it shuts off. If it doesn’t happen like that, you may have to remove the battery of the device, provided it is possible to do so. Remove the power cord from the power source in case of desktops.
Next step will be to detach all non-essential external peripherals such as printers, gaming controllers, secondary monitor, printers, phones, external storage and if possible, cut off Wi-Fi.
Let the computer stay idle. After some while, connect the battery and not the external peripherals and switch on the computer. If your black screen problem was just a small issue, the installation process will restart and complete successfully.
If the installation process does not complete, you have to follow these steps –
a. Keep the peripherals disconnected as you did earlier.
b. Reinstall Windows 10 manually, or upgrade manually again if you are trying to upgrade to Windows 10 version 1803. The process is best if you use a USB bootable flash drive to install or upgrade the OS.
If nothing works, one has to ‘roll back’ and get to the previous version of Windows 10.
26. Get rid of the wrong edition of Windows 10 installed by the upgrade process
Sometimes, during the process of upgrading Windows 10, an earlier version of it is installed instead of the latest edition. This is just a reminder that you should perform any upgrade after a complete “backup of data” as the early installation of a new software will generally have a few issues.
The best method to Fix Bugs and Problems in 1803 is to rollback and reverses the installation to the previous version of Windows 10. Once you get back to the earlier edition, you can use an alternative process to upgrade the system. Or wait till the bugs are cleared and you can install a clean version of this new edition.
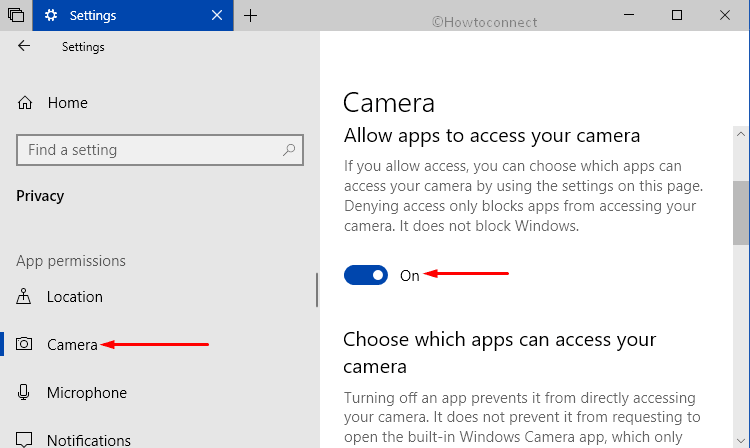
27. Fix Camera access Problems in 1803 Windows 10 April 2018 Update
There is another common problem with Windows 10 update as many users find that the device camera is not accessible to a number of apps. But this is a deliberate attempt by Microsoft to increase the privacy of the users.
See similar Camera fix: Fix: ‘We Cannot Find your Camera Error 0xC00DABE0 / 0xA00F4244’ in Windows 10.
If you want to let the camera be accessed by any app, you will have to open Settings and in Privacy, navigate to Camera section, toggle ON the option namely “Allow apps to access your camera“.
28. Fixing GPU issue installing Windows 10 April Update
Some users find that after installing Windows 10 version 1803, they encounter a message, “Cannot install app, hybrid laptop with discrete GPU connected to display. Please uninstall manually and refresh”.
This may be happening with Dell’s Alienware computers. Even re-installation of the graphics drivers does not seem to resolve this particular issue.
The only way Fix Bugs and Problems in 1803 is to go back and reverse the update process in order to get to the earlier version of Windows 10 and wait for a permanent fix. This is because Microsoft has acknowledged that a problem exists in certain Alienware editions of Dell laptops and blocked the installation in such devices. We suggest users to wait for a fix from Microsoft.
Observe these steps to recover the older version of the OS.
01. Go to Windows Settings > Update & Security > Recovery.
02. Hit the Get started option under the heading “Go back to a previous version of Windows 10”.
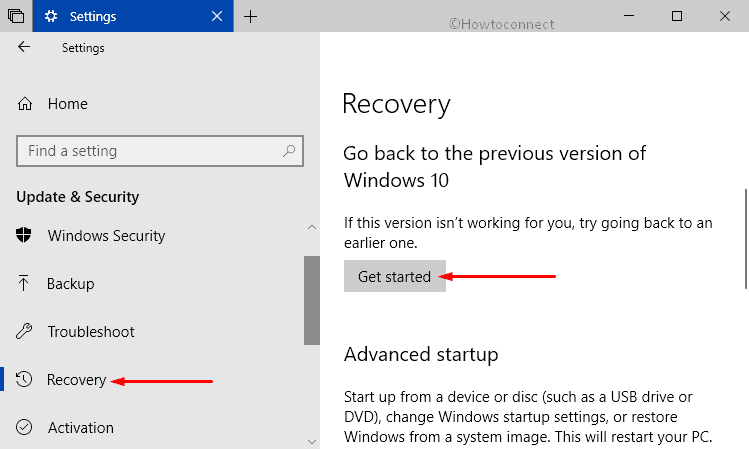
03. After selecting an appropriate reason, click on Next.
04. Select No, thanks option and click on Next button twice.
05. Lastly, select “Go back to earlier build” to start restoring to the earlier version of Windows 10.
29. Fixing disabled System Protection on installing Windows 10 version 1803
“System Restore” is usually disabled by default on Windows 10. But many users enable this feature after changing settings, installing an update or an application. However, after installing the Windows 10 April update, the System Protection feature is once again disabled without user’s consent.
In case you need System Protection feature to be enabled again, follow these steps –
I. Go to Start Menu and type “Create a restore point”. Click on the result that Cortana shows up.
II. Go to Protection Settings, and select the system drive, which is usually C:\.
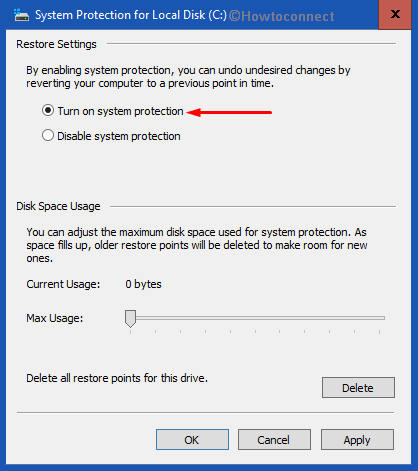
III. Click on Configure button.
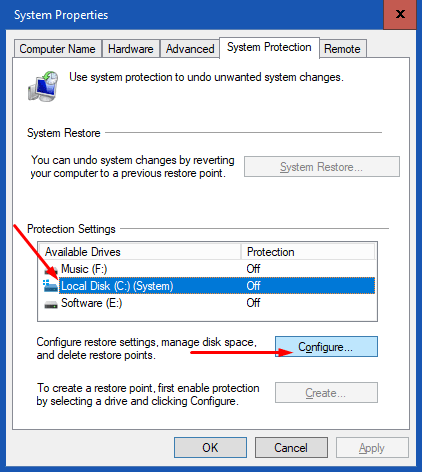
IV. Click on the option Turn on system protection, which at this point would’ve been toggled OFF. Finally, select Apply and OK.
Whenever such changes are done, recheck the settings to see that System Protection is enabled.
For reference, read How to Schedule System Restore Point to Create at Startup in Windows 10.
30. Repair Auto enabled Fast Startup Problems in 1803 Windows 10 April 2018 Update
This is a feature that helps your computer boot faster. Many users like to keep this option disabled as it is bound to cause some issues on their devices. However, upon installing Windows 10 version 1803, the Fast Startup option gets enabled without the user’s consent.
In case you want to disable the Fast Startup, follow these steps outlined below –
#. In the Start search box, type “cp” and click on the result, Control Panel Desktop app.
#. Go to Hardware and Sound > Power Options.
#. Select the option on the left- “Choose what the power buttons does“.
#. Then select the option- “Change settings that are currently unavailable“.
#. Scroll down to Shutdown settings, and here select the toggle switch for Turn on fast startup button to turn it ON or OFF based on the user preference.
Hopefully, you will now be able to Fix Bugs and Problems in 1803 by following the above guidelines carefully.
One more… Since the update, my three Seagate external drives have become inaccessible. They snap on through the USB fine and they show up in the device manager under the drives section, but they are not assigned a drive letter and the Seagate drive tools can’t find a volume on them. All applicable drivers are up to date (Seagate doesn’t have any device specific drivers available).