The problem we are going to discuss here can occur when upgrading by any method whether through Update assistant, automatic mode, or Media creation tool. Moreover, sometimes this will trouble when you try to install or update applications from Microsoft Store by causing the process to fail and showing a message. However, we have covered this issue earlier in – How to Fix 0x80248014 Windows 10 Update error WU_E_DS_UNKNOWNSERVICE but it needs more attention.
Error 0x80248014 generally shows up because of malfunctions in components or missing the associated files. The message that will come across during this occurrence in Windows 11 or 10 is “Error 0x8024801, There were some problems installing updates, but we”ll try again later.” Windows Update failures occur due to a variety of factors, including insufficient disk space, problems with internet connectivity, damaged Windows Update Components, etc.
Error 0x80248014 in Windows Update
Here is how to fix error 0x80248014 in Windows 11 or 10 –
Way-1: Launch the Windows Update Troubleshooter
Windows Update Troubleshooter is a built-in program that detects problems and restores the related settings to default. Running this tool will likely solve 0x80248014 error automatically.
- Click on Start.
- Type – Control Panel.
- Press – “Enter”.
- Change the “View By” setting to “Large icons“. See – How to Make Windows 10 Control Panel Icon Size Bigger.
- Click – Troubleshooting.
- Choose the option Fix problems with Windows Update from the right pane.
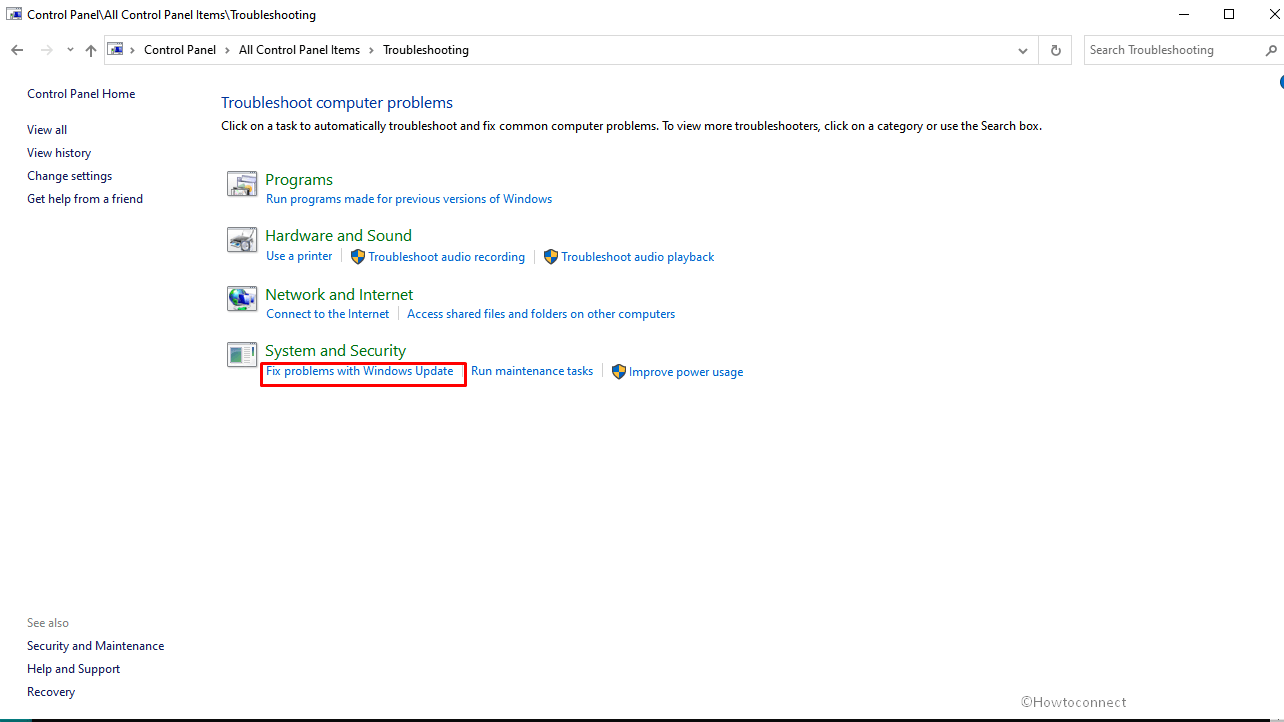
- Troubleshooter window will appear; select – Next.
- Close the ‘Troubleshooter’ then restart your system.
Way-2: Reset the Windows Update Component
Windows Update Component is a crucial element of the process that includes the associated services and SoftwareDistribution having deciding folders. A faulty component may be a culprit for any errors you see while updating Windows. Luckily, you can reset the Windows Update Component using manual method or PowerShell script without any risks and hazards. This post elaborates the same – How to Reset Windows Update to Default in Windows 10. Let’s see an easier way aka using PowerShell script –
- Press Window and R.
- Type – cmd.
- Hit – Ctrl + Shift + Enter.
- Select Yes on the confirmation prompt.
- On the command prompt copy-paste below lines one by one, and press Enter each time –
net stop wuauserv
net stop cryptSvc
net stop bits
net stop msiserver
ren C:\Windows\SoftwareDistribution SoftwareDistribution.old
net start wuauserv
net start cryptSvc
net start bits
net start msiserver
ren C:\Windows\System32\catroot2 Catroot2.old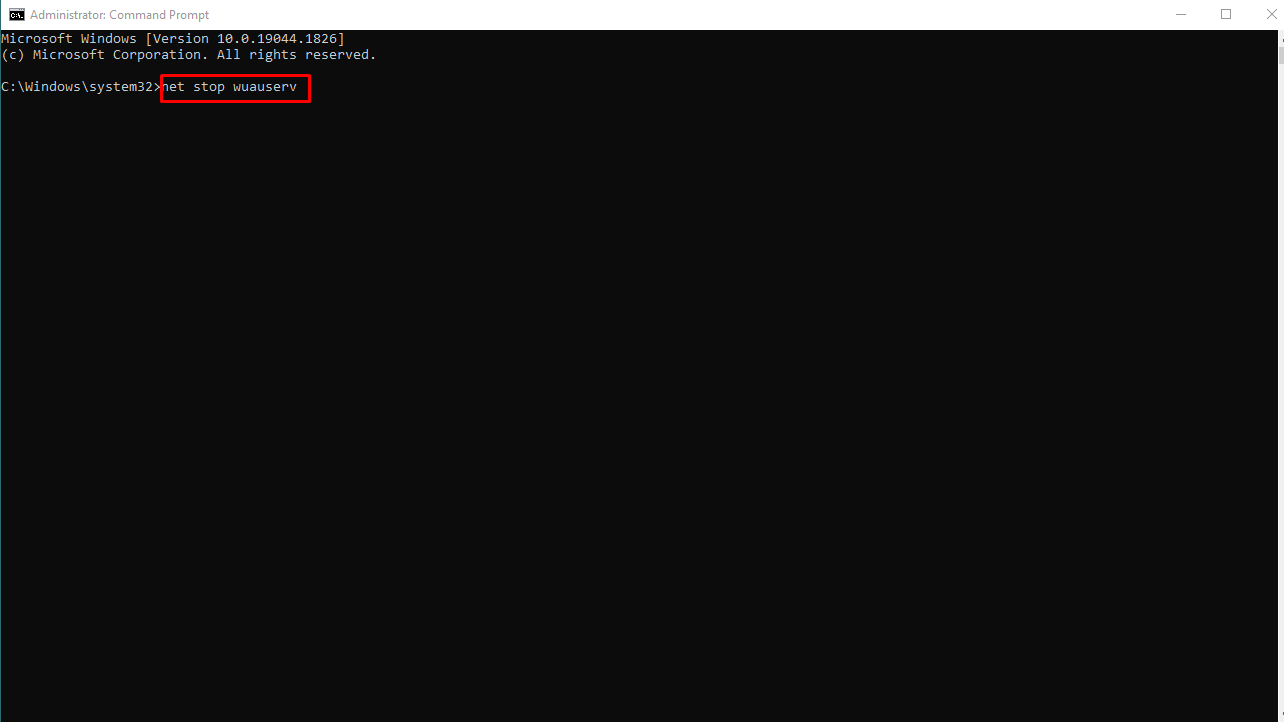
- Restart the system and check if the error 0x80248014 is solved.
Way-3: Reset Windows Store Cache
Store error 0x80248014 is also prevalent in addition to the same code with Windows update so it also needs remediation. Because Reset store cache is all-in-one solution to problems with the application this single method has the ability to fix this message appearing when installing or updating apps. Follow the steps –
- Click on Search from the Taskbar.
- Type – WSReset.exe.
- Select the same command from result.
- Allow the syntax to complete its task through Command prompt and Windows Store open.
See – 5 Ways to Reset Microsoft Store in Windows 10.
Way-4: Verify the status of Windows Update Services
Access the Services tool and verify that the services associated with Windows Update, for example, “Windows Update Medic”, “Windows Update”, “Update Orchestrator Service”, etc., are not disabled:
- Right click on Taskbar.
- Select Run.
- Type – services.msc.
- Hit Enter to launch the Services tool.
- Set the services Startup types as given below –
1] Manual – Windows Update Service or wuauserv (Triggered).
2] Services for Windows Update Medic or WaaSMedicSvc – Manual.
3] Automatic Cryptographic Service or CryptSvc.
4] Manual – Background Intelligent Transfer Service or BITS.
5] Automatic – DCOM Server Process Launcher or DcomLaunch.
6] Automatic – RPC Endpoint Mapper or RpcEptMapper.
7] Manual – Windows Installer or msiserver.
Way-5: Manually Install the Windows Update
This is one of the best methods to fix Error 0x80248014 in Windows 11 or 10. Using KB number, conduct a search for the patch on Update Catalog website and grab the standalone copy of installer. Now manually apply the patch by following the instructions –
- Start with knowing the patch number of the updates from Settings > “Update & Security > View update history”.
- Now navigate to Microsoft update catalog.
- Type the KB number in the search box.
- Hit Enter to have the results in front.
- Locate the file having architecture identical to the architecture of your CPU.
- Click on Download.
- Go to the location where the standalone file is kept and double-click on it.
- Click on Yes if prompted.
Way-6: Run a Virus Check
Use a Full scan to look for and eliminate any viruses or dangerous programs that could be running on your system. Several malicious codes can not only interfere with Windows update installing process but also steal your data. Move with the steps under and remove them –
- Click on Start.
- Type “Security”.
- Hit Enter to launch Windows Security app.
- Choose the option ‘Virus & threat protection.
- Select the link Scan options.
- Check the – ‘Full scan’.
- Finally, click on – Scan now.
- In case, you have already third-party anti-malware run a thorough scan using that.
- When finished reboot the device and check if the error is resolved.
Way-7: Rebuild or Recreate the Software Distribution Folder
Windows 11 or 10 stores its Updates in the SoftwareDistribution folder (aka “C:\Windows\SoftwareDistribution\Download“). In order to download and install updates from scratch, this folder may occasionally become corrupted, and you will need to recreate it. Follow these steps to recreate or rebuild the “SoftwareDistribution”:
- Press – Win+R.
- Type – services.msc.
- Click – OK
- Right click on – Windows Update service.
- Select – Stop from the Context menu.
- Then, open Windows Explorer (Win+E) and go to: C:/Windows/.
- Locate the SoftwareDistribution folder and remove it.
- Restart your computer.
- Go to “Windows Update Settings” and click on Check for updates.
Way-8: Clear the Catroots2 folders’ Contents
You might want to try emptying the catroot and catroot2 contents to see if it helps. These folders contain files and ‘folders’ having signature of Windows Update package.
- Go to “C:\Windows\System32\catroot2” and ‘delete’ all items there.
- Similarly access “C:\Windows\System32\catroot2”. Select all the files and folders in the directory and press Delete.
- Restart your computer and recheck for updates.
Way-9: Restart Windows PC
To ensure maximum performance, you should reboot the Windows 10/11 device once a week at least. Some users inform that only restarting the system has solved error 0x80248014 in Windows 11 or 10 for them so you can give an attempt to it
Way-10: Remove Unnecessary Temp Files
A built-in function in Windows 10 and Windows 11 following their predecessors allows users to delete temporary files. To remove any superfluous transient files go with the instructions below.
- Click on – Search.
- Type – cleanmgr.
- Press – Enter.
- On Disk cleanup small pop-up, click on OK.
- Select Clean up system files on the next window.
- Again choose OK
- Check all the boxes under “Files to delete” section.
- Click on OK and then on Delete Files.
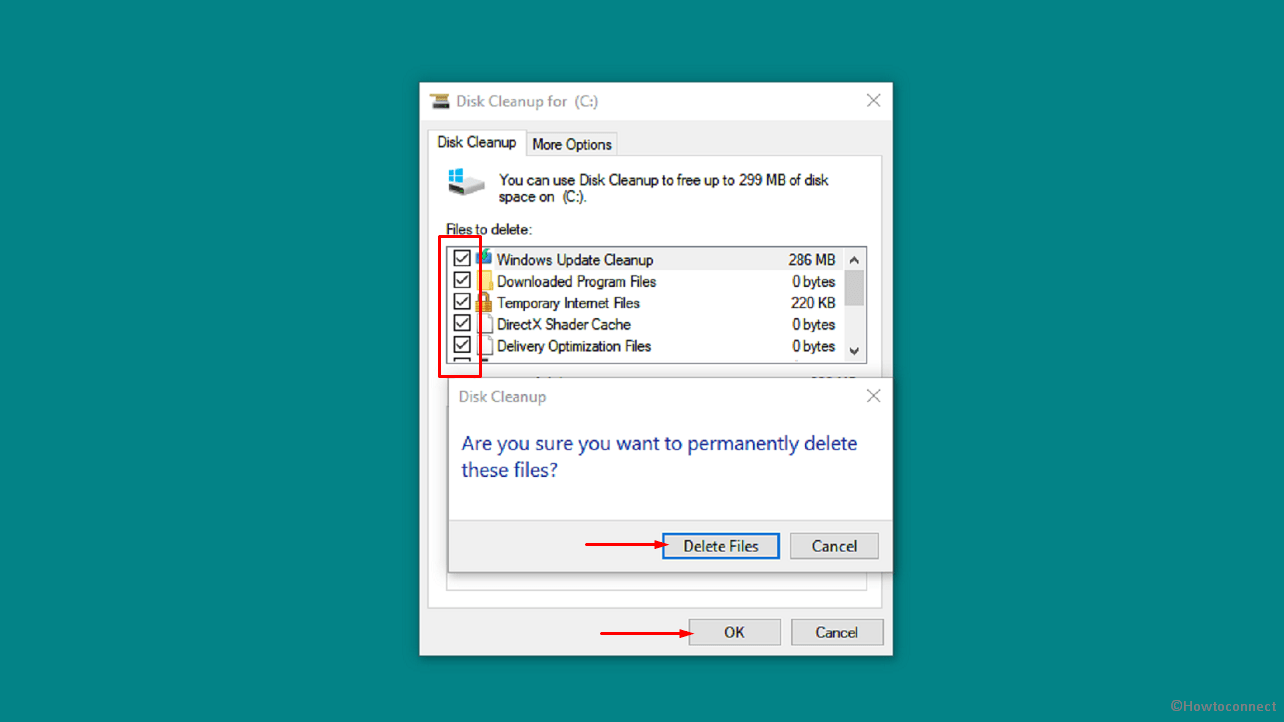
- Restart the PC and check if Error 0x80248014 no longer occurs.
Methods:
Way-1: Launch the Windows Update Troubleshooter
Way-2: Reset the Windows Update Component
Way-3: Reset Windows Store Cache
Way-4: Verify the status of Windows Update Services
Way-5: Manually Install the Windows Update
Way-6: Run a Virus Check
Way-7: Rebuild or Recreate the Software Distribution Folder
Way-8: Clear the Catroots2 folders’ Contents
Way-9: Restart Windows PC
Way-10: Remove Unnecessary Temp Files
That’s all!!