In several instances, Windows 10 and 11 devices apprehend the internal SSD or SATA drive as a removable one. When users hover over the safe removal icon in the system tray, they come across Internal Hard Drive Showing as Removable Disk. It is very obvious that you cannot eject the hard drive where the operating system is installed. This issue happens in the systems where occurs a conflict between the installed SATA AHCI driver and PC’s motherboard or BIOS. Microsoft clearly clarifies that the problem is with the BIOS itself as it considers whether a device is removable or not. Furthermore, how it positions the various SATA ports on the motherboard also determines the issue. Actually, the inbox driver straightaway examines SATA ports and thinks that the devices connected to those ports are external, which means removable devices.
So as you can see the problem is with the BIOS, you need to first ensure that it is up to date. Secondly, run a command line that would override how the inbox driver marks the devices in the port as external. Thirdly, try to disable the SATA Hot Plug feature that helped many users. Even if the system tray displays the hard disk as a removable one, try to enable the write caching policy of the hard disk and also modify some registry entries. In this article, you will find all the applicable solutions to overcome this issue.
Internal Hard Drive Showing as Removable Disk
Here is How to Fix Internal Hard Drive Showing as Removable Disk in Windows 10 or 11 –
Way-1: Check and Update BIOS
As the issues reside within BIOS, so you need to first check for and install its available updates. Installing its latest version will fix up several bugs and issues including Internal Hard Drive Showing as Removable Disk. First, check its model number and then visit the manufacturer’s website and download the update. Here is how you will check its model number –
- Press Win+R.
- Type msinfo32
- Click OK.
- Once the System Information window shows up, find the item namely “BIOS Version/Date“. Note down its Value.
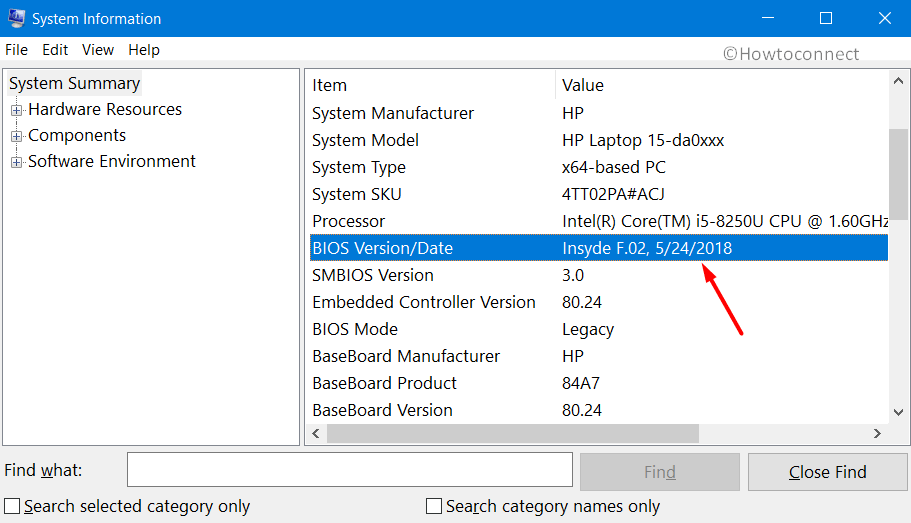
- Now, launch any web browser and visit your motherboard manufacturer’s website.
- Search for your model number and download its available updates. Install the updates and then see if the internal hard drives are still shown as removable media.
Way-2: Overrule the way the inbox driver sets the devices
If updating BIOS does not provide any relief, then you need to override the way how the inbox driver positions devices on specific ports. As mentioned earlier, the problem occurs with your system’s BIOS and how it considers the device as removable or not.
Basically, the inbox driver directly examines SATA ports and evaluates the devices connected to those parts as external which means removable devices. So, another applicable solution is to override the way the inbox driver determines devices on some ports. This is how you would do it –
- Right click on Start located on the taskbar.
- Select Device Manager.
- Once Device Manager opens up, double click on Disk Drives.
- Locate the SATA device under it that you prefer the inbox driver to regard as internal. Right-click on it and select Properties.
- Be in the General tab and note down the Bus number next to Location (see screenshot).
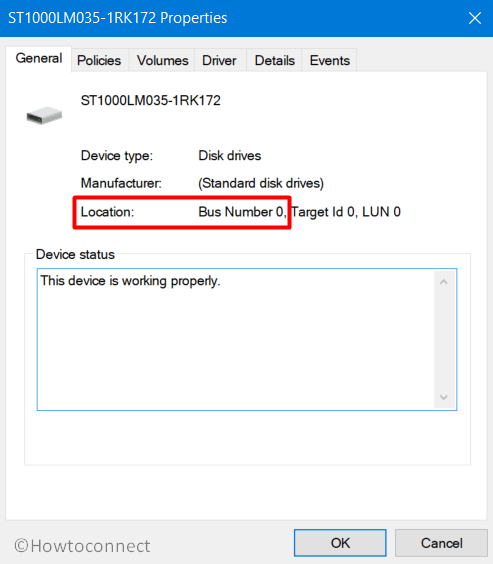
- Now, Open command prompt as administrator. (For this, you can press Windows key > type cmd > select Run as administrator > click Yes on User account control).
- In the following command, replace x with the Bus number you have noted. Now copy the whole command and paste it into command prompt.
exe add “HKLMSYSTEMCurrentControlSetServicesstorahciParametersDevice” /f /v TreatAsInternalPort /t REG_MULTI_SZ /d x- Hit Enter.
- Close all the windows and for an effective result, restart Windows 10 PC.
You can also see the method here.
Way-3: Disable SATA Hot Plug to Fix Internal Hard Drive Showing as Removable Disk
BIOS has an inbuilt ability called Hot Plugging or Hot Swapping. When this option is enabled on your motherboard it determines the hard disk as a removable device. And as a result, you come across the issue Internal Hard Drive Showing as Removable Disk. So you need to disable it to overcome the issue.
For Windows 10 –
- Press Windows and I.
- Select Update & Security.
- Click on Recovery.
- Click Restart now button (see screenshot).
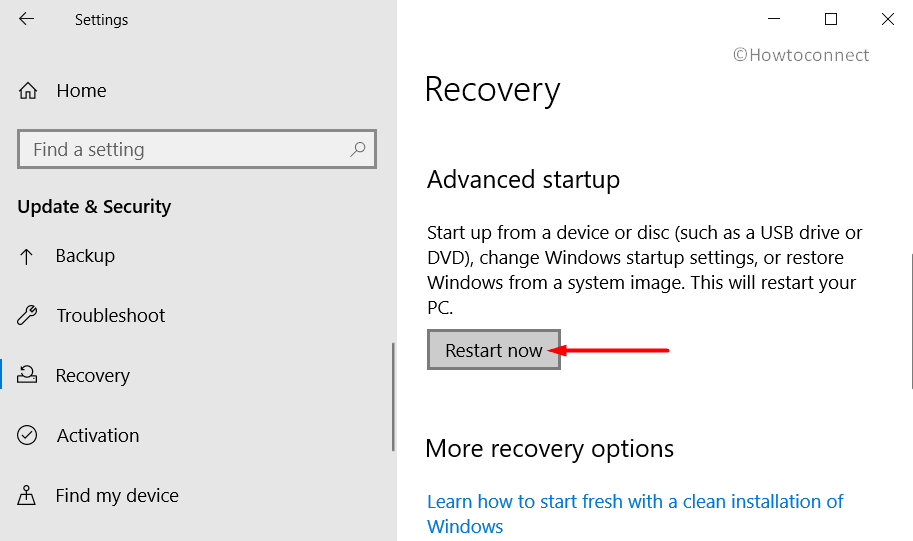
- The computer will reboot and a new menu will show up, click Troubleshoot.
- Select Advanced options.
- Choose UEFI Firmware Settings.
- Click Restart. Upon reboot, the system will straight away take you to the BIOS.
- Here, check the SATA port and disable the Hot Pluging.
For Windows 11 –
- Press Winkey + I.
- Click on Recovery from the right pane.
- Next, click on Restart now from the Advanced Startup section.
Way-4: Enable Write Caching Policy
Another applicable solution to solve Internal Hard Drive Showing as Removable Disk is through Device Manager. Several forums and experts have found this method helpful which improves system performance as well. This is how you would proceed with this workaround –
- Right-click on the Start icon and select Device Manager.
- Double click on – Disk Drives.
- Right-click on the internal hard drive (SSD or HDD).
- Choose Properties.
- Switch to the Policies tab.
- Check the box against Write Caching Policy.

- Click OK and reboot the device for productive results.
Way-5: Modify Registry Entries to Resolve Internal Hard Drive Showing as Removable Disk
People with several ports can try out this solution to fix Internal Hard Drive Showing as Removable Disk. Before you make any changes in the registry, ensure to Export Registry Editor for future safety.
- Right-click on Start and choose Run.
- Type regedit
- Click OK.
- Once you access Registry Editor, navigate to the below path –
HKEY_LOCAL_MACHINE\SYSTEM\ControlSet001\Services\storahci\Parameters\Device- Go to the right pane.
- Right-click and select Multi-String Value.
- Name it as TreatAsInternalPort.
- Double-click on TreatAsInternalPort. In its Value data field, start with 0 and then move ahead with 1 2 3 depending on how many ports you have.
- You need to take care of a small trick here; ensure to number them vertically as –
0
1
2
3
- The above example is for four ports. First type 0, press Enter and then add the rest of the digits simultaneously.
- Click OK and restart the device.
Note – If you have fewer SATA ports, remember to always start with 0.
Methods:
Way-1: Check and Update BIOS
Way-2: Overrule the way the inbox driver sets the devices
Way-3: Disable SATA Hot Plug
Way-4: Enable Write Caching Policy
Way-5: Modify Registry Entries
That’s all!!