Windows 10 powered machines can suffer from terrible blue screen error every now and then and the issue is pretty common in the older versions. OS_DATA_TAMPERING BSOD is a nagging issue of this type and it’s a rare one Bug. The error doesn’t let you know enough about it except the bug check code. However, driver related incompatibilities, corrupted system files, hardware troubles, insufficient disk space are more likely to generate this. Once occurs, the device prepares to reboot out of nowhere and a blue screen shows an error message with bugcheck code 0x00000155.
Usually, this critical trouble is an outcome of fatal system crash making the computer immobile for some time. Windows restart without saving any ongoing processes and you may lose a lot of data as most programs don’t support the autosave feature. OS_DATA_TAMPERING Blue Screen error in Windows 10 doesn’t leave any clue to resolve it easily and you have to try a few usual methods from the below section.
OS_DATA_TAMPERING Blue Screen Error in Windows 10
Here is how to fix OS_DATA_TAMPERING Blue Screen Error in Windows 10 –
1] Turn Off Automatic Restart
Blue screen error happens after a fatal crash in Windows and the device prepares for immediate restarting. At this moment, the machine seems immobile as it cannot render any more activity. Most of the running programs will lose their data as there is no chance of saving them. Users cannot prevent this sudden reboot by any means as nothing works at all.
Automatic Restarting is a default Windows feature to save critical resources from damage. After a severe crash, the system might opt to lose a huge amount of data and Windows restarts itself to prevent this. Nevertheless, it’s a very important safety measure, we cannot deploy the workarounds to fix the OS_DATA_TAMPERING Blue Screen Error keeping it enabled. Therefore, try turning Off the feature going through below steps –
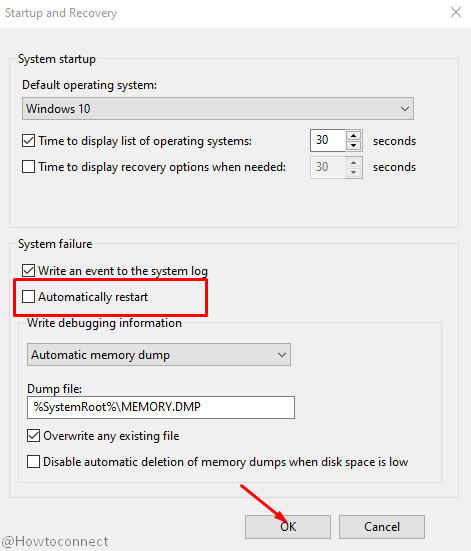
- Open the Run dialog pressing Winnows key and R at once.
- Type the – sysdm.cpl in the empty text box of it.
- Press the – Enter key to open up System Properties Windows now.
- Enter into the Advanced tab and scroll down to the – Startup and Recovery.
- Click the – Settings.
- In the next popup, move out for – System failure area.
- Uncheck the box that is set for – “Automatically restart”.
- Finally, click the Ok button at the bottom and save these changes.
2] Update all the Drivers
If new hardware is connected to the machine, drivers help in detecting them furthermore, recognize the purposes. Device drivers in Windows maintain the interaction between computer bus and attached accessories. Most of the blue screen errors in Windows 10 happen only because of the incompatibilities in driver end. An outdated driver is responsible for making the device non-functional and causing unexpected troubles. To recover this, software vendors release updates for each of them off and On too.
At the time of the Windows Upgrade process, the system makes all the drivers updated automatically. However as the regular updates keep on coming, we need to install the latest ones from the official website. Windows Device Manager makes this process easier than any other third-party applications available right now. You can see the outdated drivers with yellow indication and take necessary actions immediately. Update files will be downloaded and installed automatically as well. To update the drivers using Device Manager, follow the below instructions –
- Open Taskbar Search pressing Win+S hotkeys together.
- Write – Device manager in it.
- Select the app to open in another window.
- Find out the device having a mark of exclamation.
- Double click it and unveil drivers’ list.
- Now, right-click the driver having a yellow indication.
- Select the – Update driver.
- From the next popup, click the – Search automatically for updated driver software.
- Follow the on-screen guidelines to complete the process.
- Repeat the same to update all the drivers.
- Restart Windows 10 and check if the error is fixed.
Alternatively, follow from here – Update All Drivers in Windows 10 Simultaneously.
3] Install latest patches released to fix OS_DATA_TAMPERING error
OS_DATA_TAMPERING Blue Screen Error is an exceptional issue in Windows 10 and it’s a rare bug. The error code doesn’t define any possible cause responsible for this and the troubleshooting gets delayed. However, installing the latest patches oftentimes found to work successfully to fix the BSOD issue. Furthermore, the mentioned issue is more likely to occur in the old versions of Windows 10 than the newer ones.
Microsoft releases cumulative updates in the Insider build quite regularly providing the latest tools, security modifications, bug fixes, and a bunch of updated features. Windows Updated Process is also automatic in the machine and takes place when there is a stable, unmetered internet connection is available. Yet Microsoft often delays making the patches available for some devices too. Therefore, we have to proceed manually sometimes and try checking updates in Windows Settings app. For instance, follow the below guidelines –
- Press Windows key and I at once.
- From the Settings app UI, click the – Update & Security.
- Select the Windows Update from left pane.
- Move to the right and click the – Check for updates.
- Downloading starts automatically if there is an available update patch.
- System will start installing them immediately after downloading ends.
- Attend restarting the computer to complete the process.
4] Scan for harmful malware using Windows Security
Malware had been consistent enemies for the Windows 10 enabled devices over the years and will continue damaging further. These strongly coded programs can fuse the security layer easily after coming in contact. Nowadays, the viruses disperse through spam mails, links in the webpages. Whenever you do a click in these links, they get access to sneak the security shield.
After entering a system, these potentially harmful viruses damages system files and make them unreadable. Some crucial files like .DLL go missing as well resulting in a fatal crash eventually generates OS_DATA_TAMPERING Blue Screen Error. To strengthen the security of the machine, Windows 10 has the best default Security system. Windows Security can block all the harmful bugs and you can scan the files for malware regularly too. A full system scan using this program will ensure no virus is damaging the critical files. To do that, follow the below guidelines –
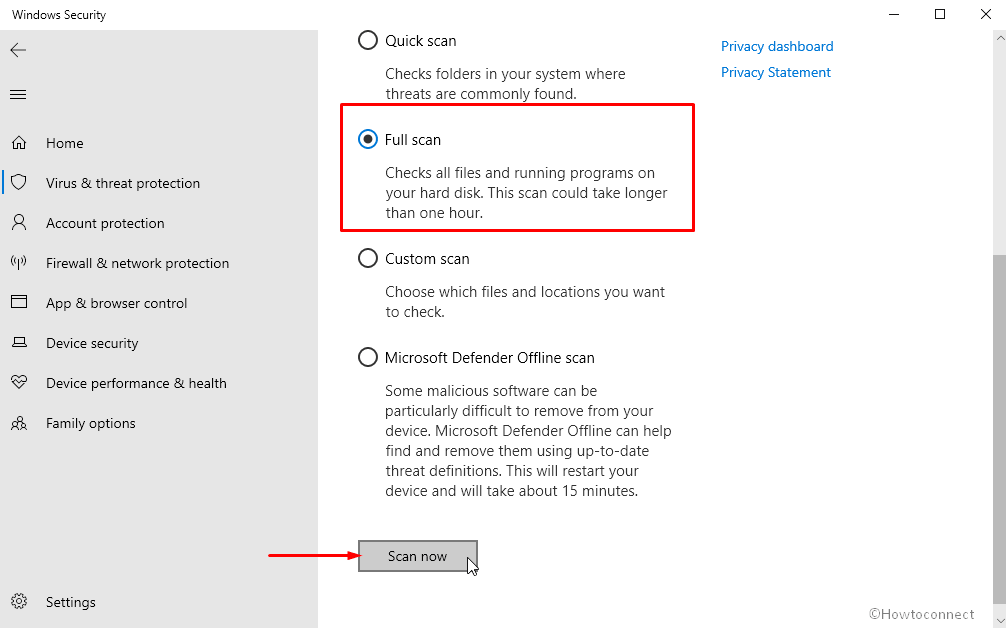
- Press the Windows key to open the Start menu.
- Approach alphabetically in the application list.
- Reach – Windows Security and click it.
- Select the – Virus & threat protection when the app opens in a separate window.
- From the corresponding right side, click the – Scan options.
- Click the radio button against – “Full scan“.
- Tap Scan now to begin malware search in the system.
- When you see a list of threats in the system, click the – Clean Threat.
- From the next page, click – Remove and then – Start actions to scrub up all the threats.
5] Uninstall unnecessary applications
Windows 10 has a wide range of default tools, necessary services allowing users to do tasks smoothly. However, some specialized tasks require a few more additional applications too. Microsoft has a Windows Store which is a huge collection of authorized applications from where users can install quite easily.
Yet many users choose to download applications from unauthorized third party vendors oftentimes. These programs often carry bugs, potentially harmful malware in them who can cause severe harm to the computer. When such programs are installed, some invalid entries might be created in Windows Registry and some values will be changed. Furthermore, similar programs cause software collisions leading the system to lose essential files. Therefore to fix the OS_DATA_TAMPERING Blue Screen Error, we have to uninstall these unnecessary applications. For that, follow the below steps –
- Press Windows key and type the – appwiz.cpl.
- Press – Enter to open Program and Features window from Control Panel.
- Reach to the problematic or unnecessary program on the list.
- Right click the app and select the – Uninstall.
- From the confirmation popup, click the – “Uninstall”.
- Follow on-screen guidelines and complete uninstalling the app.
- Restart the computer and check if the error has gone.
6] Rollback the defective update for a driver
An outdated driver is responsible for making instability in the system and contributes most in generating the blue screen error. However, updating this may not always resolve the OS_DATA_TAMPERING Blue Screen Error as many users have claimed. The reason can be a defective update for a device driver. Software vendors usually release qualitative as well as a bug-free update every time. Unfortunately, some may come with unexpected bugs and cause additional trouble instead of resolving the BSOD error.
Windows Device Manager is an ideal application for controlling drivers and their troubleshooting in the case coming out problematic. If a defective update is installed, you can undo that and roll it back to a free of error previous edition. To do that, follow the below instructions –
- Open Run dialog by pressing the – Windows key and R.
- Write the – devmgmt.msc in given search box.
- Click the – Ok.
- Reach to the device that’s driver looks suspicious.
- Double click it to split driver list.
- Right click the driver that received an update recently.
- Select – Properties option from context.
- Form the next popup, click – Driver tab.
- Scroll down and click – Roll back driver.
- Follow the guidelines and complete “rolling back”.
- Restart the Windows 10 and check if the workaround has resolved the blue screen error.
7] Run SFC scan to check for corrupted system files
Windows System files help to run the computer and it’s assisting programs accurately and they are essential components. They contain fixed internal components sitting in a definite structure to make it readable. In case, these files encounter a malware infection of sudden mishaps like power surge, can be easily corrupted. Sometimes Windows Updating faults and software collision erase a few of them including .DLL files. In absence of these files or due to unreadable system components, a fatal crash takes place leading to generate OS_DATA_TAMPERING Blue Screen Error.
A default tool in Windows enabled machine i.e. System File Checker is provided to take care of the corrupted system resources. It can also recover missing essential files after carrying out a thorough scanning on the computer. The utility runs in the Elevated Command Prompt once you execute sfc command. To run this utility, follow the below guidelines –
- Press Win+S hotkeys at once.
- Type the – cmd in the Taskbar Search box.
- Right click Command Prompt when appears.
- Select the – Run as Administrator.
- Hit – Yes when the UAC will prompt to grant permission.
- Type the following command in the black window –
Sfc /scannow
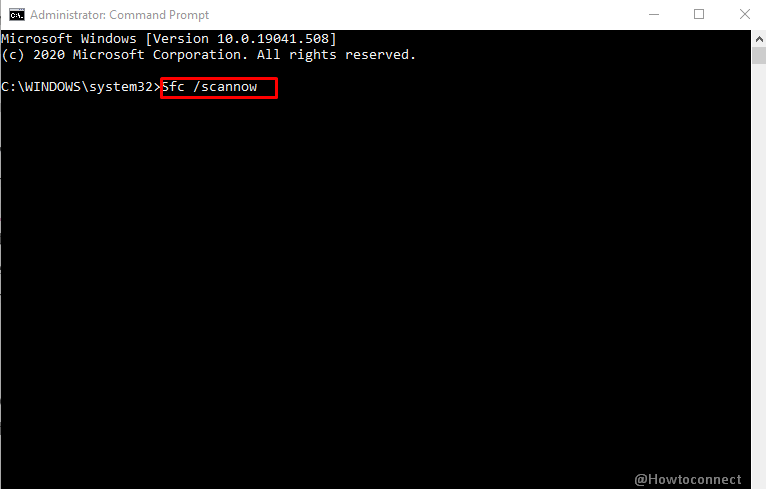
- Execute command by pressing – Enter.
- Once the process ends, restart the computer once the process ends.
8] Update BIOS for the Windows to solve OS_DATA_TAMPERING error
Basic Input/Output System i.e. simply BIOS is an essential part of the Operating System that comes pre-installed when you buy a machine from the store. This is the frontline software to run at the first startup and energies the system. The firmware is located on the Motherboard and controls the data flow between the OS and the attached accessories such as video adapter, keyboard, mouse, printers, hard disk, etc. The ROM chip allows a new user to set up a computer from a very basic level without trouble.
Technically speaking, outdated BIOS is very much risky for Windows as it will be somewhat non-functional. It will fail to communicate well with the Central processing unit and cause severe fatality. It has been found to cause OS_DATA_TAMPERING Blue Screen Error too from outdated BIOS. Therefore, keep this software updated always and the guidelines are as following –
- Open Power user menu pressing – Win+X hotkeys.
- Select – Run from the appearing context.
- Write – msinfo32 in the text box provided.
- Press – Enter to open System Information in a separate window.
- Locate – BIOS Version/Date option on the right-side pane.
- Note down information shown against this category.
- Close System Information window and visit its maker’s web page for your BIOS using default browser.
- Find the most suitable BIOS file using the information you found earlier.
- Download the latest BIOS file and install it in the system.
9] Delete unnecessary junk files from the system drive
A device comes with fixed storage in the disk and separated in partitions like OS (C:), D:, E: etc. Usually, the Windows is installed in the C: drive and hence we call it a system drive. Other files like temporary executable ones, shader cache, browsing data, web cache, and restore point data will be stored here as well. When we delete a file from the machine, a shadow copy is stored in the Recycle Bin as well. This entire thing will cover up a huge amount of storage in the drive including previous Windows files taking gigabytes of space.
When the system drive runs in short of memory, the device overall performance is badly affected always. You will see freezing of the desktop area, unexpected lags, and even the OS_DATA_TAMPERING Blue Screen Error. To delete these junk files, Disk Cleanup tool is the best one provided in Windows 10. To run and remove the unnecessary files, follow the below steps –
- Click the magnifier icon from Taskbar.
- Write the – cleanmgr.exe in the empty box of Taskbar Search.
- Press the – Enter to open the disk cleanup tool.
- When a small box floats up asking you to choose a preferable drive for running cleanup tasks, select OS (C:).
- Press the – Enter to confirm selection.
- The tool will calculate total recoverable space in the disk and let you choose areas to delete.
- Move down to the bottom left end and Click the Cleanup system files button.
- When the Disk Cleanup asks to select drive, choose OS (C:).
- Press – Enter to proceed.
- Disk Cleanup for (C:) will appear after calculating total space.
- Check all boxes from Files to delete area.
Note – Leave the checkbox against Downloads unmarked and ensure nothing important is left in the Recycle Bin.
- Click the – Ok and begin cleanup.
- Reboot the Windows after completing the action.
10] Diagnose problem in the Memory
A Windows machine suffering from memory problems will now and then encounter OS_DATA_TAMPERING Blue Screen Error. This problem usually starts with low disk space as we said before. Therefore we need to keep the disk space free from unnecessary materials as well as junk. However, memory problem also indicates a defective RAM too in many cases and it can cause blue screen error too.
RAM issues are from the hardware end and usually, the resolution is to replace the entire unit with a new one. Therefore before we proceed to buy a new one, a diagnosis is necessary to ensure the RAM is a defective one. To do that, the Windows Memory Diagnostic Tool can help by sending a complete report based on carrying out tests. To run this tool, follow the below guidelines –
- Open the Run dialog pressing – Win+R keys together.
- Type mdsched.exe in the given search box.
- Press the – Enter key to move ahead.
- From the Windows Memory Diagnostic tool, click the – Restart now and check for problems (Recommended).
- A blue screen will show up in a moment and start detecting memory problems.
- After the diagnosis ends, windows will reboot again.
- In the next desktop, you will get a notification in the System Tray from the Windows Memory Diagnostic tool.
- Check the report and see if the RAM needs to be replaced.
11] Disable Fast Boot mode to fix OS_DATA_TAMPERING blue screen error
Fast boot mode enables quick startup by reducing the booting period and you can make the machine up and running faster. This is a pre-enabled feature in Windows combining two power options i.e. shut down and hibernate. The feature usually collects all the information from an ongoing session and carries over the data to succeeding boot. Hence, the startup period doesn’t need a lot of data to be loaded and boots quicker.
Nevertheless, the feature is quite handy and a useful one, it can also carry over BSOD error code to the following boot too. Therefore keeping the mode enabled, it’s impossible often to resolve the OS_DATA_TAMPERING Blue Screen Error. To disable the Fast Boot mode, proceed with the following details –
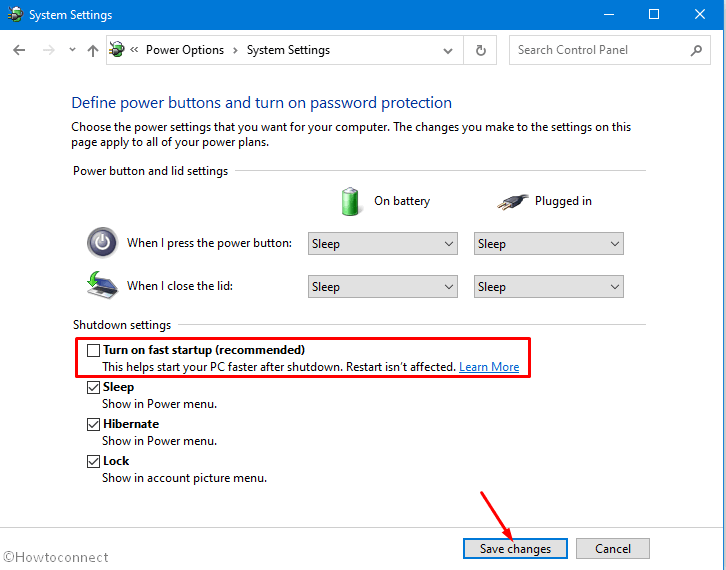
- Right-click the battery icon from far-right corner of Taskbar.
- Choose the – Power Options.
- In the following Control panel window, select Choose the – What the power buttons do click lying on the left pane.
- From the next page, click the link that says – Change settings that are currently unavailable.
- Move out for the – Shutdown settings area.
- Ensure unmarking the box set for – Turn on fast startup (recommended).
- Click the – Save changes to disable Fast Startup.
12] Deploy DISM tool to fix corrupted Windows image files
Windows image files are the components of ISO files released ahead of a major upgrade in ISO 9660 format. You can use these files for making identical copies for that update, create a bootable media device, and write in CD-R or DVD-R drives. However, these files can also be corrupted due to some strong malware attack or from the effect of a third party buggy program. A corrupted Windows image file is a primary suspect for causing OS_DATA_TAMPERING Blue Screen Error.
Running DISM tool is an ideal resolution for fixing these files as the free is applicable for even the offline images. Deployment Image Management and Servicing (DISM) tool is a default utility and you can activate it in Elevated Command Prompt. To run, follow the below steps –
- Open Run dialog and type cmd in its empty text area.
- Make a combined press of Ctril+Shift+Enter keys.
- When the UAC prompts up, click Yes to provide consent.
- Enter the following command in blinking cursor –
Sfc /scanow
- Execute the command by pressing Enter key.
- DISM tool will detect corrupted image files by running necessary scanning.
- Fixes will be applied accordingly as well.
- Once done, Restart the computer and check if BSOD has resolved once the next session starts.
13] Enable Safe Boot for faster troubleshooting
Most blue screen errors generate out of nowhere in a Windows enabled computer and doesn’t leave a clue to troubleshoot easily. Since the issue generates after a fatal crash, the system will render no functionality at all. At this time, Booting in the Safe Mode is the only way to start a machine. This is a troubleshooting technique that allows only essential programs at the startup. Third-party programs, tools, services will be opted out and only the basic resources will the Operating System. This actually cuts troubleshooting into half as you need to search trouble only in the default programs.
Safe Boot mode enables a minimum number of services to be loaded and hence you will not get the internet if necessary. To enable the internet, you can try Safe Mode with Networking and it’s the most popular way of resolving a critical problem happening in Windows. Follow the below guidelines to Turn On Safe Mode –
- Press Windows key and R at once.
- In the Run dialog box, type the – msconfig.
- Click the Ok to open up System Configuration.
- In the popup, click the – Boot tab.
- Scroll down to the second half i.e. Boot options area and check the box that reads – Safe boot.
- Click the radio button set for – Minimal.
- If you want to enable internet services, select the radio button set for – Networking.
- Hit the Apply and then Ok to save the changes.
- Close these tabs and restart Windows 10.
- System Will Boot to Safe Mode or “Safe Mode with Networking” based on what you have selected.
- For going back to normal boot, remove the checkmark from ‘Safe Boot’.
- Save the changes and Restart.
14] Remove problematic Update patch
Microsoft releases regular updates for Windows 10 through patches, insider builds and the process is autonomous. Unfortunately, a few update files may come with harmful bugs and issues. If you install these, Windows will run into trouble and may cause OS_DATA_TAMPERING Blue Screen Error too.
Nevertheless, Microsoft fixes the bug in the succeeding update; you should not keep the patch installed in the machine. In fact, the Control Panel has options to uninstall a patch from the computer without making significant changes to it. Follow the below steps and remove the defective patch –
- Press Win+I hotkeys at once.
- From the Windows Settings app pane, click the – Update & Security.
- Choose the – Windows Update.
- Click the – View update history on the right-side pane.
- From the next page, click – Uninstall updates.
- When the Programs and Features loads on display, locate the latest update patch.
- Right-click it and select- Uninstall.
- Hit “Uninstall” to confirm once more.
- Follow the on-screen guidelines and complete the process.
- Reboot Windows 10 and check if the error is resolved.
15] Perform System Restore to resolve OS_DATA_TAMPERING
System Restore is a process or turning back Windows to a previous point where it was before. Sometimes few changes in the computer become so critical that users cannot fix it easily. For instance, if a problematic third party program is installed, it can affect the Windows Registry. It can create a new DWORD or change an existing value to tweak it in an unpropitious way. We know, Windows Registry is a sensitive part and only professional users should modify this.
However, in case of an irrecoverable issue like OS_DATA_TAMPERING Blue Screen Error, you can try performing System Restore. By doing so, the Windows will load back a previous Restore point where there was no error. To complete this workaround, follow these steps from the below section –
- Click Taskbar search and type recovery in the vacant text area.
- Click Recovery option from results.
- From the Control Panel window, click the – Open System Restore.
- When the System Restore popup shows, click the radio button set for “Recommended restore” to load the most recent Windows state.
- For a different restore point, hit Choose a different one instead.
- Click Next button to proceed forward.
- Check the box set for – Show more restore points.
- When all available points show up, select the one where you opt to restore.
- Select the Next and form the succeeding window, confirm the selection.
- Tap Finish to start the process.
- Windows will reboot and you will get a message confirming that “System Restore completed successfully”
16] Repair bad areas in the Hard disk
Most machines with Windows Operating System suffer from critical issues when there is a snag in the Hard disk. The powerhouse of the system stores all necessary resources for running Windows. People keep using a stationary magnetic disk from the lifetime of the computer but very seldom take good care of. Eventually, some bad areas are formed in it and cause OS_DATA_TAMPERING Blue Screen Error.
Usually, the defective areas are formed in both of the magnetic stationary hard disks and external drives when connected. The root cause is basically from a production fault, sudden power intermission, forcibly pulling out cable from CPU. To fix these sectors, we have to run the disk checking tool in the Elevated Command Prompt. To run, follow the below guidelines –
- Click the Windows icon from Taskbar.
- From Start menu, click Power icon.
- Select Restart meanwhile press the Shift key.
- When the machine will boot into Automatic Repair blue screen, select the – Troubleshoot.
- Simultaneously choose Advanced options => Command Prompt.
- In the black window, enter the following command –
chkdsk /f /r C:
- Tap the Enter key and execute the inserted command.
- Disk Checking tool will be activated and run scan for defective areas in the hard disk.
- Once the fixing is done in a while, restart the computer.
- Check if there is any blue screen error in the system.
17] Reinstall drivers causing BSOD error
In most blue screen issues, driver issues are the main troublemakers when they go outdated or receive a buggy update. Same is equally applicable for OS_DATA_TAMPERING Blue Screen Error as well. Some people have found that blue screen errors do not really fix after updating the drivers or rolling back their defective update.
If the same thing happens for you as well, try uninstalling the problematic driver to resolve this issue. If that helps, you can install the latest driver software from official website of the vendor. To uninstall a driver using Windows Device Manager, follow the below guidelines –
- Press Windows key and X at key at once.
- From Power user menu, select the – Device Manager.
- Scroll down to the device causing trouble.
- Make a double click to expand drivers list.
- Right-click the driver that looks suspicious.
- From the context, select the – Uninstall device.
- Click “Uninstall” again to confirm the selection.
- Comply with on-screen guidelines to complete this workaround.
- Restart Windows and check if the blue screen error is resolved.
- Open the browser to visit the manufacturer’s website for the driver software.
- Download the compatible driver file and install on the computer.
18] Tryout guidelines from Microsoft’s Support
Oftentimes, the blue screen error appears quite irrecoverable and it doesn’t resolve even after deploying some usual workarounds. Microsoft to deal with these bugs, introduced an online help page i.e. Blue Screen Troubleshooter.
Following the link of Microsoft Support, you can get an accurate resolution process based on the encountered BSOD error. Many users have resolved OS_DATA_TAMPERING Blue Screen Error following the guidelines from this online troubleshooter. To accomplish this task, follow the below steps –
- Visit the Microsoft Support page for Blue Screen errors going to https://support.microsoft.com/bn-bd/help/14238/windows-10-troubleshoot-blue-screen-errors.
- Scroll down to When did you get the error?
- Click any of the radio buttons set for After an update was installed or While using my device.
- The page will unveil hidden guidelines based on pre-selected error criteria.
- Follow them to the point properly and fix the error accordingly.
19] Fix up Hardware issues
Though little unlikely but hardware issues can also cause OS_DATA_TAMPERING Blue Screen error in Windows 10. These problems may possibly be arising from the drivers or USB adapters. If Updating fails to resolve the error, disengage the problematic hardware accessories like mouse, printer, keyboard, or speaker. It might seem pretty simple but can resolve exception blue screen issues sometimes.
Hardware troubleshooter is a new default tool in Windows enabled machines which can detect the trouble and apply necessary fixes. We recommend you try running this tool to ensure Windows is not having any problem with the attached hardware. To do that, move with the below steps –
- Press Windows key and Q together.
- Type in – cmd in the Taskbar Search box.
- Click Run as Administrator from the right side pane.
- Once the UAC will prompt up, click Yes to proceed.
- Copy the following command and paste to the blinking cursor –
msdt.exe -id DeviceDiagnostic
- Press the – Enter key to execute the command.
- A new Hardware and Devices Troubleshooter page will open up immediately.
- Click Next button to go ahead.
- The tool will detect the hardware trouble in the computer and fix it immediately if found any.
20] Perform Clean Boot in Windows 10
Clean Boot is an advanced troubleshooting method to detect a critical issue in Windows 10. The feature is quite similar to Safe Boot but differs in the action of carrying out test and diagnosis. This will also allow only a minimal number of applications to be loaded at the startup making troubleshooting easier.
Performing Clean Boot often serves a good deal in resolving the OS_DATA_TAMPERING Blue Screen Error in Windows 10. The carried diagnosis helps in detecting other critical trouble presently going in the machine. To perform a Clean Boot, comply with the following instructions –
- Press Windows key and Q together.
- In the Taskbar Search box, type – msconfig.
- Choose – System Configuration from the results.
- Move the new popup precisely in the General tab.
- Scroll down and click the radio button set for – Selective startup.
- Unmark the box that reads – Load startup items.
- Click the Services tab and check the box that reads – Hide all Microsoft services.
- Move forward and click the Disable all button.
- Return back to Startup tab and click the link – Open Task Manager.
- From the Task Manager window, right click on each program listed here and choose Disable for all.
- Open the System Configuration window again.
- Click the – Apply.
- Hit Ok to save the changes.
Methods:
1] Turn Off Automatic Restart
2] Update all the Drivers
3] Install latest patches released
4] Scan for harmful malwares using Windows Security
5] Uninstall unnecessary applications
6] Rollback the defective update for a driver
7] Run SFC scan to check for corrupted system files
8] Update BIOS for the Windows
9] Delete unnecessary junk files from system drive
10] Diagnose problem in the Memory
11] Disable Fast Boot mode
12] Deploy DISM tool to fix corrupted Windows image files
13] Enable Safe Boot for faster troubleshooting
14] Remove problematic Update patch
15] Perform System Restore
16] Repair bad areas in the Hard disk
17] Reinstall drivers causing BSOD error
18] Tryout guidelines from Microsoft’s Support
19] Fix up Hardware issues
20] Perform Clean Boot in Windows 10
That’s all!!