PASSIVE INTERRUPT ERROR is a Blue screen of Death issue in Windows 10 which can cause severe damage to a system. The main reason for this issue is usually outdated device drivers and missing system components. But some other relatively less likely causes may play greater roles in causing the same like RAM issues, bad areas in Hard Disk, outdated BIOS or even unnecessary hardware accessories. The error has a bug check code of 0x0000013B which clearly indicates the Kernel has detected some drawbacks with the passive-level interrupt.
While a user attempts to open a newly installed program, some abnormal error messages appear along with the error. Sometimes, the desktop area freezes and makes the whole thing complicated. But the most annoying trouble occurs when Windows starts rebooting frequently to minimize the effect of damage. The stop code is undoubtedly a dangerous one and needs immediate fixes to eliminate. Hence today, we will discuss some of the most comprehensive workarounds to resolve this Blue Screen error from Windows 10. Let’s begin –
PASSIVE INTERRUPT ERROR
Here is how to fix PASSIVE INTERRUPT ERROR Blue Screen in Windows 10 –
The above list of solutions when applied perfectly in Windows, PASSIVE INTERRUPT ERROR Blue Screen error will resolve as expected. Before we go to try any workaround, the system needs to be a stable one. Blue Screen error will cause potential harm to a system and it will automatically reboot frequently to reduce the effect of damage. Therefore, we cannot really deploy the resolution process unless disabling the automatic restarting. Hence, follow the below guidelines to disable this automatic feature –
- First of all, save and preferably close any ongoing process to avoid unwanted data loss.
- Head over to the Desktop area pressing Win+D together.
- From the visible area, click the This PC icon and select Properties option.
- In a moment, System window cuts your view, select Advanced system settings located at the left pane.
- Moving to the System Properties, highlight its Advanced tab.
- Hover down a little and click on the Settings button located under Startup and Recovery section.
- Move to System failure section and eventually deselect the box before Automatically restart option.
- In the end, click the OK button from bottom to save the changes in Windows 10.
Once the changes are effective in Windows 10, it will not reboot anymore automatically. Its time, we can try the following workarounds one after another and resolve PASSIVE INTERRUPT ERROR in Windows 10.
1] Update all the drivers in Windows 10
In the beginning, we have already mentioned that outdated drivers have a great role in causing the PASSIVE INTERRUPT ERROR Blue Screen in Windows 10. The issue will resolve automatically once the drivers are up to date. True that updating drivers take place automatically when the device is connected to an active internet connection. In lieu of that, we can proceed manually using Device Manager to avoid some unexpected issues to happen. To accomplish the task, follow the below process –
- Press Win+R hotkey together and invoke the Run dialog.
- Type devmgmt.msc in the text field of this wizard and press Enter key.
- When the new Device Manager window comes in the view, reach out to the device having mark of exclamation.
- Double click on the same and spread the devices list.
- Do a right-click on the driver and choose the Update driver option from the appearing menu.
- Complete the process complying with the guidelines available on display.
- Repeat the same for all the outdated drivers.
- Finally, Restart the Windows upon finishing the process.
2] Fix up memory issues residing in Windows 10
Windows confronting memory issues will be at severe risk of getting affected with Blue Screen Error with code 0x0000013B. A majority of these issues are originated from bad RAM after a device falls on the ground. Usually, a bad ram demands full replacement which will cost a bulk amount of money. Before proceeding to that, we recommend resolving other related problems using Windows Memory Diagnostic tool. The guideline is as follows –
- Launch Settings app by pressing Win+I key at once.
- On the interface, type memory in the search box provided there.
- Choose “Diagnose your computer’s memory problems” when it appears in the result.
- Windows Memory Diagnostic tool will open up.
- From the wizard, click “Restart now and check for problems (recommended)”.
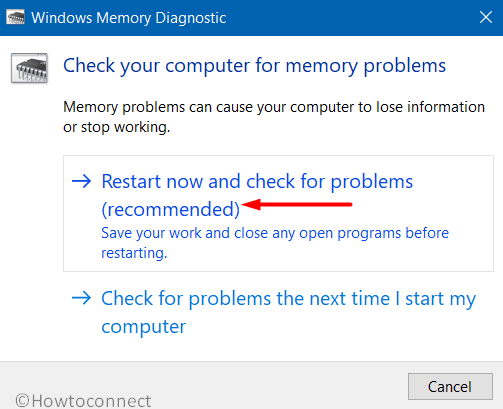
- Windows after completing the first cycle of rebooting, a blue screen will be visible and it will detect memory issues.
- Once the progress hits 100%, the device will restart again.
- When the session starts, a result of the carried out diagnostic will be available in the System tray- notification area.
3] Install all the latest Updates to fix PASSIVE INTERRUPT ERROR
Updating the operating system enables users to experience the latest modifications in features. Besides, the new patches contain probable fixes for the existing bugs. Thus, updating Windows makes the operating system healthy and it will be less likely to gets affected by bugs and issues. Every after a closed interval, Microsoft releases the update files and you can get them in the system easily by checking Windows Update section in the Settings app. Whenever the device is connected to a valid internet connection, these files will be installed automatically. However, the autonomous system found to cause some complications as well. Therefore, let’s proceed to install the available updates for the OS moving through below steps –
- Press Windows key and select gear icon from Start menu.
- When the Settings app UI unfolds, click on Update & Security and move to the next page.
- Choose Windows Update from the left ribbon here and jump to alongside right.
- Click on Check for updates button and initiate searching Update files.
- When all the new patches are available, hit Download button located there.
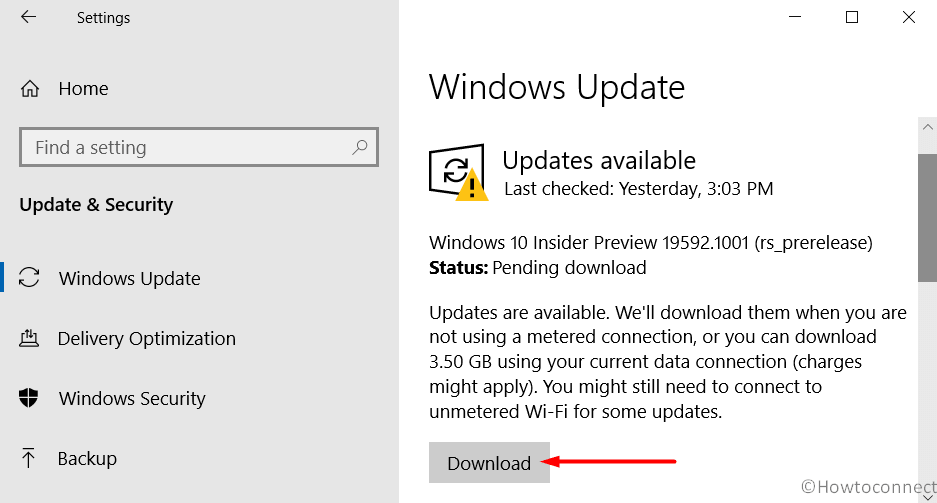
- Once the download finishes, installation will commence automatically
- This process will require consecutive restarting of Windows. Attend all the tasks to complete the updates.
4] Perform System Restore to load the previous state of Windows
PASSIVE INTERRUPT ERROR Blue Screen in Windows 10 may occur after installing a new program. Same may also occur when a user attempts to cancel uninstalling a program forcibly. These abnormal processes will have an adverse effect on Windows registry and thus, blue screen error will show up. To avoid this unwanted setback, we can turn back the present state of Windows to a previous point. The process is well known as System Restore where windows will load back its previous state on implementation. Here are the guidelines to accomplish this task –
- Open the Power user menu by pressing “Win+X” hotkey together.
- Select Run from the menu to invoke the wizard.
- Type ‘rstrui’ in the blank text field and click Ok.
- When the System Restore wizard floats up, click select Show more restore points.
- Choose the latest point and click the Next button from bottom.
- Finally hit Finish from the succeeding page and start the process.
5] Detect the malware threats in Windows Security and eliminate them
The biggest threat on internet nowadays is malware residing in disguise in some links. Whenever a user clicks that, these bugs manage to sneak through the defense and enters into the system. Since they have a replicating character, can easily transform them into other system files. Thus, many of the Windows core components go missing and few lose their originality. This action causes PASSIVE INTERRUPT ERROR Blue Screen in Windows 10.
In order to protect these files, we need to strengthen the security system and also eliminate any potential threat using an anti-virus solution. Windows Security is assured to be the best and Microsoft introduced this software a default in OS. The program has a robust architecture and real time protection against malware. Here is how to detect and eliminate the virus invaders using Windows Security –
- Press Windows key and type security in the blank space provided.
- Select Windows Security when displayed and open the app.
- On the left pane, click Virus & threat protection and move on to right.
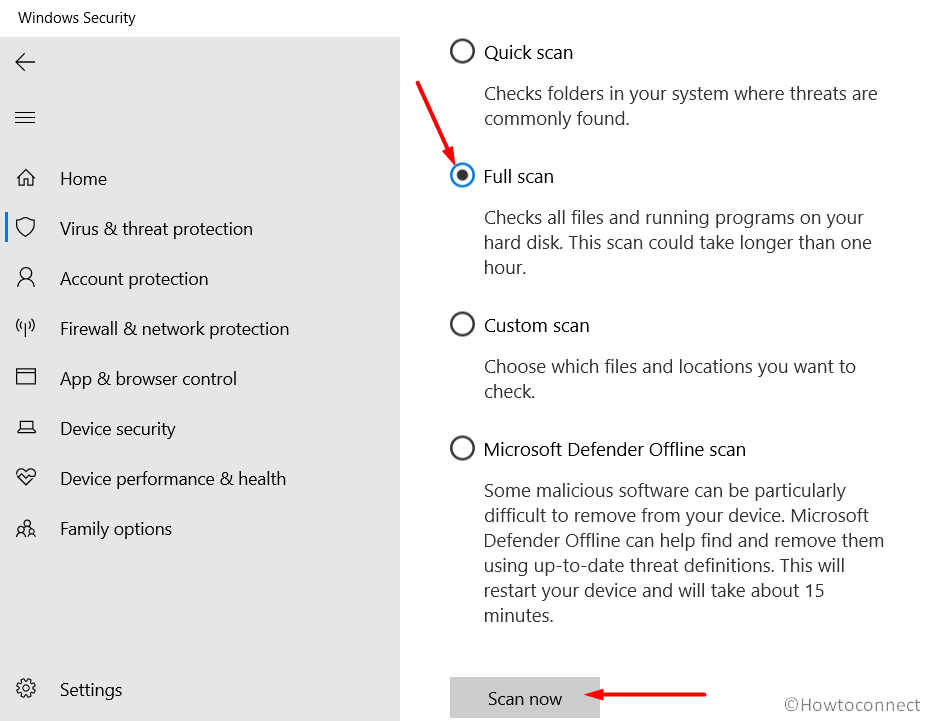
- Hit Scan options link and select radio button set for Full scan option when all methods are available.
- Start the detection process by selecting click Scan now button.
- If there is any virus present in the system, it will be displayed. Click the Clean Threat option to get rid of them.
- When moved to next window, select Remove followed by clicking Start actions to resolve the threats
6] Limit the risk of Software collision in Windows 10
The more this world is getting tech savvy, the more we are becoming dependent on software programs. Plenty of applications are made every day to serve a variety of purposes. We often see many programs come with a slight different name but same functionality. There is a little hiccup here in installing applications unnecessarily especially the dual ones. Similar programs often come in conflict with each other and cause a software collision. As a result of that, lots of windows core components can go missing and eventually cause blue screen error with bug check code 0x0000013B. We need to uninstall unnecessary programs from the system to avoid happening that using below instructions –
- Press Windows key and type “appwiz.cpl” in the provided text space for searching.
- Hit the Enter key to unfold the Programs and Features window on display.
- Head over to the similar application that you opt to remove.
- Do a right click on the program and select Uninstall option.
- When UAC asks for permission, click Yes to proceed.
- Follow the guidelines on-screen until the process ends completely.
- Later on, restart the Windows and make these changes effective.
7] Scan the system components and rectify the dreadful ones
Windows operating system depends on some core components to run smoothly. These system files may often get corrupted or go missing due to infection from malicious bugs or after a software collision. At that moment, PASSIVE INTERRUPT ERROR Blue Screen error may show up in Windows 10. To rectify these components thereby resolving the BSOD error, System File Checker tool can be handy. As the utility is effective in the elevated command prompt only, we need to proceed as follows –
- Press Win+R hotkeys together to open Run dialog box first.
- Type “cmd.exe” in the provided text box provided of it.
- Now press Ctrl + Shift + Enter keys together once more to directly open Command Prompt as Admin from Run dialog.
- When the User Account Control floats up for permission, click Yes to continue.
- After being directed to the Elevated Command Prompt enter the below text –
sfc /scannow
- Hit Enter key to activate System file checker tool in there.
- Now the utility will start looking for corrupted and missing system components in the device.
- It will automatically resolve the dreadful system files and the process might be a little lengthy.
- Once it finishes and reboot the Windows once done.
8] Roll Back a defectively installed device driver to Fix PASSIVE INTERRUPT ERROR
After the driver updating process is made autonomous with installing latest Windows patches, few new issues came into play. Some defective drivers are getting installed unnoticed. In a while, they are also causing PASSIVE INTERRUPT ERROR Blue Screen in Windows 10. To recover the device from this trouble, we have to disable that specific device driver or roll back it to default. The process is as following –
- Press Windows key and Q at once to open Taskbar Search.
- Type device manager in the provided text box and hit Enter.
- When the Device Manager is upfront, reach to the dreadful device whose drier you opt to disable or restore to default.
- Double click to spread its driver list.
- Do a right-click on the suspected driver and choose Properties option.
- After a new popup window comes up, enter into its Driver tab
- Hover down a little and click Disable Device or Roll Back Driver.
- Repeat the same for all defective drivers in the system.
- Finally, Reboot Windows 10 to make these changes effective.
9] Disable Fast Boot to fix PASSIVE INTERRUPT ERROR
Two very prominent power options for a computer are Shut Down and Hibernate. Fast Startup is a combination of these power options which collects the information when the device is running. The idea is to save these data from an ongoing process to boot the device faster in the next session of Windows. The fast boot process will carry over the blue screen error from previous session if not disabled. Therefore, disable this feature in the first place using below guidelines –
- Move the cursor to the right corner of Taskbar followed by making a right-click on Battery icon.
- Select Power Options from the appearing menu.
- When a new window opens, choose What the power buttons does link from left pane.
- Moving forward to the next page, click on Change settings that are currently unavailable to unveil the hidden options.
- Hover downward and uncheck the box that reads Turn on fast startup (recommended).
- Finally, click the Save Changes button from the bottom.
10] Boot Windows 10 in the most reliable Safe Mode
When most of the resolutions failed to recover the computer from PASSIVE INTERRUPT ERROR Blue Screen in Windows 10, a simple technique can serve the best. We are talking about booting Windows in the Safe Mode. This is a very much reliable resolution found to be effective in every critical issue of Windows. In this special type of startup method, the device powers up with default applications and set up only. This will remove BSOD error existing in the system very effectively. Even the setback exists also, you can be sure that any third party program is causing the trouble. To boot the device in safe mode, follow the below steps –
- Open Run dialog and type msconfig in void text area.
- Click on OK button from the wizard to open System Configuration.
- Get into the Boot tab and scroll down to the second half where Boot Options is visible.
- Proceeding ahead, mark the checkbox saying Safe Boot.
- After the grayed options be functional, choose radio button before Minimal.
- Click on Apply button followed by hitting Ok to save the changes.
- Now, close the System Configuration wizard and Restart the Windows in usual way.
- In the succeeding startup, press F8 key until the Advanced Boot menu comes in.
- From the appearing menu, choose Safe Mode from here and enter.
11] Clean the junk files and make space in Hard Disk
Temporary files, browsers cache, Recycle Bin, old Windows installation files, etc are generated for specific tasks in the operating system. These files though become useless after finishing the tasks, occupy same space in the disk just like an original one. Since they keep on producing in large numbers; a huge space in the disk becomes full due to unnecessary junk. In the process, the device functionality deteriorates drastically and cause a few critical issues as well. Blue Screen error with bug check code 0x0000013B may too show up. To clean this bulk amount of junks, Disk Cleanup utility will be helpful. Here are the guidelines to use the default utility –
- Fire up the Run dialog pressing Win+R hotkeys together.
- Type in cleanmgr in its text area and press Enter key.
- In a second, a small pop-up will rise up immediately asking to choose the drive name.
- Select C: and click on OK button.
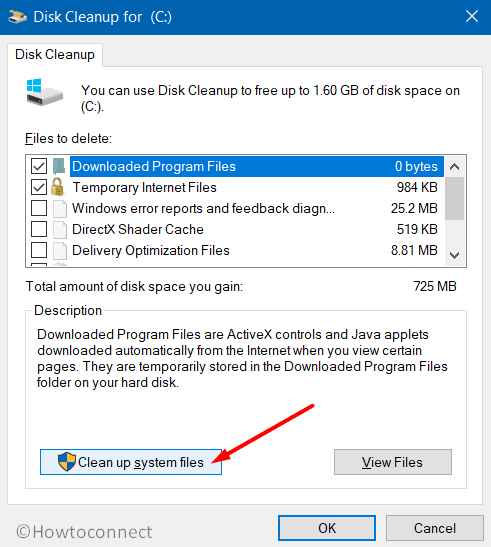
- After some time, Disk Cleanup for (C:) will arrive.
- Hover down to its bottom left end and click Clean up system files option.
- Choose C: again and hit Enter key when prompt.
- In the upcoming window, check all the options residing under Files to delete section.
Note – Make sure no necessary file remains in the Downloads and Recycle Bin folder before deleting all the junk files.
- Finally, hit the OK button to initiate cleanup.
12] Fix PASSIVE INTERRUPT ERROR by Temporarily disconnecting hardware devices
PASSIVE INTERRUPT ERROR Blue Screen in Windows 10 may occur from wide range of reasons. You may often come across BSOD error after connecting any hardware accessory like mouse, keyboard, speaker or a printer. The truth is, these accessories are inseparable parts of a system. In absence of them, even a simple task appears horrible.
The good news is, this drawback has a very efficient and quick fix according to many of the users. Only disconnecting them for some time may offer great relief to the users. De-port the hardware items with best care and place them in a safe location. After doing so, restart Windows 10 and check for the blue screen error after coming back to a new session. If no setback shows up, connect all the accessories and use them for functionality.
13] Use DISM tool to rectify dreadful Windows image files
Windows image files are the components of a major update and they are very sensitive in most cases. Once these components are corrupted by some reasons, Blue Screen error with bug check code 0x0000013B may appear in the system. To rectify these files eventually saying goodbye to BSOD error, DISM tool comes handy. This tool will be activated in the elevated command prompt when proceeding through the below guidelines –
- Open the taskbar Search pressing Win+Q hotkeys.
- Edit the empty text space and type in cmd.exe.
- When the Command Prompt appears in the result, make a right-click on it.
- Select Run as administrator option.
- Hit Yes when a UAC prompts for permission.
- When the dark window unfolds, enter following command tool –
DISM.exe /Online /Cleanup-image /Restorehealth
- Hit Enter key to run the DISM tool.
- Wait a while until the process finishes completely, it might be a little lengthy.
- Once done, Restart Windows 10 to put changes into effect.
14] Install the latest version of BIOS
A Firmware that runs initially when a computer starts for the first time is known as the BIOS. This is a very important part of an operating system that controls hardware initialization and provides runtime services for various installed programs. The BIOS needs to keep updated every time to stay away from any bugs and problems like PASSIVE INTERRUPT ERROR Blue Screen in Windows 10. To accomplish the task, here are the guidelines to follow –
- Press Win+S hotkeys to open up Taskbar search.
- Type “System” in the provided search box and select System Information app from results.
- When a new page opens, come down to bottom part and write BIOS in the search box provided here.
- Press Enter key and you can see information before BIOS Version/Date on the right-side pane.
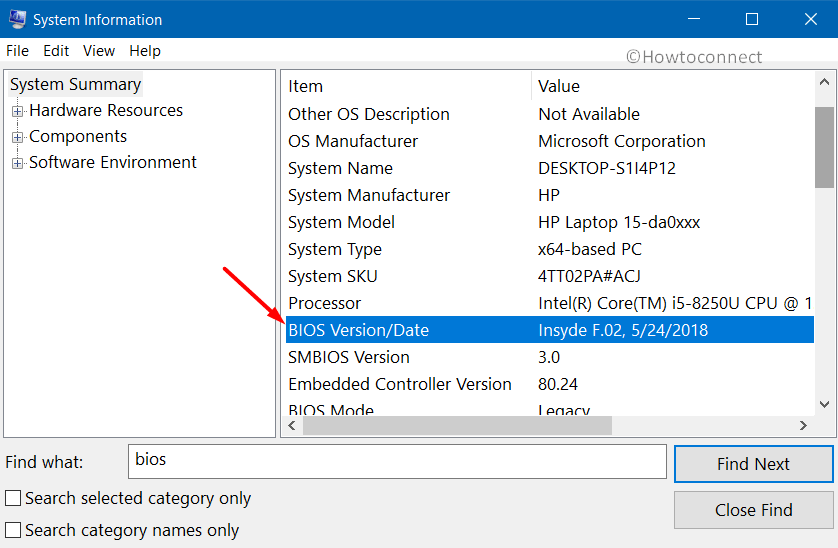
- Note down the information and close the window.
- Launch the web browser and visit the manufacturer site for the BIOS of your computer using information collected before.
- Once you find the latest version of BIOS, download the compatible ones and install it.
15] Fix up bad areas from Hard Disk to Resolve PASSIVE INTERRUPT ERROR
Hard Disk is one of the most important parts of the computer often compared to soul of the device. People seldom intend to replace it as it doesn’t cause many problems. But using the same thing for long time may end up getting some snags one of which can be blue screen error with bug check code 0x0000013B. There are bunch of ways to keep it healthy but only one tool can help when bad areas are formed. Talking about Disk Checking Tool which activates in the Elevated Command Prompt. Here is how to use the tool –
- Manage access to the Elevated Command Prompt using same guidelines shown before.
- When in the black window, enter following command at the base of blinking cursor –
chkdsk C: /f /r /x
- Hit the Enter key to activate the Disk Checking Tool in this window.
- The utility will find out bad areas in the disk and finally fix them automatically. This process might take long time than expected, schedule the task accordingly.
- When the process ends, restart Windows 10 to save these changes to system.
16] Involve Windows Blue Screen Troubleshooter
Windows Blue Screen Troubleshooter is one of the most trusted resolution processes having the capability to eliminate the BSOD error. This is a default tool and introduced in Windows 10 first with Fall Creators Update edition. Initially, it was available in Windows Settings app but later on shifted to Control Panel based on public demand. Now, you can also use a direct online troubleshooter to fix the PASSIVE INTERRUPT ERROR Blue Screen in Windows 10. Here is how to use the default tool –
- Open the Run dialog and type control panel in the void text box provided here.
- Press Enter key and let the app to arrive on display.
- In case, the UI shows only Categories, click on dropdown menu beside View by and select Large icons/ Small icons.
- After the window readjusts, select Troubleshooting from first column.
- Moving to the next window, choose View all option from left pane
- After the following page unrolls, make a double click the Blue Screen option from second place.
- From the Troubleshooter wizard appearing next followed by a click on Advanced link.
- Select the option Apply repairs automatically.
- Now, click on the Next button to initiate the process.
- Upon the completion of troubleshooting you will see the measure to be taken if any BSOD issue is detected. Ensure to have an active internet connection to the device beforehand.
Users can also use the direct Online tool for this Blue Screen issue using any web browser. For that, proceed with below guidelines –
Using Direct Online Tool
- Launch a browser form Windows and visit the webpage dedicated to Microsoft’s online troubleshooting by clicking this link.
- When a new page arrives, hover down to When did you get the error? Section.
- Select one of the radio buttons from here based on your case.
- Once the page reveals stepwise tasks to resolve an existing issue.
- Follow them to the point and fix the error eventually.
17] Remove any Third Party anti-malware software
Virus components nowadays are strongly coded and most of them can easily sneak through security defense. To defend them, you can have many anti-malware solutions beforehand. But the most trustworthy one is the Windows Security developed by Microsoft. Other third-party tools can also be used but now in parallel with the default Windows Security. Keeping two programs side by side increases probability to cause a software collision. The result will end up causing PASSIVE INTERRUPT ERROR Blue Screen in Windows 10. Therefore, we recommend removing the third party security solution using below guidelines –
- Open the Start menu pressing Windows key.
- Click on the Settings cog to open the app.
- When the layout loads fully, select Apps and shift to the consequent page.
- From the succeeding page, choose Apps & Features from the left side pane and eventually jump to the right.
- Hover to the third-party anti-malware tool when the list of installed apps is available.
- Click the same followed by choosing Uninstall from the expanded pane.
- If UAC prompts, choose Yes to continue.
- Follow the next steps from display until the uninstallation finishes.
- Restart Windows 10 upon ending the process.
18] Uninstall the defective Windows update
As the Windows updating process is autonomous, often it may entangle in a close loop. When the unfinished files or some defective patches are installed in the system, Blue Screen error may evolve there. If you are getting the PASSIVE INTERRUPT ERROR Blue Screen after a Windows update, it might be due to the faulty update files. In such cases, these files need to be removed immediately using below guidelines –
- Right-click on Start menu and select Settings from there.
- From the app UI, select Update & Security and pass forward to more settings.
- Select the Windows Update option located on the left side when the next page loads.
- Jump to the right and click View Update history link available there.
- Upon opening subsequent window, make a click on Uninstall updates link.
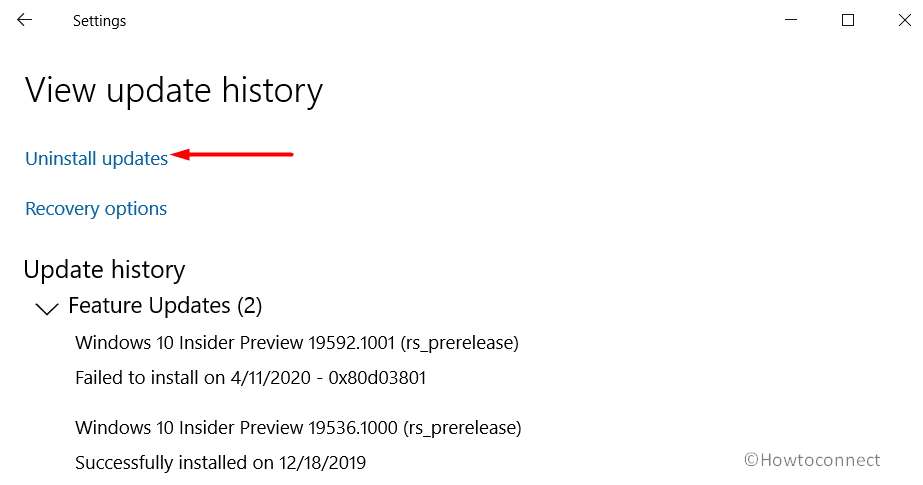
- In a moment, you will be redirected to a new window from Control panel, look for the latest installed update you opt to remove.
- Select the defective patch and click Uninstall option from top ribbon.
- Follow the guidelines coming up on display until the process ends.
19] Run the Automatic Repair to solve PASSIVE INTERRUPT ERROR
Whenever complex issues like Blue Screen error shows up in the system, Automatic Repair is welcomed in the third boot. Here, a good number of diagnoses are carried out to detect the actual problem. The process may be lengthy and time-consuming when proceeded automatically, hence we can do it manually using below guidelines –
- Manage to open the Settings app using guidelines stated in above workaround.
- Select the Update & Security tile once the app is loaded.
- From the consequent page, click Recovery option on left pane.
- Shift to the corresponding right side and head over to Advanced startup section.
- Do click Restart now button located under it.
- After Windows finishes rebooting, select Troubleshoot =>Advanced options => Startup Repair.
- Once Automatic Repair page comes in the view, provide your Microsoft account credentials.
- Finally, choose Continue button to initiate the process.
20] Perform a Clean Boot to Fix PASSIVE INTERRUPT ERROR
Clean Boot is a troubleshooting method that allows the device to perform some diagnosis to detect which program is causing the error during normal booting process. Basically, both the Clean Boot and Safe Boot may appear similar and often create conflict in the system. Clean Boot is a bit advanced in case of troubleshooting by isolating performance issues. Performing a Clean Boot may resolve PASSIVE INTERRUPT ERROR Blue Screen in Windows 10 as well. Here is how to accomplish the task –
- Get access to Run dialog pressing Win+R hotkeys.
- Type msconfig in the empty text space and click Ok button.
- When the System Configuration window comes up, click the radio button set aside Selective startup.
- When the grayed out options are visible, untick the box against Load startup items.
- Enter into Services tab and put a tick mark on the box assigned for Hide all Microsoft services.
- Click the Disable all button.
- Move back to the Startup tab and click the link says Open Task Manager.
- Perform a right-click on each program listed here and choose Disable for all.
- Go back to System Configuration window.
- Click on Apply button first and then Ok to save the changes.
Methods:
1] Update all the drivers
2] Fix up memory issues residing
3] Install all the latest Updates
4] Perform System Restore
5] Detect malware threats
6] Limit the risk of Software conflict
7] Scan the system components
8] Roll Back a defectively installed device driver
9] Disable Fast Startup
10] Boot Windows 10 in the most reliable Safe Mode
11] Clean the junk files
12] Temporarily disconnect hardware devices
13] Use DISM tool to rectify dreadful Windows image files
14] Install the latest version of BIOS
15] Fix up bad areas from Hard Disk
16] Involve Windows Blue Screen Troubleshooter
17] Remove any Third Party anti-malware software
18] Uninstall the defective Windows update
19] Run the Automatic Repair in Windows 10
20] Perform a clean Boot to Windows
That’s all!!