You will find solutions to HAL_IOMMU_INTERNAL_ERROR Blue Screen of Death error in Windows 10 here. This BSOD issue having bugcheck value 0x000001D9 leads the desktop to freeze and hang. Frequent Reboot of PC also occurs when this stop error appears.
HAL IOMMU INTERNAL ERROR in Windows 10 mostly happens because of corrupt, old and incompatible device drivers. Conflicts between similar applications and malware infection are also the main reasons for this BSOD. Furthermore, if the system runs with memory problems, low disk space, problematic areas in HDD, corrupted Windows Image files it can face the error. In the below section, we will be discussing some effective and proven workarounds that can potentially help to resolve HAL_IOMMU_INTERNAL_ERROR BSOD in Windows 10. See the list of workarounds first –
HAL_IOMMU_INTERNAL_ERROR Windows 10 Solutions
Here is how to fix HAL_IOMMU_INTERNAL_ERROR BSOD in Windows 10 –
1] Disable Automatic Restart
With a confirmed HAL_IOMMU_INTERNAL_ERROR BSOD, Windows PC will have a tendency to perform Automatic restarting. This will be the most annoying problem you could ever come across. Unless this gets a fix, you cannot deploy other resolutions as well. Therefore, this solution comes at the top of the priority. Disabling the Automatic Restarting is not a complex job and you can proceed in the below steps –
Step-1: Navigate to the Desktop area after saving the running programs. Use Win+D hotkey press together and head to the place immediately.
Step-2: Right click on This PC icon. Choose Properties option from there to allow opening the System window.
Step-3: When it is visible on the screen, select Advanced system settings from the left side of the window.
Step-4: As the System Properties wizard appears, click on Advanced tab.
Step-5: Scroll a little down in the tab and reach Startup and Recovery section. When you see the Settings option here, hit it straightway.
Step-6: After a new wizard appears, go to its System failure part and uncheck the box for “Automatically restart”
Step-7: Lastly, select the Ok to save these changes.
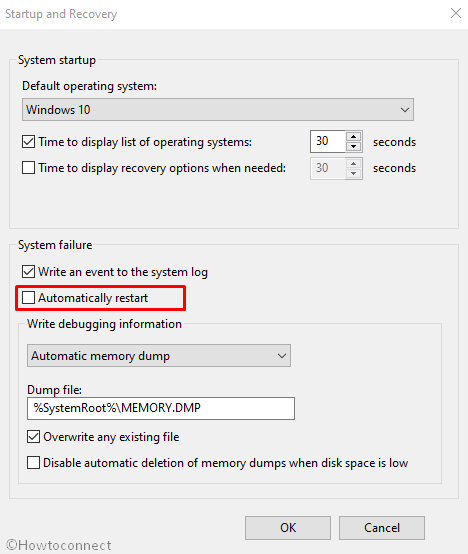
Now windows will not go for rebooting automatically. Hence, there will be enough opportunity for you to deploy the upcoming resolutions and resolve the issue accordingly.
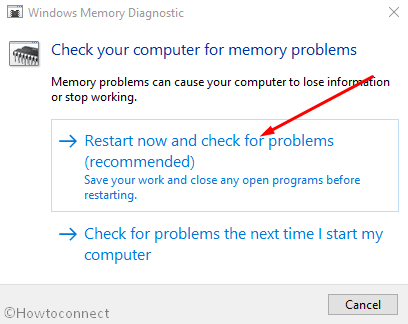
2] Resolve all the Memory problems including poor areas in RAM
Windows can suffer from memory issue due to wrong allocation of it and the presence of poor segments in the RAM. With these sorts of problems in the Windows, BSOD errors like HAL_IOMMU_INTERNAL_ERROR commonly occur. Luckily, we have the Windows Memory Diagnostic to deal with these troubles and fix the errors. Let’s proceed to the handy utility in the below process –
- Press Windows and S keys and invoke Taskbar Search.
- In the empty text box located here, type “Memory” and wait for results to load finally.
- Select Windows Memory Diagnostic Desktop app from the results to proceed.
- Select the option “Restart now and check for problems (recommended)”.
- Then windows will prepare for the first cycle of rebooting.
- Subsequently, you will find blue screen upfront detecting memory issues with the rate of progress in percentage.
- When the info shows 100%, windows will Restart for the second time.
- Finally, you can check the diagnosis report in the Notification area of the System Tray.
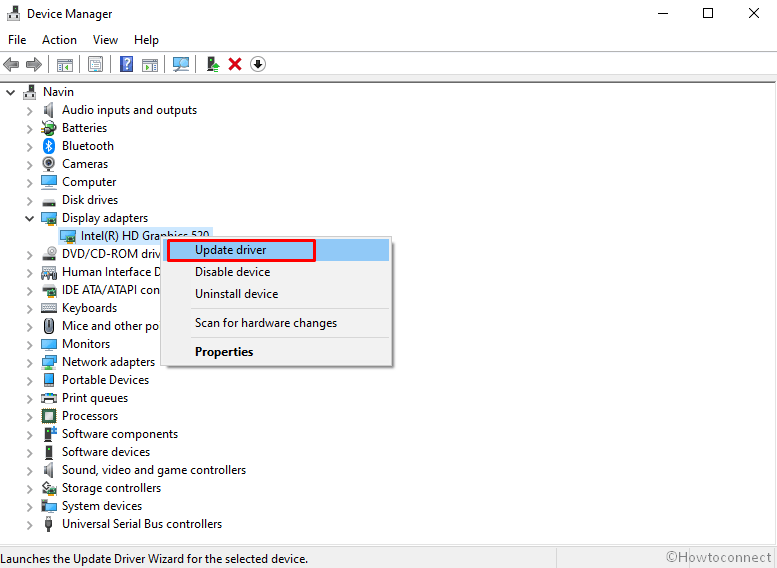
3] Update Drivers to fix HAL_IOMMU_INTERNAL_ERROR BSOD
HAL_IOMMU_INTERNAL_ERROR BSOD is the result of outdated and corrupt device drivers mostly. Every time we come across a critical issue, they play a greater role there. We really should not allow such a driver on the computer which is old and defective. The Windows Device Manager is a top-notch app in this regard and it shows them with a yellow accent if needs to be updated. To accomplish the workaround, move with below steps –
- Right click on Start menu and choose Run to invoke the window.
- In the text box provided here, write devmgmt.msc and eventually hit Enter key.
- Device Manager will hit on display and you have to watch closely in the console for any exclamation marks in the device’s list.
- Prior to expanding the device, right click on the drivers having Yellow warning icon on it.
- Select Update driver option and follow the other guidelines coming to display until these all get updated.
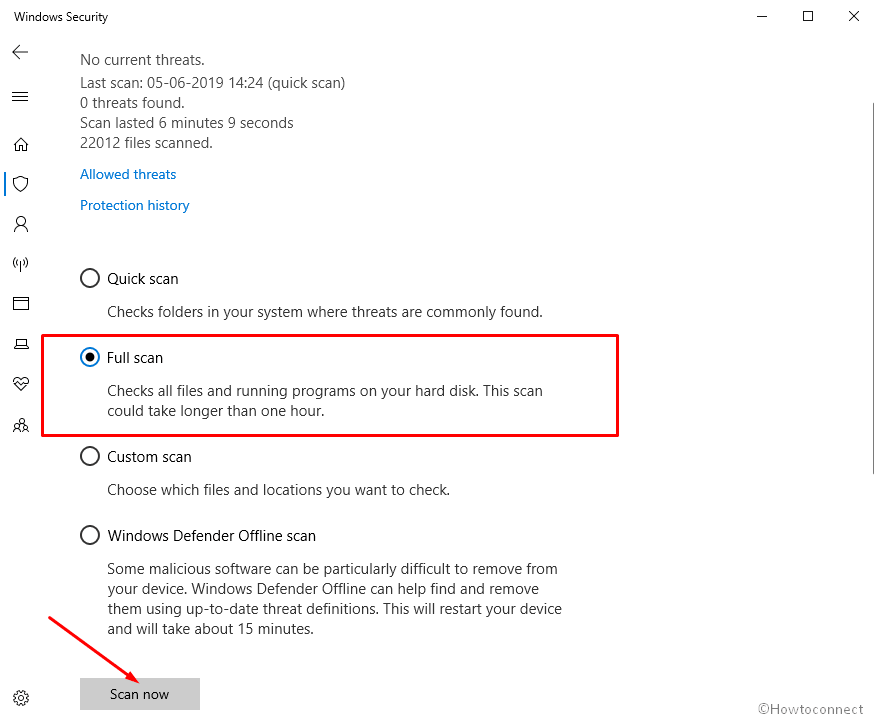
4] Detect the Malware in Full System and dismiss them using Windows Security
All over the web, Malware is present and often it exists in disguise. You can be easy prey to them after making a visit to a website or clicking link coming in emails. Sometimes inserting a USB can also be risky. Once they get entrance to the system, cause the necessary files to be removed or infected. As a result, many issues come up including HAL_IOMMU_INTERNAL_ERROR. You can avoid this malignant consequence by making regular scanning in Windows security. The default tool can also dismiss all the threats in the most effective way. Follow the below guidelines to complete the task –
- Click on Show hidden icon arrow from the right side of the taskbar.
- Select Shield icon from there and let the system open Windows Security app.
- Moving on to the App, select Virus & threat protection option.
- Now, click on Scan options link to reveal available methods.
- Check the radio button allocated for Full scan and then select Scan now option.
- After the detection gets over, you will be shown a result. If there is any malware present, hit Clean threats option located here.
- Go to the next page, among three options, select Remove first and then Start actions to dismiss all these viruses.
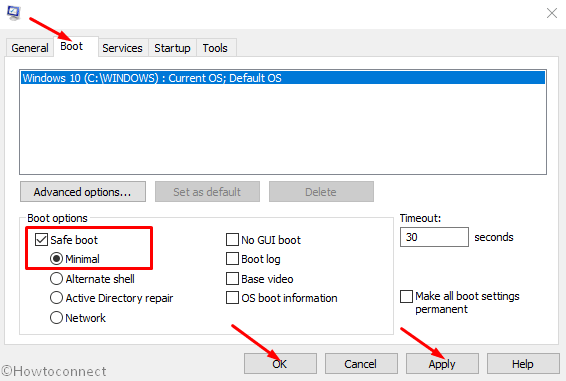
5] Load the Basic Programs only by Booting Device in Safe Mode
In all critical times, Booting in the Safe Mode came out as savior in Windows 10 including previous versions. In this startup procedure, the device starts with only the basic processes and hence, the problems get resolved immediately. Let’s give this renowned utility an attempt following below instructions –
Step#-1: Invoke Run dialog by pressing Win+R hotkeys together.
Step#-2: In the provided typing box, write msconfig using the keyboard and select System Configuration Desktop app once visible.
Step#-3: In the App UI, jump to Boot tab and straightway get at its second half.
Step#-4: Here, you can see the Boot options area. Now, check the box before Safe Boot and activate all the grayed out options.
Step#-5: Hit the radio button before Minimal option and proceed forward.
Step#-6: Select Apply button first and then Ok to save these changes.
Step#-7: Get inside of the Safe Mode on the further move.
6] Use Windows Blue Screen Troubleshooter to solve HAL_IOMMU_INTERNAL_ERROR
Since HAL IOMMU INTERNAL ERROR causes serious damages to the system, Microsoft technicians came up with a built-in tool for resolving this issue effectively. The utility named Blue Screen Troubleshooter and it is accessible through the settings app. Proceed with the below instructions to deploy the tool –
- Open Windows Settings app by pressing Win+I hotkeys altogether.
- From the app UI, head to Update & Security tile and eventually click on it.
- When the page loads completely, choose Troubleshoot located in the left pane, and jump on the adjacent side.
- Reach out to Blue Screen there and expand it by clicking.
- Hit Run the Troubleshooter option from the extended pane.
The utility will now detect and fix all the Stop errors. In the end, there should not be any HAL_IOMMU_INTERNAL_ERROR in the system.
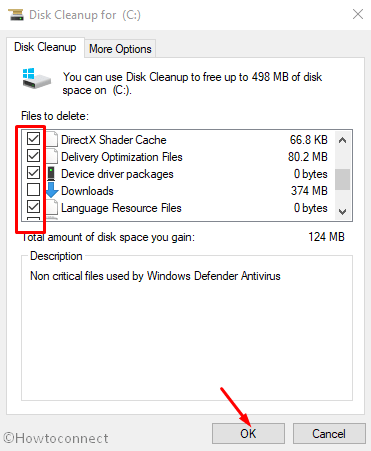
7] Delete the temporary and junk files from storage and make more space in it
Temporary files as stored in the Hard Disk, once grow bigger will occupy huge space in it. The ultimate result is, the storage runs in low space and operation gets slow down. In the process, HAL_IOMMU_INTERNAL_ERROR also hitched up. Using Disk Cleanup tool can be thoroughly beneficial to delete the junks in one platform. Here is how to proceed –
- Open Run dialog box.
- In the search box provided, type cleanmgr and press Enter from keyboard.
- A small popup window will float in and ask you to choose preferable Drive to run a cleanup. Select C: by doing a click on dropdown menu and then press Enter.
- Disk Cleanup Utility will come ahead slowly after calculating the space it can make free from the drive.
- When the wizard appears, come down to the bottom and click on Clean up system files.
- Once again, that small popup window will appear asking for the desired drive. Choose C: like before and press Enter key.
- When Disk Cleanup for C: comes ahead, reach Files to delete area.
- Check all the boxes available here and keep Downloads as it was.
- Hit Ok button and let the Cleanup start.
- Wait until this process ends automatically as this might take several minutes.
8] Disconnect external Hard drives to fix HAL_IOMMU_INTERNAL_ERROR
Some people come across HAL_IOMMU_INTERNAL_ERROR BSOD when an additional Hard Drive joins the system. Good news folks, Issue resolved easily as well just after disconnecting the external USB or other peripheral only. Follow the below guidelines and give a momentarily pause by disconnecting –
- Isolate all the Hardware accessories including the External HDD.
- Keep them at a separate and safe location to avoid damage.
- Now, restart the windows in the usual method.
- After completing the rebooting when you can see Desktop, make a check for the error.
- If resolved properly, start connecting them one after another.
- At this moment after connecting all, launch the web browser from windows.
- Visit Maker’s Webpage for each and Download the Latest drivers.
- Install the drivers in windows to use easily.
9] Settle up the bad areas present in Hard Disk
Prolonged use causes to form problematic areas inside a Disk Drive. When this happens, the system runs in various problems including HAL_IOMMU_INTERNAL_ERROR. The Disk Checking Utility comes handy to resolve these sectors automatically. See the method in detail –
- Press Win+S to call in Taskbar search and type cmd.exe. When Command Prompt appears in the result, right click on it.
- Choose “Run as Administrator” and also select “Yes” Once UAC prompts for your consent.
- In the Black Elevated Prompt, type following syntax and parameters –
chkdsk C: /f /r /x
- Press the Enter button when you have finished typing. This process will take a little longer as we have added three more notations instead of chkdsk only which would show disk status only.
- After the task is finished, Restart the device and upon coming back to operation, check if there is an error present.

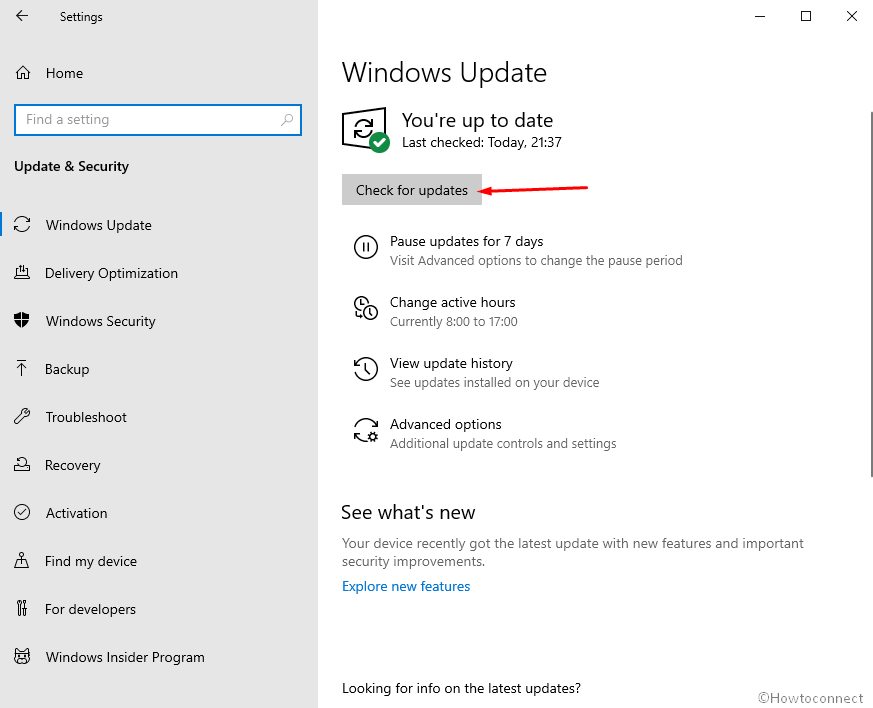
10] Install available Update Patches to solve HAL IOMMU INTERNAL ERROR
Any update patch contains fixing of existing bugs, quality improvements, the introduction of latest features. Installing these will give the OS a big blow and strength to fight vulnerabilities like HAL IOMMU INTERNAL ERROR. An Outdated Windows 10 is prone to get affected always. Follow the below guidelines to install them –
- Manage to Load the Settings page of Update & Security as shown in the above workaround.
- Select Windows Update available in the left pane.
- Navigating to the corresponding right, click on Check for updates link ignoring “You’re up to date” dialogue.
- Upon finishing the downloading, click on Install.
- Reboot the Windows once asked and update the OS.
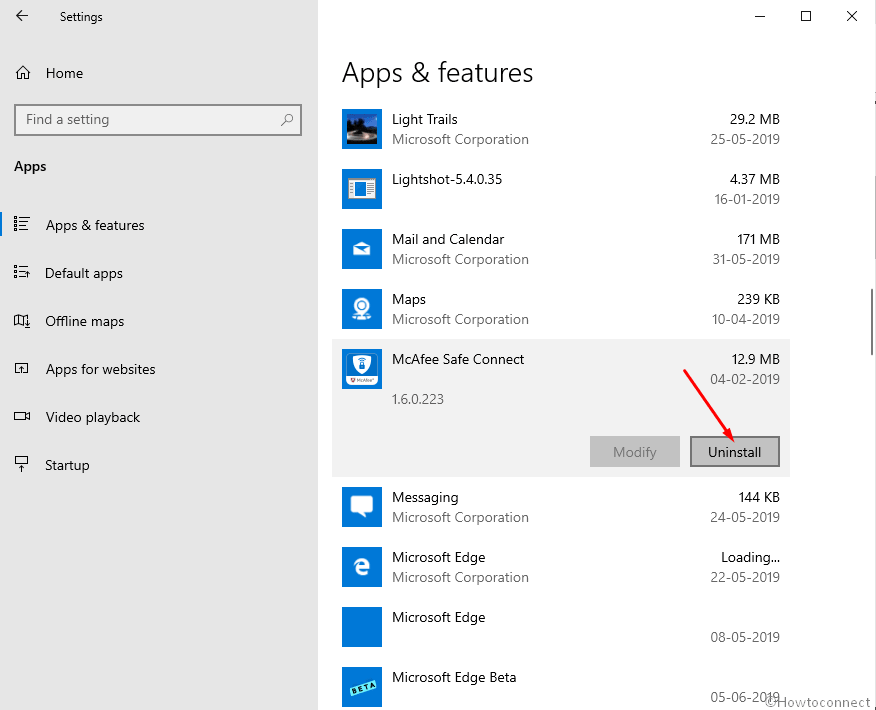
11] Uninstall similar programs to eliminate conflicts
Having the same applications often become risky they tend to collide with one another. Meanwhile, the necessary OS files get eradicated and HAL_IOMMU_INTERNAL_ERROR evolves. In these cases, uninstalling comes ahead first. When we remove one of these, the action reduces the risk of collision between them. Follow the below guidelines to uninstall an App –
- Access Windows Settings app using any convenient method stated above.
- When on the Home page, roll the cursor to Apps and click on it eventually.
- On the next page after appears, choose Apps & features on the left wing and shift to the right.
- Once all the Apps be visible, reach out to applications colliding with each other.
- Select each and hit Uninstall option from the expanded pane.
- If User Account Control prompts for authentication, select Yes to proceed.
- Follow the on-screen guidelines until finally removed.
- Restart the device and once powers up next, do check for the error in the system.
- If resolved, you can Launch Microsoft Store and Download the deleted app again.
12] Undo recent changes by System Restore
Performing a System Restore directs you back to the state where you were. We often install an app or uninstall some for the necessity of work. These actions leave marks in Windows Registry and when they go wrong, HAL IOMMU INTERNAL ERROR is imminent. Therefore, to Undo these changes, perform the below tasks –
- Open the Taskbar search (commonly Win+S) using any of the above instructions.
- Type rstrui in the text area and hit the Enter button.
- Once the System Restore Wizard appears on the screen, select Next.
- From the consequent page, click on Show more restore points and reveal all the points you have created beforehand.
- Choose the last one in the list and click on Next.
- After the following page cuts your view, click Finish.
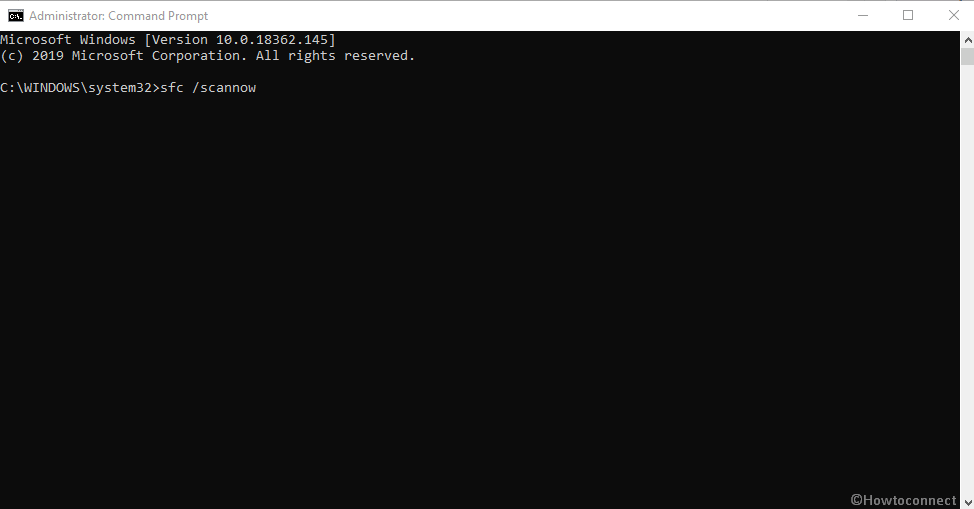
13] Recover missing DLL files and corrupted resources using System File Checker
So many vulnerabilities occur in Windows 10 and sometimes in worst extent, system resources are erased. In the same way, DLL files often go missing. When these cases happen, HAL_IOMMU_INTERNAL_ERROR BSOD comes in. System File Checker comes handy to fix these components once executed in the Elevated Command Prompt. To access the utility, follow the below instructions –
- Open the Taskbar search by pressing on Win+S keys.
- In the search box given here, type cmd.exe and select Run as administrator from the right flyout.
- After User Account Control asks for your consent, provide approval by choosing Yes.
- On the Black Elevated Command Prompt window, type underneath code and hit Enter key –
sfc /scannow
- System File Checker will be activated and start detecting file corruption and missing DLL ones. Fixing will also start automatically.
- Though this process is a little time-consuming, do not terminate abnormally and let it end by itself. After all these files are okay, there should not be any.
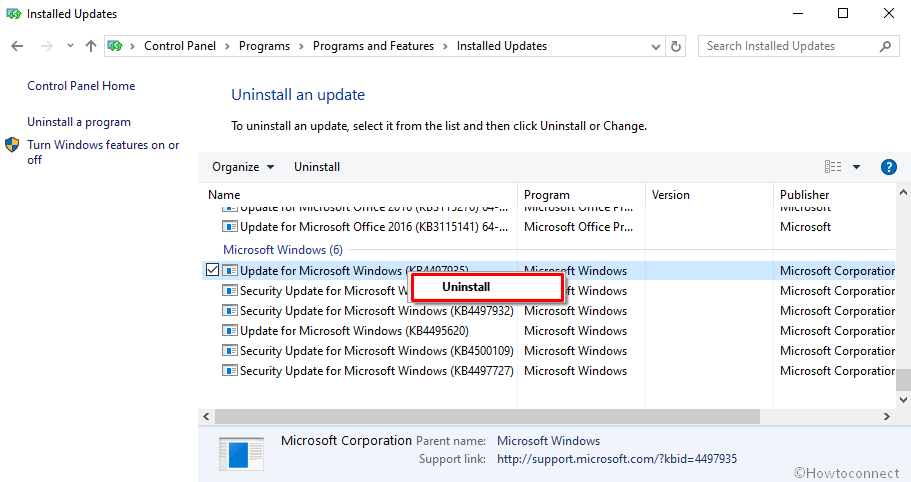
14] Uninstall the troublesome Windows Update
Sometimes Windows update creates the Blue screen HAL IOMMU INTERNAL ERROR. Uninstalling the files will be enough as to resolve the issue or prevent it. To complete the task, move with the following guidelines –
- Press Windows key.
- Once Start menu becomes visible on display, choose Gear cog.
- From App UI, move ahead to Update & Security and click on it.
- From the following page after loaded, select Windows Update and shift to the corresponding side.
- Click on View update history link.
- Select Uninstall updates and let a window unroll from Control Panel.
- Reach the last received patch and do a right click on it.
- Select Uninstall and follow on-screen instructions until they get removed completely.
15] Remove all the Third Party Anti-Virus Programs
In virus issues, you might have used a free anti-virus solution as a safeguard. This is okay until Windows Security arrives. Since the tool is the default for Windows 10 and also very effective, there is no need of using a third party program in this regard. Moreover, most of these programs, due to conflict, often cause HAL_IOMMU_INTERNAL_ERROR BSOD. Therefore, if you have such applications, uninstall using the following guidelines –
- Type appwiz.cpl in the Windows search and Enter
- Select Third Party Anti-virus app in the list.
- Hit Uninstall option visible at the top ribbon.
- Next steps will be as shown in the display until it gets uninstalled completely.
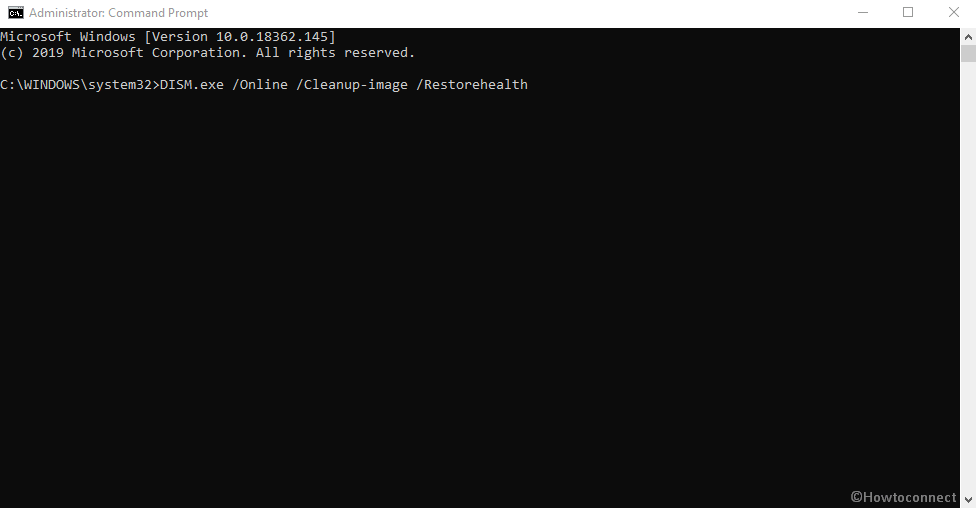
16] Run the DISM tool in Command Prompt for fixing defective Windows image files
When Windows Image files fall into corruption, it might cause HAL_IOMMU_INTERNAL_ERROR. As a fix, DISM tool will be the best-suited utility. Here is the procedure –
- Rght click on Taskbar and select Task Manager from the appearing menu.
- From the app once loaded fully, select File located at the top left corner.
- Choose Run new task when seen and let Run dialog appear.
- In the empty writing field, cmd and move down later on.
- Mark the checkbox below the Open saying “Create this task with administrative privileges”.
- After Pressing Enter key, you will be straightaway guided to Elevated Command Prompt.
- At the black window, type following command where a cursor winks –
DISM.exe /Online /Cleanup-image /Restorehealth
- Hit Enter key and let the Tool fix corrupt Windows image files. The process may be lengthy, wait until it gets over automatically.
- When ends, Restart the windows and after coming back to operation, check if the error resolved.
Till this point, we have elaborated almost all the effective resolutions hoping to resolve HAL IOMMU INTERNAL ERROR in Windows 10. Hopefully, the issue is no more prevalent in your system and you are working smoothly. If the issue still persists, we can suggest only the last resort – Reinstalling Windows 10. This will be the ultimate solution to all the existing problems and if done accurately, no issue will be evolving next.
Methods:
1] Disable Automatic Restart
2] Resolve all the Memory problems
3] Update Drivers
4] Detect the Malware in Full System
5] Load the Basic Programs only by Booting Device in Safe Mode
6] Use Windows Blue Screen Troubleshooter
7] Delete the temporary and junk files
8] Disconnect external Hard drives
9] Settle up the bad areas present in Hard Disk
10] Install available Update Patches
11] Uninstall similar programs to eliminate conflicts
12] Undo recent changes by System Restore
13] Recover missing DLL files and corrupted resources using System File Checker
14] Uninstall the troublesome Windows Update
15] Remove all the Third Party Anti-Virus Programs
16] Run the DISM tool
That’s all!!