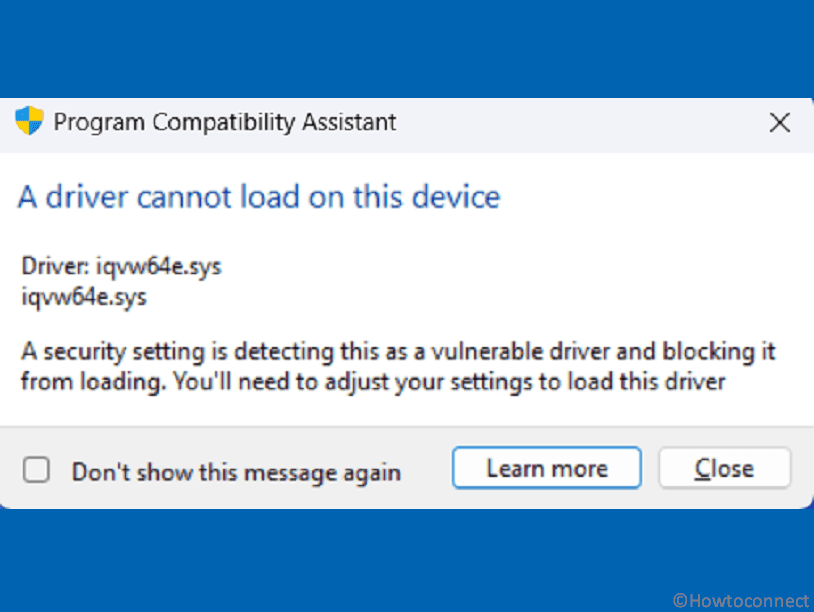
Do you come across frequent error messages saying “A driver cannot load on this device in Windows iqvw64e.sys” when trying to start the Windows system? If yes, then the problem commonly occurs because of Memory Integrity enabled on your PC which perceives this driver as malware or something harmful and blocks this. The error may pop up when trying to launch a program or after installing a Windows update.
If you want to know what is iqvw64e.sys then this is a software component of Intel Network Adapter Diagnostic Driver located in C:\Windows\system32\Drivers\iqvw64e.sys. iqvw64e.sys is the diagnostic driver for Intel LAN software tool and it is not an important or mandatory module for a LAN Device. But when Windows computer is starting, Windows misunderstand it as a virus through Memory integrity tool and this is the basic cause of this error. See: Fix wdcsam64.sys Memory integrity Error in Windows 11 or 10.
Table of Contents
A driver cannot load on this device iqvw64e.sys
Here is how to fix iqvw64e.sys A driver cannot load on this device in Windows 11 –
Step-1: Disable Memory Integrity
Memory Integrity is a built-in security feature that helps protect your computer by preventing unauthorized access to the core parts of the operating system. When this is enabled, Windows 11 uses virtualization-based security to protect key components of the operating system’s memory, making it more difficult for malicious software or unauthorized modifications to occur.
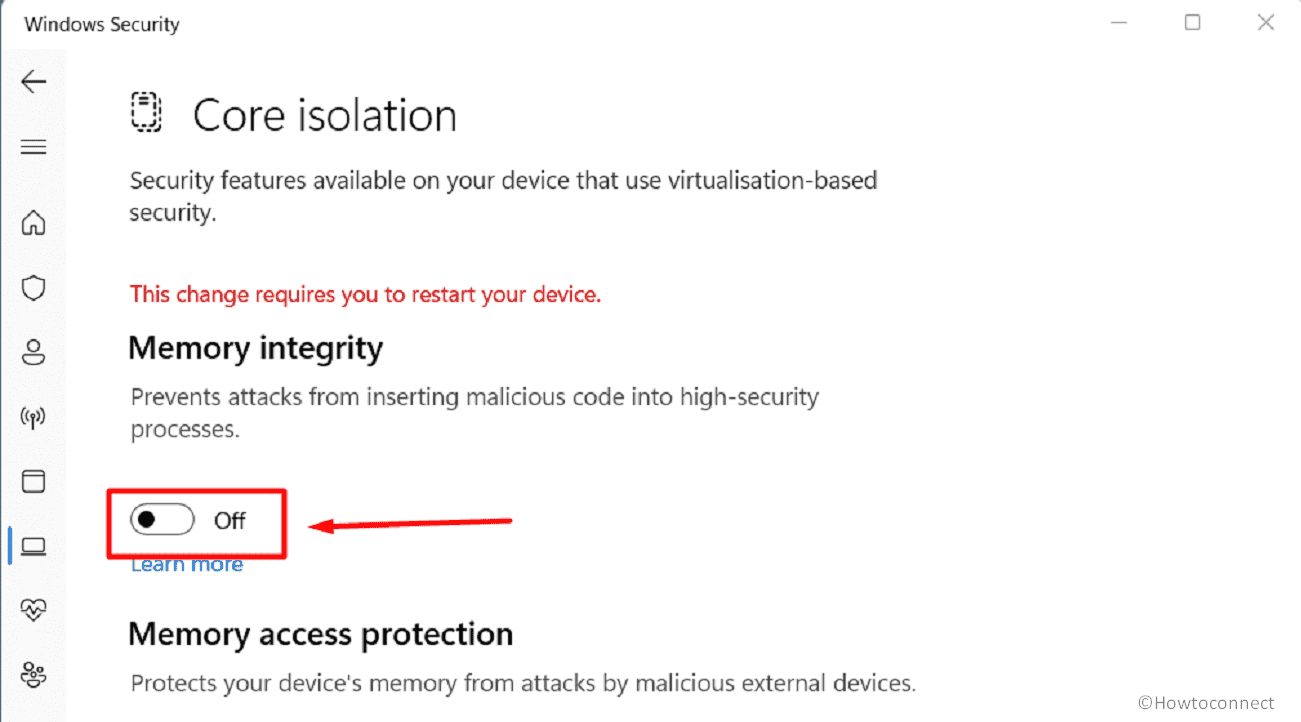
But sometimes, this Memory Integrity causes A driver cannot load on this device iqvw64e.sys error. Thankfully, disabling this feature can fix the issue:
- Press Windows and I keys.
- On Settings, click on Privacy & security.
- Go to the right panel, and select Windows Security.
- From the next page, click on Device security.
- Then, click the link – Core isolation details.
- Use the toggle switch and turn off Memory integrity.
Step-2: Use Autorun
If you are unable to repair the issue, even after disabling Memory integrity, you can utilize autoruns to eliminate any corrupted driver entries and subsequently delete the driver manually.
- First of all, download Autoruns.
- Back to the Downloads folder and right-click on the Autoruns.zip file.
- Select Extract All…
- Click on “Extract”.
- Locate the correct version of Autoruns.exe and right-click on it.
- Select – Run as administrator.
- Once User account control comes up, click Yes.
- In the Quick filter, at the top of the window, type in iqvw64e.
- Delete all the entries coming in the result and close the tool.
- Press Windows + R and navigate to the following location (ensure hidden files are shown): (How to Enable Hidden Files and Folders in Windows 10)
C:\Windows\System32\Drivers\
- Locate iqvw64e.sys file and delete it
Step-3: Update the Intel Network adapter Diagnostic driver
Since iqvw64e.sys error appears due to Intel Network Adapter Diagnostic Driver, updating the driver might work. Intel regularly releases driver updates to address bugs, improve performance, and enhance compatibility with the latest software and operating systems.
To update the Intel network adapter Diagnostic driver and potentially fix errors, you can follow these steps:
- Visit the official Intel website (www.intel.com) or the website of your computer’s manufacturer to access the driver download section.
- Look for the support or driver downloads page and search for the appropriate driver for your hardware component.
- Find the latest version of the driver that is compatible with your operating system and specifications. Make sure to download the correct driver version.
- Download the package or executable file provided by Intel. Typically, it will be in the form of a compressed archive or an executable installer.
- Prior to installing the new driver, consider creating a system restore point or backing up important files as a precautionary measure.
- Uncompress the file if it is compressed.
- Double-click on installer and follow the onscreen instructions to complete the process.
- If any issue in installing you can use Device Manager to deploy the driver update in the following way.
- Press Win+X and select Device Manager.
- Find the culprit intel driver in the list and right-click on it.
- Select Update driver.
- When a new window appears, click on Browse my computer for drivers.
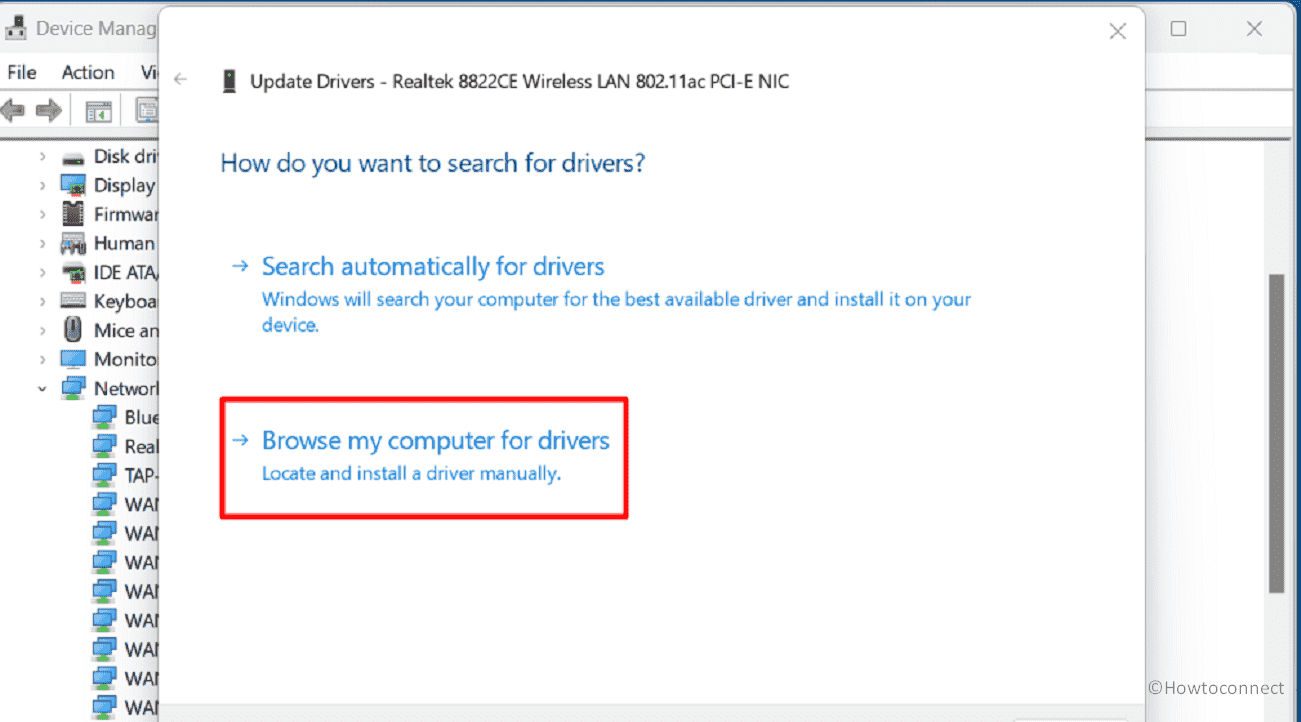
- Click on “Browse“.
- Choose the driver you have downloaded and select OK.
- Then click on Next and allow the driver to install.
- Restart your computer.
Step-4: Install pending Windows updates
Microsoft pushes driver updates for OEM companies through Windows updates so when you encounter iqvw64e.sys error due to obsolete drivers this method is useful.
- Click on Search.
- Type updates and press Enter.
- Once the Settings app opens, click on Check for updates.
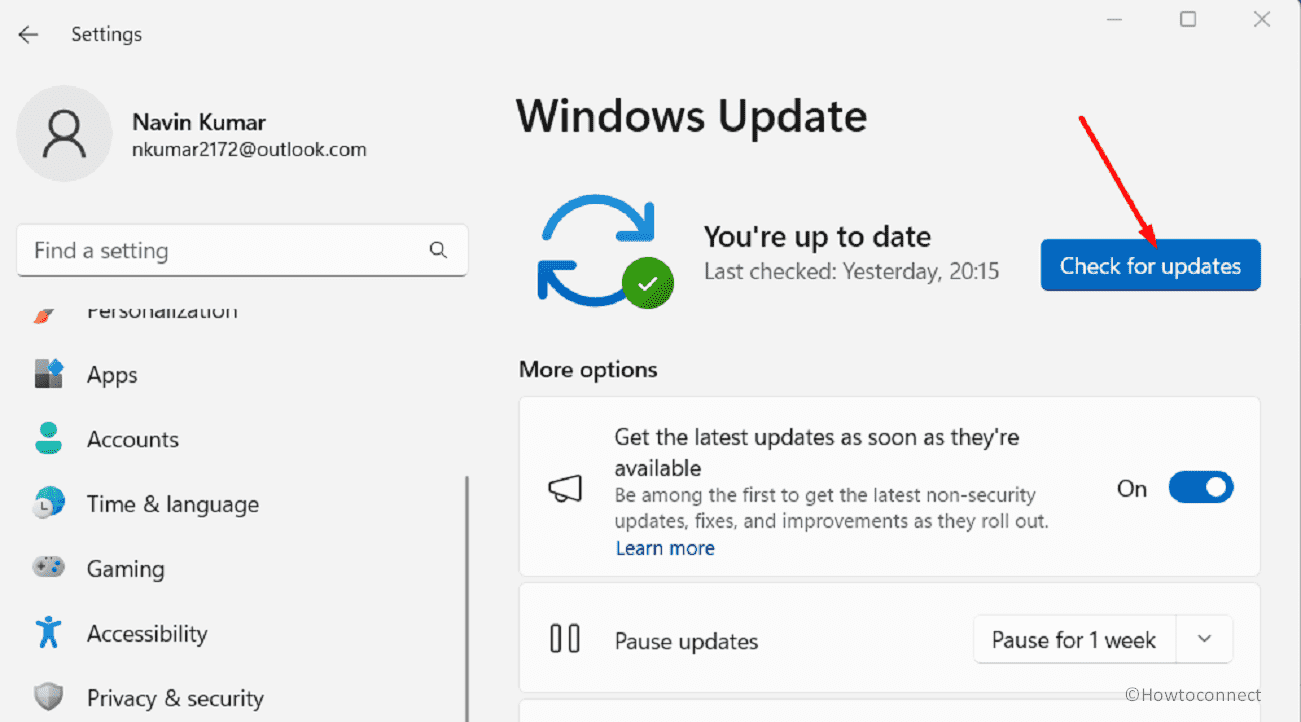
- If any update is found after scanning click on Download and Install.
- Finally, restart the PC when you are asked.
Step-5: Uninstall and then install the driver
Corrupted driver installation is likely to trigger this Program Compatibility Assistant error iqvw64e.sys so uninstall the driver and then install the same to deal with the issue:
- Right-click on Start.
- Select Device Manager.
- Find Network adapters and double-click to expand it.
- Then right click on the one that is creating the issue and select Uninstall device.
- Leave the box saying “Attempt to remove the driver for this device” unchecked.
- Click on Uninstall.
- Then, restart the device.
Step-6: Remove the recently installed Windows update
Sometimes buggy Windows updates or conflicts between update files and the driver might generate the error. But Don’t worry, you can easily uninstall the Windows update using below instructions:
- Press Winkey+R.
- Type appwiz.cpl and press Enter to launch the Programs and Features window.
- From the left panel, click on View installed updates.
- The Settings page will prompt showing you the list of Windows updates (Windows 11).
- Click on Uninstall for the most recent one and confirm the popup.
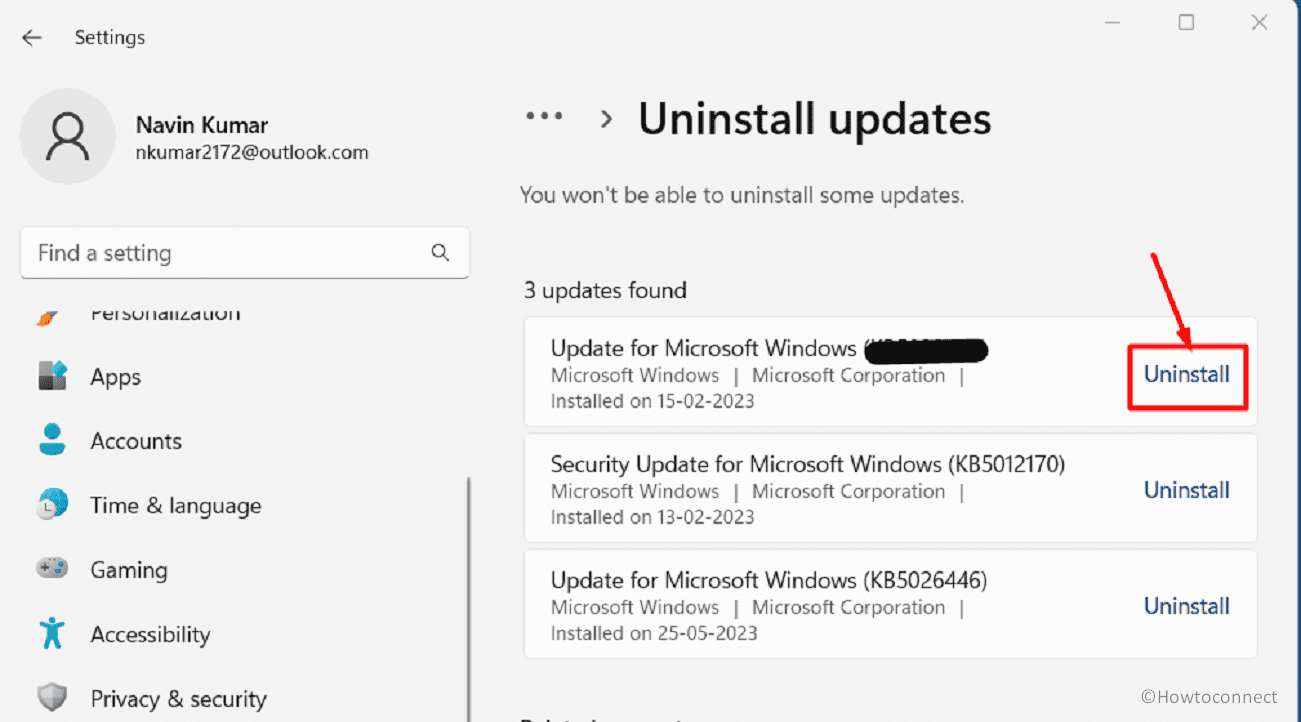
- In Windows 10, right click on the latest update and click “Uninstall” (staying at the Programs and Features window).
- Select Yes on the verification dialog.
Step-7: Use SFC and DISM utilities
If A driver cannot load on this device iqvw64e.sys error occurs due to corruption in system files or Windows installation this method is quite effective to fix the glitch. Both SFC and DISM are valuable tools for resolving system-related issues, ensuring the stability and functionality of Windows. So, run them as follow:
- Click on Start.
- Type cmd.exe.
- Select Run as administrator.
- When UAC opens, click on – Yes.
- On the Administrator: Command Prompt, type
SFC /SCANNOW. - After verification and files integrity checking is completed, restart the system.
- Check if iqvw64e.sys is solved or it still persists.
- In case, the issue continues to occur then again open the Administrator: Command Prompt as mentioned in the first 4 steps in this method.
- Then run the below commands by turn:
dism /online /cleanup-image /checkhealth
dism /online /cleanup-image /scanhealth
dism /online /cleanup-image /restorehealth- In the end, restart the device.
Step-8: Perform System Restore
System Restore is designed to help recover from system issues, software conflicts, or unintended changes that may have caused instability or malfunction. Using this feature, you are able to revert back the system to the point of time when the error was not started.
- Press Windows and R then type rstrui.exe.
- Hit the Enter key to launch the System Restore wizard.
- If you can find Choose a different restore point check this one.
- Click on Next.
- Select the date and time when the error “A driver cannot load on this device” did not begin.
- Then click “Next”.
- Check the point you have selected on the coming window and click on Finish.
- If a warning pop up appears, select Yes.
Methods:
Step-1: Disable Memory Integrity
Step-2: Use Autorun
Step-3: Update the Intel Network adapter Diagnostic driver
Step-4: Install pending Windows updates
Step-5: Uninstall and then install the driver
Step-6: Remove the recently installed Windows update
Step-7: Use SFC and DISM utilities
Step-8: Perform System Restore
That’s all!!
