RegistryChangesView is a freeware compatible with every edition of Windows and provides you capture a snapshot of Registry Editor. After capturing a snapshot you can compare it with previously stored Registry snapshots. You can Use ShadowCopyView in Windows 10, a small utility to access snapshots of a disk drive.
RegistryChangesView allows you to compare 2 Registry snapshots and detect exact tampering if exists. Moreover, you can also export the changes into a .reg file with the help of this tool. Read our related guide on How to Import and Export Registry Editor on Windows 10. Let us move ahead and explore all the details of this free Registry snapshots program.
RegistryChangesView Functions
1. We suggest creating a Registry snapshot before installing this freeware. Once the installation is over, you can compare this snapshot with the current one. This will show you all the manipulations made by the installer. In case, you find any modifications that you don’t like, you can immediately generate a .reg file to revert back the changes.
2. You might want to see changes in Windows configuration from the GUI of Windows and how to process this alteration in the Registry. So simply create a Registry snapshot before making the config and then after the configuration modifications. Now you can compare this snapshot with the current one and optionally create a .reg file that constitutes this configuration change.
3. Suppose there is an unwanted change in the Registry and you don’t have any previous snapshot. Undoubtedly, you can compare the current Registry with a shadow copy created by Windows and try to figure out the unwanted changes.
4. You can also use RegistryChangesView tool as a simple method to backup the Registry. The snapshot you take by RegistryChangesView simply contains Registry hive files with the same name as the original one, such as ntuser.dat, SYSTEM, SOFTWARE, and so on.
RegistryChangesView – Download and Install
Step 1 – Visit RegistryChangesView web page and download the utility version matching to your device (32-bit or 64-bit).
Step 2 – Extract the contents of the file and double-click RegistryChangesView.exe file. If UAC prompt comes up, click Yes.
How to Use RegistryChangesView
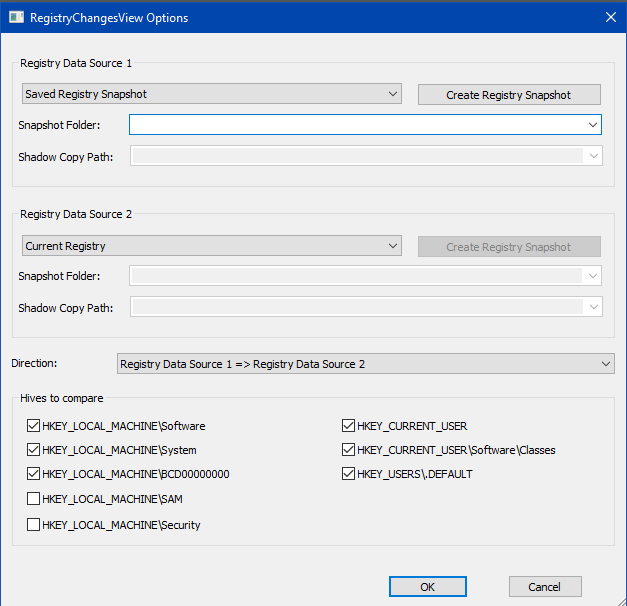
Step 1 – Once you run RegistryChangesView, the main options window shows up on the PC screen. This window allows you to choose 2 Registry snapshots to compare.
Step 2 – For every snapshot, you can choose one of the following data sources: Current Registry, Saved Registry Snapshot, and Shadow Copy.
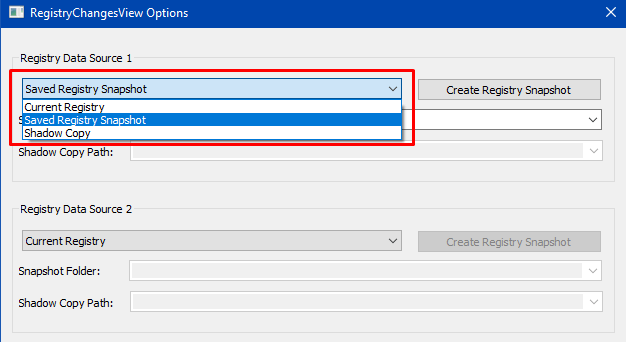
Step 3 – You can choose any combination you want, as long as Data Source 1 is not identical to Data Source 2.
For example, you can select to compare the Registry of 2 different shadow copies. You can Compare a shadow copy with a current one, or saved with current, or saved snapshot with another saved Registry snapshot, and so on.
Create a new Registry Snapshot
Step 1 – To generate a new Registry snapshot, select Saved Registry Snapshot in the data source combo-box.
Step 2 – Click the Create Registry Snapshot button. Subsequent, in the visible window and select the folder.
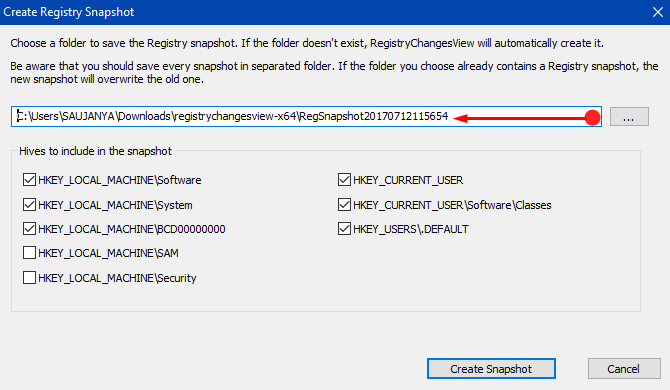
Step 3 – Click the Create Snapshot button, and allow it to perform the task in a few seconds.
Note – You can also create from the main window by pressing F8 (File -> Create Registry Snapshot).
RegistryChangesView – Other options
In the RegistryChangesView utility, you should also configure the below options after once you select 2 Registry data sources to compare.
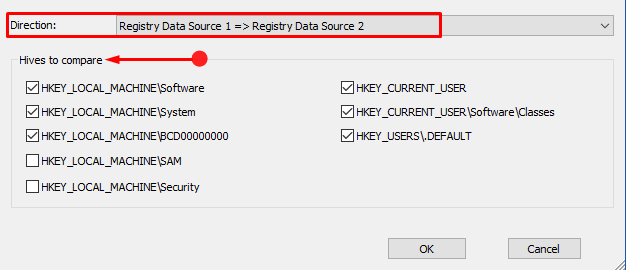
1. Direction – This field determines how the 2 Registry snapshots are compared.
For example, if the direction on RegistryChangesView you choose is “Registry Data Source 1 => 2”, every Registry key or value that exists on the second snapshot but doesn’t exist on the first snapshot will be displayed as Added Key or Added Value.
But if you select the reverse direction (Registry Data Source 2 => 1), every Registry key or value that exists on the second snapshot but doesn’t exist on the first snapshot will be displayed as Removed Key or Removed Value.
The direction field also triggers the way that .reg file is generated (Export Selected Items To .Reg File and Copy As .Reg File Format options). If the direction you select is Registry Data Source 1 => 2, the generated .reg file will make the changes from snapshot 1 to snapshot 2. If the direction you choose is “Registry Data Source 2 => 1”, the generated .reg file will make the conversion from snapshot 2 to snapshot 1.
2. Hives to compare – Lets you select which Registry hives to compare.
For example, If you only want to see the Registry changes on HKEY_CURRENT_USER, you should select the HKEY_CURRENT_USER and HKEY_CURRENT_USER\Software\Classes hives and unselect all others.
After selecting all options, click the Ok. RegistryChangesView will compare the sources you chose and displays the result in the main window.
Follow a basic guide on How to Create a New DWORD Value in Registry Editor on Windows 10.
Few Important Notes
1. The inbuilt setting does not make SAM and SECURITY Registry hives selected for comparison for creating new Registry snapshots. You can select these 2 Registry hives if you need to compare them. However, you should be aware of a security risk in this method. These Registry hives comprise encryption keys and password hashes of your computer and if you quit a snapshot with SAM/SECURITY hives, a non-admin user, or hacker can approach. He will find the sensitive files and might be able to use them for penetrating your system.
2. When you select Current Registry as one of the data sources, RegistryChangesView utility generates a temporary snapshot at %temp%\TempRegSnapshotX folder (X = numeric value) and deletes it after the comparison process gets over.
3. The snapshot created by RegistryChangesView is just a folder that contains the Registry files with their original name. If you possess a copy of hives and you want to use them as a snapshot, copy them into a separate folder with their original filename (Software, System, ntuser.dat, UsrClass.dat) and select this folder as a Registry snapshot.
Generating .reg file
RegistryChangesView lets you generate a .reg file that you can effectively employ to import with RegEdit tool of Windows. There are 2 options to generate .reg file –
1. Export Selected Items To .Reg File (Ctrl+E): Exports into a .reg filename that you choose.
2. Copy As .Reg File Format (Ctrl+R): Generates text in .reg file format into the clipboard.
Description of Columns
1. Registry Key – refers to the Full path of the key.
2. Change Type – Type of Registry modifications: For instance, Added Key or Value, Removed Key or Value, Modified Value.
3. Value Name – Indicates the name of the Registry value (Relevant only when the Change Type is Add, Remove, Modify).
4. Value Data – The content of Registry value (Relevant only when the alteration Type is Addition, Removal or Modification of Value). If the Change Type is Modified Value – This column shows the original value (before the change). The Value Data Changed To column shows the value after the change.
5. Value Type – Kinds of Registry value (REG_SZ, REG_DWORD, REG_BINARY, and so forth…). If the Change Type is altered Value – this column shows the original value type (before the change). The Value Type Changed To column displays the value type after the change.
6. Value Data Changed To – The content of Registry value after the change (Relevant only when the Change Type is revised Value).
7. Value Type Changed To – The type of Registry value after the change (Relevant only when the Change Type is Modified Value).
8. Key Modified Time 1 – The timestamp of the specified Registry key in the first snapshot.
9. Key Modified Time 2 – The timestamp of the specified Registry key in the second snapshot.
Quick Filter
If you want to observe only Registry keys or values that include particular strings, press Ctrl+Q (View -> Quick Filter). Then in the quick filter text box type the desired filter string.
Conclusion
So, use RegistryChangesView to Take a Snapshot of Registry Editor in Windows. Starting from Windows XP, this utility works superbly on every version, including the latest Windows 10.