In this article, we will show you the way to Share VPN Internet Connection Over WiFi in Windows 10 or 10. Sharing this connection will protect your internet security and privacy. Some devices like Sony Play Station, XBOX, or Apple TV do not allow this specific sharing feature. However, there is a way out doing which you can connect them pretty easily.
Sharing VPN feature with other devices in Windows 10 comes in handy in several situations without installing extra software. All you need is to execute certain series of commands with the help of WiFi. Let us see them in detail now!
Share VPN Internet Connection Over WiFi in Windows 11 and 10
Here is how to Share VPN Internet Connection Over WiFi in Windows 11 or 10 –
Check Hosted Network Support
Before heading towards the steps to share VPN using WiFi in Windows 10 and 11, you have to access an elevated Command Prompt and execute certain minor codes.
Step 1: At first, click on Search box from the taskbar and type cmd.
Step 2: In the result, right-click on “Command Prompt” and select the option “Run as administrator”. Click Yes.
Step 3: When the black window appears, type in or copy/paste the given-below command. Hit Enter.
netsh wlan show drivers
Note: The above command will check whether all the necessary drivers are perfectly installed in the PC or not. Also, ensure to read the instructions on Command Prompt properly. If the line “Hosted Network Supported” denotes as “Yes” then everything is okay and you can proceed to the next step.
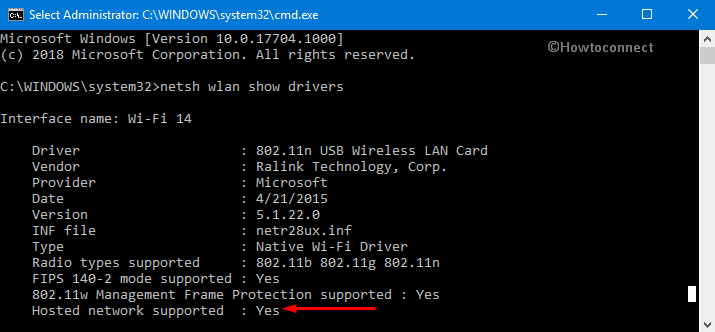
If you find “Hosted Network Supported” line as NO then you have to install relevant driver for it.
Create a Wi-Fi network with SSID
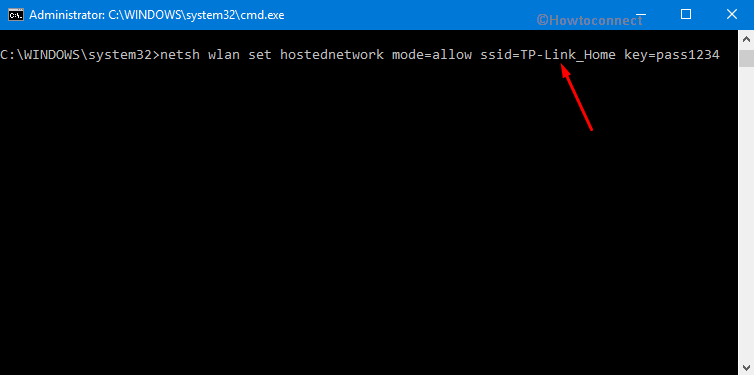
On the Command Prompt, insert the following given line of command.
netsh wlan set hostednetwork mode=allow ssid=cactusvpn key=password
Replace “ssid” with the name of your wireless network.
Furthermore, ensure to replace the “password” with network security key you to use to connect to your network. Keep in mind that the passphrase has to be at least 8 characters in length.
Share VPN in Windows 11 or 10
After creating the host network, go ahead with the following command to activate the hosted network. Copy/paste it and hit Enter to continue.
netsh wlan start hostednetwork
Finally, it will notify you that “The hosted network started”. At last close Command Prompt.
Note: If you come across the message “Hosted network could not be started” it indicates that the Wi-Fi driver is outdated. In that case, go ahead and update Windows with the latest version of the driver.
Share Your Internet Connection with a Hosted Network on Windows 11 or 10
After successfully running the above-mentioned commands in the proper sequence, you are ready to share VPN using WiFi in Windows 11 or 10. To make the hosted network accessible to other devices, ensure to share the internet connection. To do so, take help of the ‘Internet Connection Sharing’ feature from a physical network adapter.
Step 1: At first, open Run dialog box by hitting Win + R hotkeys. Here, type in or copy/paste ncpa.cpl in the text field and click OK.
Step 2: Now right click on the VPN connection and then go to Properties option in the popped up menu.
Note: Make sure to remember the name of the newly created connection as this will be required in the next step.
Step 3: Now switch to the Sharing tab and then mark against the checkbox “Allow Other Network User to connect through this computer’s Internet connection”.
Step 4: After this, go to the just below option “Home Network Connection” and click on the arrow and adjust it as a connection which you have just created.
At last, just tick on the checkbox “Allow other network users to control or disable the shared Internet connection” and press the OK button.
Connecting to VPN
On your PC, go to the VPN connection (as above discussed). Now open the ‘Play Station’, ‘Xbox’, ‘Apple TV’ (or another device that you want to use), and connect it to the newly created WiFi network.
Note: The newly created VPN settings will be lost the moment you switch off your PC. Basically, the above-dealt process will get disabled.
To enable this network again you should go to Command Prompt and type the following command.
netsh wlan start hostednetwork
That’s it!!! By doing the above-mentioned commands and steps, you will be able to Share VPN Internet Connection over WiFi.