An integration of DNS over HTTPS is possible for Windows 10 and 11. You can pretty effortlessly turn on DNS over HTTPS and test it by tweaking EnableAutoDoh DWORD in Registry. DNS over HTTPS (in short DoH) assists you to avoid ISP monitoring. In simple terms, DoH prevents ISPs from tracking users’ activities by modifying the default DNS service.
This feature was already integrated into popular browsers like Edge, Chrome, Firefox, etc but you can implement it as a system-wide setting in Windows 10. However, to make it possible in Win 10 and 11, ensure your Microsoft Account is a part of Windows 10. Once your system satisfies this requirement, verify that it is running Build 19628 or higher. Now walk through the given steps to enable and test this feature.
Turn on DNS over HTTPS EnableAutoDoh
Here is How to Turn on DNS over HTTPS EnableAutoDoh in Windows 11 or 10 –
Stage 1 – Modify Registry Editor
- Type regedit on the taskbar search box and press Enter.
- Once you access Registry Editor, head to the below-mentioned path –
HKEY_LOCAL_MACHINE\SYSTEM\CurrentControlSet\Services\Dnscache\Parameters- Switch to the right pane of Parameters key and create a new DWORD here. To do so, right-click on an empty space, hover over New followed by a click on DWORD (32 Bit) Value.
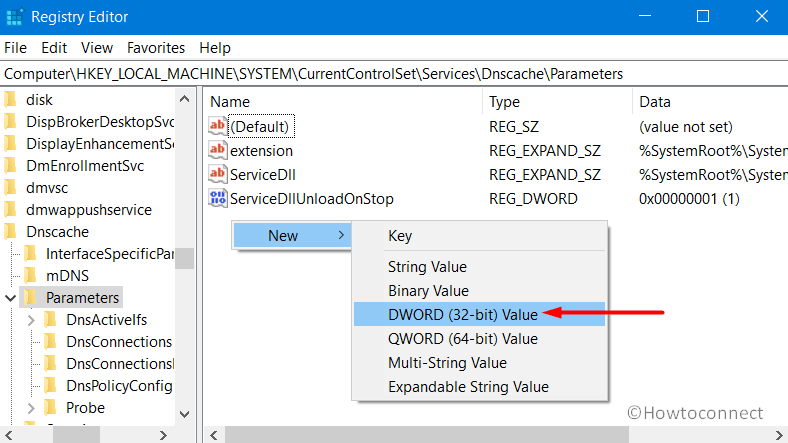
- Name this DWORD as EnableAutoDoh.
- Double-click on EnableAutoDoh DWORD and on its edit window set the value as 2 and click OK.

This will Turn on DNS over HTTPS using EnableAutoDoh registry DWORD.
Stage 2 – Change Default DNS Settings on your PC
- Press the “Win + R” hotkey to open Run dialog box.
- Insert the command ncpa.cpl and click OK.
- Right-click on the connected network and choose Properties.
- Now, double-click on Internet Protocol Version 4 (TCP/IPv4) or Internet Protocol Version 6 (TCP/IPv6). However, it completely depends on which version of IP your ISP is using.
- Select the radio button Use the following DNS server addresses. Moving on, provide the IP addresses as given below –

| Server Owner | Server IP addresses |
| 8.8.8.8 8.8.4.4 2001:4860:4860::8888 2001:4860:4860::8844 | |
| Cloudflare | 1.1.1.1 1.0.0.1 2606:4700:4700::1111 2606:4700:4700::1001 |
| Quad9 | 9.9.9.9 149.112.112.112 2620:fe::fe 2620:fe::fe:9 |
- Click OK, close all the active windows, and Restart Windows 10 PC to reboot the DNS service.
Stage 3 – Add a New Traffic Filter to Port 53
- In the taskbar search, type cmd.exe.
- Right-click on Command prompt and select “Run as administrator“.
- Select Yes upon a UAC pop-up on the PC screen.
- Once you access elevated Command Prompt, insert the following and hit Enter to reset the current network traffic filters.
pktmon filter remove- Now, its time to add a new traffic filter to Port 53, and to do so, enter the given command –
pktmon filter add -p 53- To get a clear picture and understand the monitoring process, you need to start logging the real-time traffic. For that, run the below command –
pktmon start --etw -m real-time- By running the above command, all the port 53 packets should be redirected and moreover printed to the command line.
- In case, you prefer to test a DoH server that is not in the official auto-promotion list, then you are required to register it. First, do that manually from your computer by entering a command line. However, make sure to identify the IP address along with the DoH URI template for the server you wish to add. Once you are ready, run the following command –
netsh dns add encryption server=<your-server’s-IP-address> dohtemplate=<your-server’s-DoH-URI-template>- Finally, you can also verify that the template was applied to the well-known DoH server list through this command. It should eventually show you the template being used for a given IP address –
netsh dns show encryption server=<your-server’s-IP-address>- Windows is now completely configured to use that IP address as a DNS server, and as a result, it will use DoH rather than classic DNS.
This is all about Turn on DNS over HTTPS using EnableAutoDoh in Windows 11 or 10.
That’s all!!