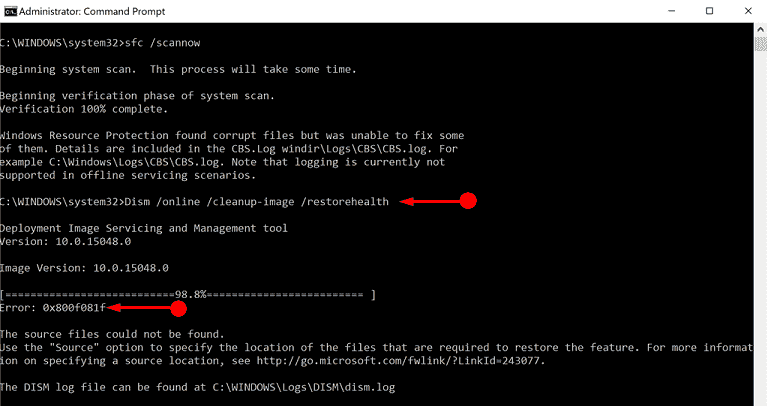
DISM Error 0x800F081F error is likely to occur frequently in computers with Windows 10 operating system. This specific error usually shows up after running a command “DISM /Online /Cleanup-Image /RestoreHealth” in order to repair Windows image. You generally use this command to repair certain issues that occur with Windows Update.
The above command usually comes into action when you need to repair an error coming out from Windows server update service (alternatively WSUS). RestoreHealth portion actually allows the system to mention additional repair source locations which the DISM tool needs to carry forward the repair task. But when you come across DISM Error 0x800F081F, it indicates that the built-in tool was unable to locate the files on their default location that were required to repair the online Windows image. The error message goes like this –
“Error 0x800f081f, The source files could be found.
Use the “Source” option to specify the location of the files that are required to restore the feature…”
However, there is no need to worry as we present you certain promising workarounds that can help you in resolvin DISM error 0x800F081F Error.
Lets’ explore the solutions and their sequence of steps in detail.
DISM Error 0x800F081F in Windows 10 Workarounds
First of all, there arises a need for you to specify a valid Windows image file ( known as install.wim) that incorporates all the files for the repair process to bypass DISM error 0x800F081F. However, you should ensure that the version of install.wim file must be same as Windows installed on the machine. In addition to this, keep the Edition and Language version of the file also the same as in the installed Windows.
Anyone can get install.wim file in Windows installation Media. It is stored in the sources folder (sources\install.wim).
Most of you might be familiar with the “media creation tool” while downloading ISO files for Windows 10. Therefore, if you carefully notice there is install.esd file in place of install.wim under the Sources folder. Install.esd file has different versions of Windows 10. As a result, you need to extract the appropriate Window 10 image. So, the ultimate solution is that you have to download the ISO file, then extract the valid Windows 10 image, and then use the DISM tool. If you don’t have an accurate image, you will continue to encounter DISM Error 0x800F081F. Regardless of the explanation which might seems lengthy, the method is quite easy.
For your convenience, we have divided the solution into 3 parts so that you can pursue them correctly.
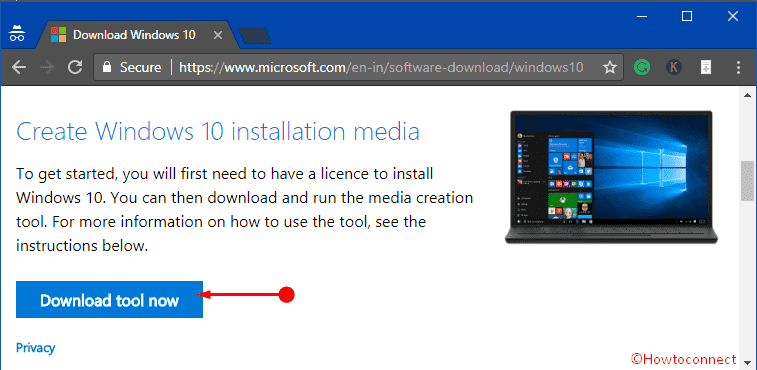
Part 1: Download Windows Installation Media in ISO format
Step-1: Visit the web page mentioned and grab the Media Creation Tool. As indicated in the image, make a click on the Download tool now button.
Step-2: Double-click on MediaCreationTool.exe file and when you see license terms, click on Accept.
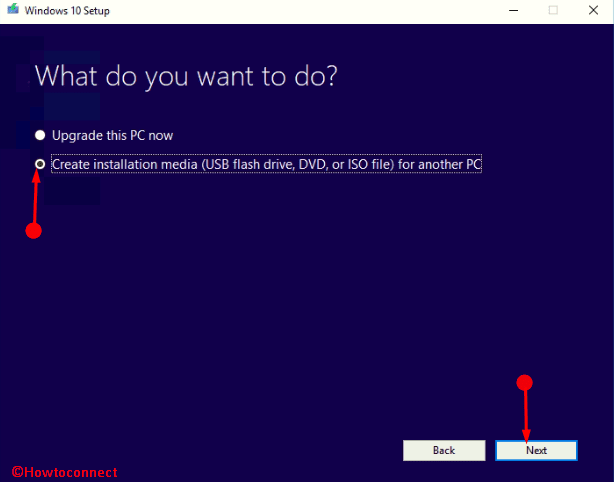
Step-3: Proceeding forward, select the option Create installation media for another PC. Click the Next button at the bottom of the wizard (see screenshot).
Step-4: On the following screen of “Select Language, architecture and edition“, hit Next.
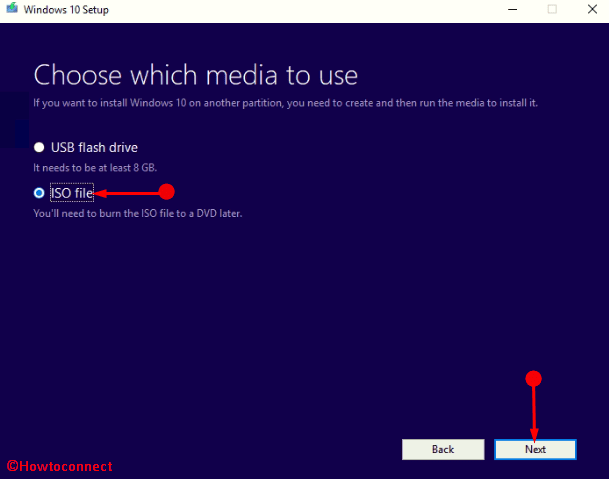
Step-5: When the setup asks you to choose a media, select the option ISO file. Hit the Next button.
Step-6: Now, in order to ‘save’ this Downloaded file, select a suitable location and press Save option.
Step-7: Wait until the download is finished. Upon completing, proceed to the next part of the resolution.
Part-2: From install.esd file extract install.wim file
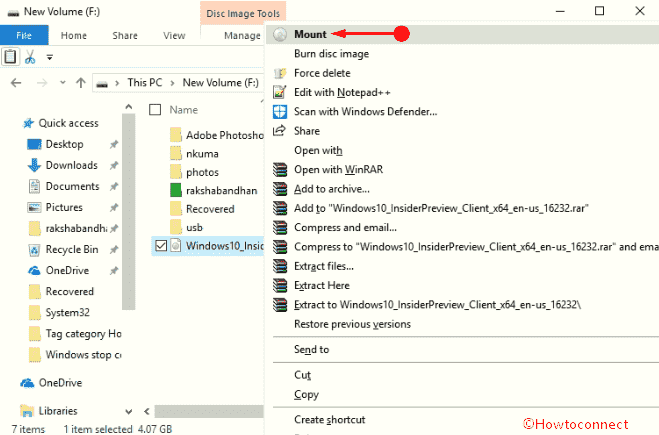
Step-1: Put a right click on the ISO file which you just downloaded and from the list of options, click Mount, the first one.
Step-2: Copy the install.esd file from the folder Sources folder (For instance, G:\sources\install.esd) located in mounted “Windows ISO file”. Paste it into the Root folder of drive C:\ (means in C:\ folder )
Step-3: Once you paste the file, open Cortana and type cmd. Now, press Ctrl and Shift keys and immediately hit the Enter key. This evokes UAC prompt, click Yes to launch an elevated Command Prompt.
Step-4: In this black window, type or copy-paste command cd\. Press – Enter.
Step-5: In order to find the images inside of install.esd, copy/paste or type the below-given command and hit Enter key.
dism /Get-WimInfo /WimFile:install.esd
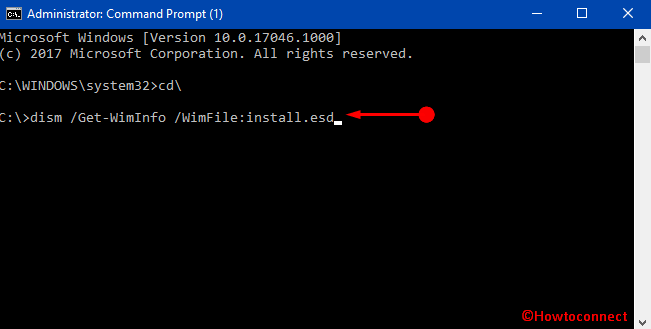
Step-6: Depending on what Windows 10 version you have installed, note down its index number from the list that shows up. For example, if you have installed the Windows 10 Pro, the index number is 1.
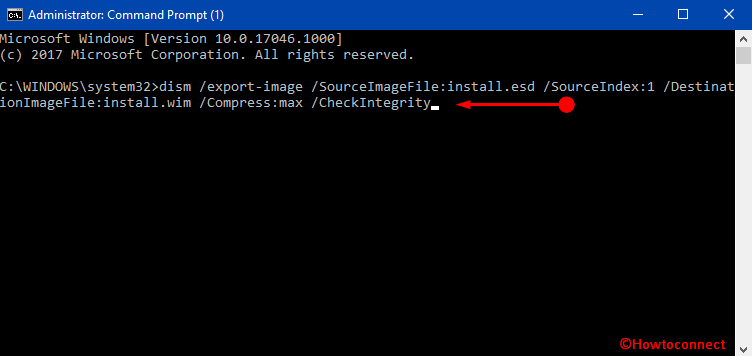
Step-7: Now copy/paste the given syntax in the Command Prompt to extract the images corresponding to your current Windows version install.wim file (Index number).
dism /export-image /SourceImageFile:install.esd /SourceIndex:IndexNumber /DestinationImageFile:install.wim /Compress:max /CheckIntegrity
Note – Ensure to replace the IndexNumber with the number as per your installed Windows 10. In that case, the command will be as follows:
dism /export-image /SourceImageFile:install.esd /SourceIndex:1 /DestinationImageFile:install.wim /Compress:max /CheckIntegrity
Step-8: Upon the completion of the process, you will be able to find the exported file of the install.wim on the drive C. For example, C:\install.wim.
Proceed to the final part of the solution next.
Part-3: Run DISM tool to Repair Windows Image
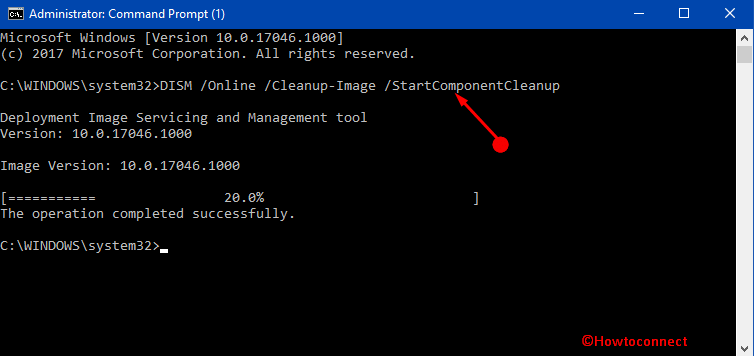
Step-1: First & foremost, launch an elevated Command Prompt by using any of your preferred ways.
Step-2: Type the commands stated below and then press Enter after inserting each.
DISM /Online /Cleanup-Image /StartComponentCleanup
DISM /Online /Cleanup-Image /AnalyzeComponentStore
Step-4: Lastly, specify the C:\install.wim as the source file to fix the Windows image. To accomplish this task, insert the following command and press Enter
DISM /Online /Cleanup-Image /RestoreHealth /Source:WIM:c:\install.wim:1 /LimitAccess
Step-5: As a final step, input the below command and press Enter when the RestoreHealth process is completed.
sfc /scannow
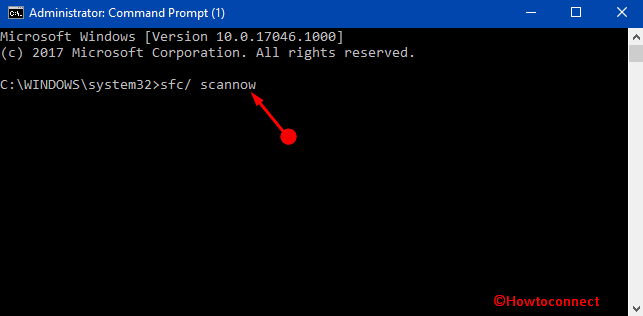
After finishing the SFC process, this should fix the DISM Error 0x800F081F.
Conclusion
DISM error 0x800F081F is truly annoying in terms of repairing Windows image. Windows users need to repair this nagging error when they come across this issue. The process that we have discussed here in order to resolve the DISM error 0x800F081F is found to be entirely effective. If you are having a similar issue, don’t waste any more time. Read this part of the solution very keenly and apply appropriately. You can fix this error as well as can have a flawless computer close to hand.