Way to Use DataProtectionDecryptor in Windows with steps. – DataProtectionDecryptor is an effective tool for Windows that permits you to decrypt passwords and other information encrypted by the DPAPI (Data Protection API) system of Windows. You can use this tool to decrypt DPAPI data on your current running system and to decrypt DPAPI data stored on an external hard drive. Pursue a similar type of article – How to Decrypt EFS Encrypted Folders and Files on Windows 10.
This tool works on any version of Windows, starting from Windows XP and up to Windows 10. Both 32-bit and 64-bit systems are supported. You can use this tool to decrypt DPAPI-encrypted data in 2 different modes:
1. Decrypt data of the current system and user – In this mode, you don’t need to provide the logon password of the user or any other information, but you may need to run DataProtectionDecryptor as administrator.
2. Decrypt data of another system or another user on your current system – In this mode you have to provide the path of Registry files and the Protect folders of Windows, and you may also need to provide the logon password of the user if the password was used to decrypt the data.
How to Use DataProtectionDecryptor on Windows
Download and Install DataProtectionDecryptor
Step 1– Download DataProtectionDecryptor on Windows 10 from its creator’s website. Then, unzip the folder and run the file DataProtectionDecryptor.exe.
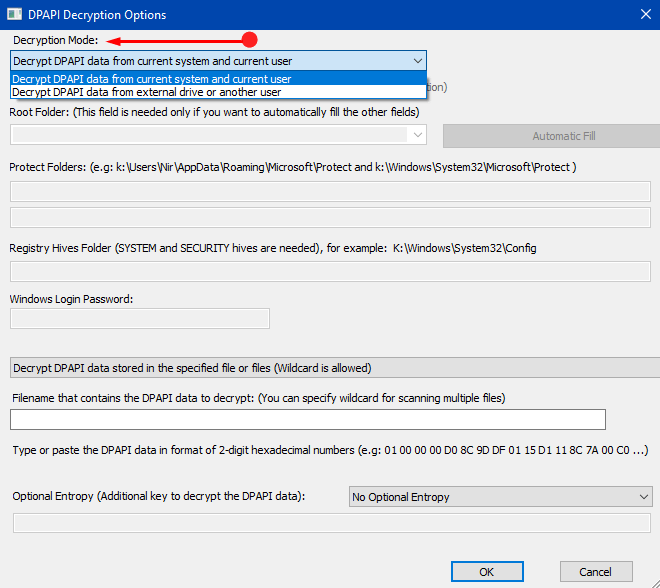
Step 2 – This will open the DPAPI Decryption Options window on the PC screen. In addition, you can also open this window by pressing F9.
Use DataProtectionDecryptor on Windows
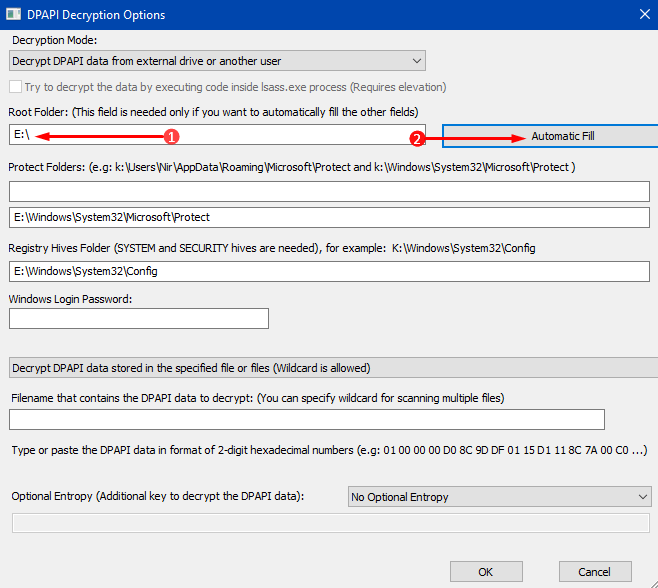
Step 3 – Next, Choose the Decryption Mode, the first option. If the DPAPI data was encrypted on your own computer with your current user, choose the ‘Decrypt DPAPI data from current system and current user‘ option. If you want to decrypt DPAPI data created on another system stored on external drive, choose the ‘Decrypt DPAPI data from external drive or another user‘ option.
Step 4 – If you selected the external drive decryption mode: Choose the Root folder of your external drive, click the ‘Automatic Fill‘ button and the other fields (Protect Folders, Registry Hives Folder) will be filled for you.
Note – You can also manually fill these fields with the correct folders. If the DPAPI data was encrypted with the logon password, you have to enter this password in the ‘Windows Login Password’ field.
Step 5 – Moving on, In the DPAPI data section, you can choose one of the following options:
1. Decrypt DPAPI data stored in the specified file or files: If you choose this option, you can specify any file that contains the DPAPI encrypted data as binary data or as text. Examples for files that you can specify: Windows Registry hives (ntuser.dat, SOFTWARE file in C:\windows\system32\config), .reg files exported from the Registry, Windows Credentials files, Wireless network key files (stored in C:\ProgramData\Microsoft\Wlansvc\Profiles\Interfaces ), cookies and passwords file of Chrome Web browser.
2. Decrypt DPAPI data from the specified string: If you choose this option, you should type or paste the sequence of DPAPI bytes in the DPAPI data text-box. For example:
01 00 00 00 D0 8C 9D DF 01 15 D1 11 8C 7A 00 C0 4F C2 97 EB….
01,00,00,00,D0,8C,9D,DF,01,15,D1,11,8C,7A,00,C0,4F,C2,97,EB…
01000000D08C9DDF0115D1118C7A00C04FC297EB…
Note – You can also paste the text from .reg file of Windows that contains the DPAPI encrypted data.
Step 6 – Optional Entropy: You should use this option only if the DPAPI data is encrypted with additional key. You can specify the key in hexadecimal format (e.g: 2A 3D B8 C9…) , as ANSI string or as Unicode string.
Step 7 – After filling all needed fields in the ‘DPAPI Decryption Options‘ window, press the ‘Ok‘ button and DataProtectionDecryptor will start decrypting the DPAPI and display the result on the main window.
The main window displays the result of the DPAPI decryption. In the upper pane table, a new line is added for every DPAPI data block. When selecting an item in the upper pane, the lower pane displays the decrypted data in hex-dump format.
Upper Pane Columns Description
Decryption Result: Result of the decryption process (Succeeded or Failed).
Decrypted Size: Size of the decrypted data block (bytes).
Encrypted Size: Size of the encrypted data block (bytes).
Description: Description stored inside the DPAPI data block (might be empty).
Hash Algorithm: Hash algorithm that was used in the encryption process of the DPAPI block (SHA1 or SHA512).
Crypt Algorithm: Crypt algorithm that was used in the encryption process of the DPAPI block (3DES or AES256).
Key Encrypted With: Specifies whether the key file is encrypted with a system key (Stored in the Registry) or with the user SID+password.
Key File Guid: Specifies the Guid of the key file that was used for encryption.
Key File Hash Algorithm: Hash algorithm that was used in the encryption process of the key file.
Key File Crypt Algorithm: Crypt algorithm that was used in the encryption process of the key file.
Key Filename: Specifies the key filename that was used for encryption (Located in the ‘Protect’ folder).
Data Filename: Specifies the filename that contain the DPAPI encrypted data.
What to do when DPAPI decryption fails?
If you try to decrypt DPAPI data on your current running system, try to run DataProtectionDecryptor as administrator by pressing Ctrl+F11. If the decryption still fails, you can also try to turn on the following option: ‘Try to decrypt the data by executing code inside lsass.exe process (Requires elevation)’. For using this option on 64-bit systems, you must use the 64-bit version of DataProtectionDecryptor.
If you try to decrypt DPAPI data on external drive:
1. Verify that all folders specified in the ‘DPAPI Decryption Options‘ window are correct and you have read permission for these folders.
2. If the ‘Key Encrypted With‘ value is ‘User SID+Login Password‘, verify that you type the correct login password of the user on the external system.
Translating DataProtectionDecryptor to other languages
In order to translate DataProtectionDecryptor to another language, follow the instructions below:
Step 1 – Run DataProtectionDecryptor with /savelangfile parameter:
DataProtectionDecryptor.exe /savelangfile
A file named DataProtectionDecryptor_lng.ini will be created in the folder of DataProtectionDecryptor utility.
Step 2 – Open the created language file in Notepad or in any other text editor.
Step 3 – Translate all string entries to the desired language. Optionally, you can also add your name and/or a link to your Web site. (TranslatorName and TranslatorURL values) If you add this information, it’ll be used in the ‘About‘ window.
Step 4 – After you finish the translation, Run DataProtectionDecryptor, and all translated strings will be loaded from the language file.
If you want to run DataProtectionDecryptor without the translation, simply rename the language file, or move it to another folder.