You will see the easiest way to Enable and Disable Nagle’s Algorithm on Windows 10 and 11 here. When you get a PC with Windows 11 or 10 as the Operating System, you expect every tool in your computer to be unconventional and useful. But a bitter truth is that all the features in it are not convenient. One such useless feature is Nagle’s Algorithm that slows down your internet speed and prevents you from quickly responding.
Before proceeding further, Let’s understand what Nagle’s Algorithm is in very simple words. It is designed to control the productivity of TCP/ IP networks by decreasing the packets that need to be sent over a network. This algorithm is justified by saying that it properly utilizes the TCP/ IP packets and prevents small TCP/ IP packets from flooding your network. Sending these smaller packets (tiny grams) is advantageous only in some particular scenarios such as on slower networks but overall, it is useless to many. Read –
Enable and Disable Nagle’s Algorithm on Windows 11 and 10
Here is How to Enable and Disable Nagle’s Algorithm on Windows 11 or 10 –
At first, let’s see some general information about Nagle’s Algorithm and why it is useless to many –
The Common Reason for Disabling Nagle’s Algorithm
Despite the convenience it provides, Nagle’s Algorithm has failed to impress most users. People who are involved in networked video games suffer from this algorithm the most as the games are effective only when the data transfers without any delays. Once you disable this, there will be no stuttering time delay while playing multiplayer games on a network.
Why you should disable Nagle’s Algorithm on Windows 11 or 10?
If you want the data to flow freely through your network, it is vital to disable Nagle’s Algorithm. Doing so will help in fasten network, and evade the lower gaming ping/latency. Before learning to enable and disable Nagle’s algorithm, it is important to understand the NIC Interface.
NIC Interface – When a PC has multiple internet connections Windows Registry generates a distinctive NIC-ID or NIC Interface for each one. Your computer displays this in a cryptic combination of numbers and letters, surrounded by braces. For recognizing the relevant NIC-ID, you need to get your active internet connection IP address. Here’s how –
- In the Search Box of your Taskbar, type CMD and when the result shows up, Press Enter on your keyboard. By doing this, Command Prompt opens.
- On the following window, type IPCONFIG after the blinking cursor and hit Enter so that information about your active internet connection can be seen.
- Under the Wireless LAN adapter Wi-Fi, look next to the IPv4 Address. It is the IP address you are looking for; note it down.
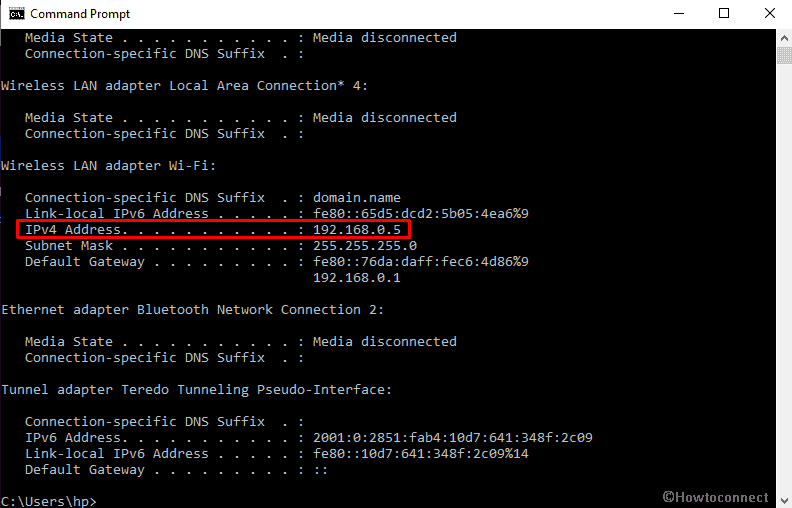
- Exit Command Prompt.
Enable Nagle’s Algorithm on Windows 11 or 10
You don’t need to do anything to turn on Nagle’s Algorithm on Windows 10 because your Operating System has it enabled by default. However, there are some steps to disable it which you will learn in the next part of this article.
Disable Nagle’s Algorithm on Windows 11 or 10
Disabling Nagle’s Algorithm on Windows 11 or 10 is quite easy; you just need to change in a registry entry. But, remember that for modifying the registry, you need the IP address which you have already found out in the above part of this article. After that, follow the below steps –
Step-1: In your Start Search Box, type regedit.exe and hit Enter.
Step-2: If a UAC prompts up, click on Yes to access Registry Editor.
Step-3: Copy the following path, paste in the address bar of the registry editor and press Enter –
HKEY_LOCAL_MACHINE\SYSTEM\CurrentControlSet\services\Tcpip\Parameters\InterfacesDon’t be curious if you see several NICs in the right pane because, as it’s normal. To disable Nagle’s Algorithm for the accurate internet profile, you need to gain access to the right NIC-ID. And this is done by clicking on each interface key. Then, locate and match the IP address with the one you noted in the previous section. The string value in which it is present might have the name DhcpIPAddress or IPAddress.
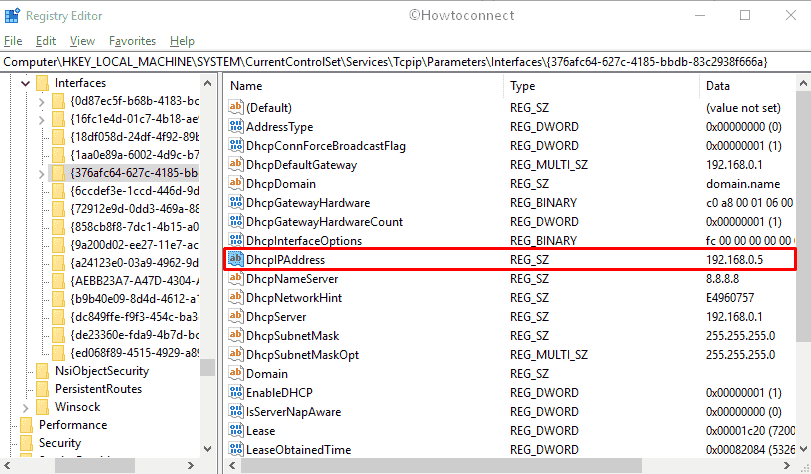
After finding it, continue in that key only –
Move your mouse pointer to the empty space, right-click, and choose New. This is for creating 2 different DWORD (32-bit) Values. Name one as TcpAckFrequency (to instantly send out the packets) and another one as TCPNoDelay (to disable Nagle’s Algorithm).
Next, modify both these entries by double-clicking them.
For activating them, set their Value data as 1.
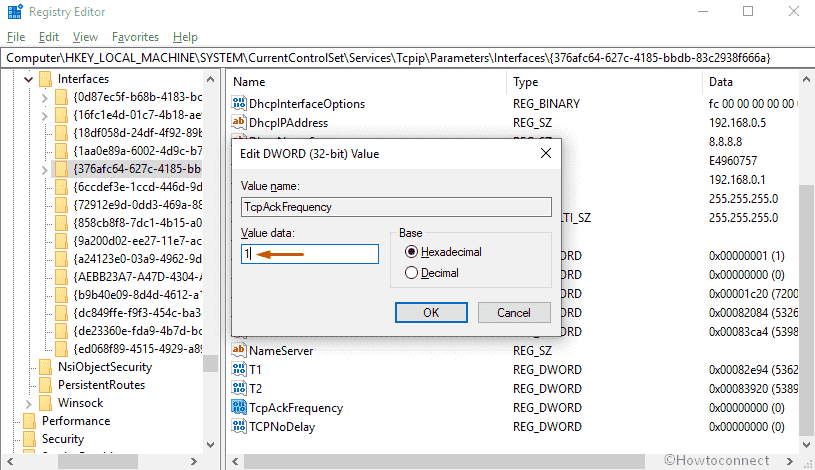
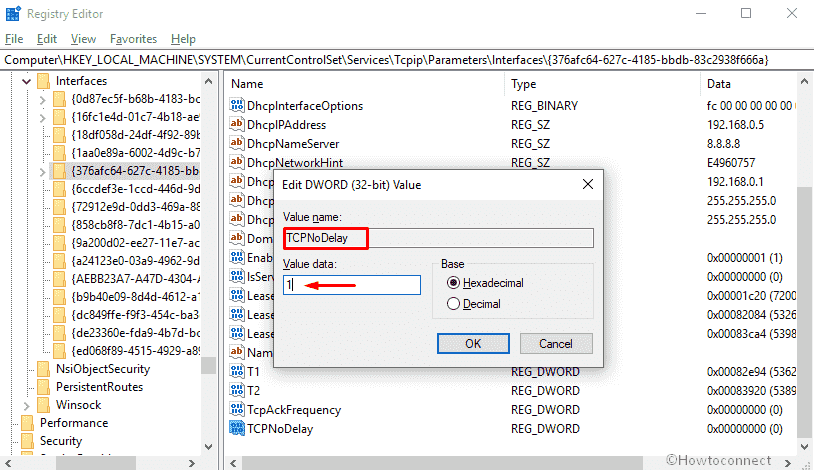
Finally, click on OK to save the changes, close the Registry Editor and Restart your PC.
So, this is the easiest method to disable Nagle’s Algorithm on Windows 11 or 10. However, note that this is a vital tool of Windows 11 or 10 and should be reactivated when you carry out some proficient piece of work on your computer. It is best to disable this algorithm temporarily because when permanently turned off, your network’s regular bandwidth gets influenced. Therefore, when you finish your work, reverse the settings of Nagle’s Algorithm by altering the details of the two recently created values to 0.
That’s all!!