While trying to install Windows 11, some are getting error code 0xC1900101 that obstructs the process at a certain percentage. The issue occurs in all cases whether you are installing through Media creation tool, Installation Assistant or ISO file, or Windows update.
This error code always comes with a prefix such as 0xc1900101 0x30018, 0xc1900101 0x20017, 0xc1900101 – 0x40021, 0xc1900101 – 0x3001a, 0xc1900101 0x2000c, 0xC1900101 – 0x4000D. 0xC1900101 Windows 11 Install Error mainly prompts due to low disk space, and problems associated with BIOS & SATA, and presence of third party software. Besides, corrupted system components, multiple SSD, faulty network adapters can bring such issues too.
0xC1900101 Windows 11 Install Error
Here is how to Fix 0xC1900101 Windows 11 Install Error –
Way-1: Use Error lookup tool and Setupdiag
This method is for techie users so if you are a beginner move to the next one. Now let’s proceed with – When the error 0xC1900101 occurs the first task is to collect the information of the factors that can cause this issue. In order to find out what actually the code explains, you need to check this in the error look up tool.
Microsoft is also featuring a new diagnostic tool i.e. SetupDiag which can identify the reason for which a Windows 11 upgrading process is not successful in your machine. Running this tool will save the result to a specific file. You can check this Setupdiagresults.log in the folder where Setupdiag.exe is located.
- Download SetupDiag.
- After the downloading ends, double click on the file SetupDiag.exe.
- If you run this file without parameters, it will reach out to the saved file where the tool has stated what is the problem for upgrading your OS to Windows 11.
- Once the scanning is over, the tool usually generates a result in the directory that holds a .log file extension. During the same period, a zip folder containing all the log files will be generated by SetupDiag. The name of this file will be as Logs.zip. After tracing out the upgrade issue, it will create the below directories in the zip file –
\$Windows.~bt\sources\panther
\$Windows.~bt\Sources\Rollback
\Windows\Panther
\Windows\Panther\NewOS.
- Read the files, find out the culprit and remediate accordingly.
Way-2: Unplug external peripherals
Oftentimes, external hardware like printers, USB devices, speakers, scanners, or webcams triggers unknown issues in the system. Before proceeding to install Windows 11 or any other update, remove all external peripherals that might have been plugged into your device and aren’t needed for basic functionality. Doing so will reduce the chances of installation errors as well as other issues. After installing the update successfully, you can always reconnect them.
Way-3: Uninstall third-party apps
Third-party applications especially non-Microsoft security suites are more likely to block the installation. 0xC1900101 Windows 11 Install Error could be a result of the same. If so, uninstalling third-party antimalware and other suspicious programs will solve the issue. Here is the process –
- Press – Windows + R.
- In Run command, insert – appwiz.cpl.
- Click – OK.
- From Program and Features window, look for the non-Microsoft antivirus program.
- Right-click the same and choose – Uninstall.
- If a pop-up prompts for final consent, give it.
- Follow further on-screen instructions to remove the application completely.
- Similarly, uninstall other third-party programs you got from untrustworthy places.
- Once you are done, restart the Windows device.
Way-4: Check for faulty drivers
Usually, Windows downloads and installs drivers automatically, but there might be a list of drivers pending in the queue. Specific errors like 0xC1900101 might get resolved when you update those drivers. To do so –
- Right-click on the Start button and choose – Device Manager.
- Look for the device with an exclamation mark.
- Expand the same by double-clicking.
- Right-click on the driver that has a question mark beside it and then choose – Uninstall device.
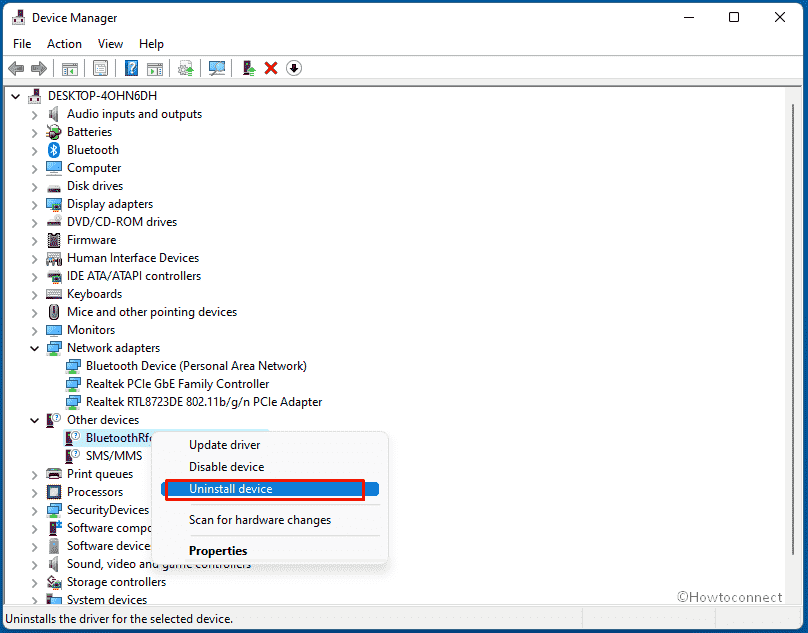
- To confirm the action, again click – Uninstall.
- In the same way, uninstall other faulty drivers as well.
- And then go to the dedicated manufacturer’s website to get updated driver versions.
Way-5: Disable Network adapters
Disabling all drivers present under Network Adapter oftentimes solves 0xC1900101 Windows 11 Install Error and lets the installation take place without any hitch. Here is how to proceed –
- Press – Windows + X.
- Choose – Device Manager.
- Double-click on Network Adapters.
- When a list of drivers becomes visible, right-click any of it and then choose – Disable device.
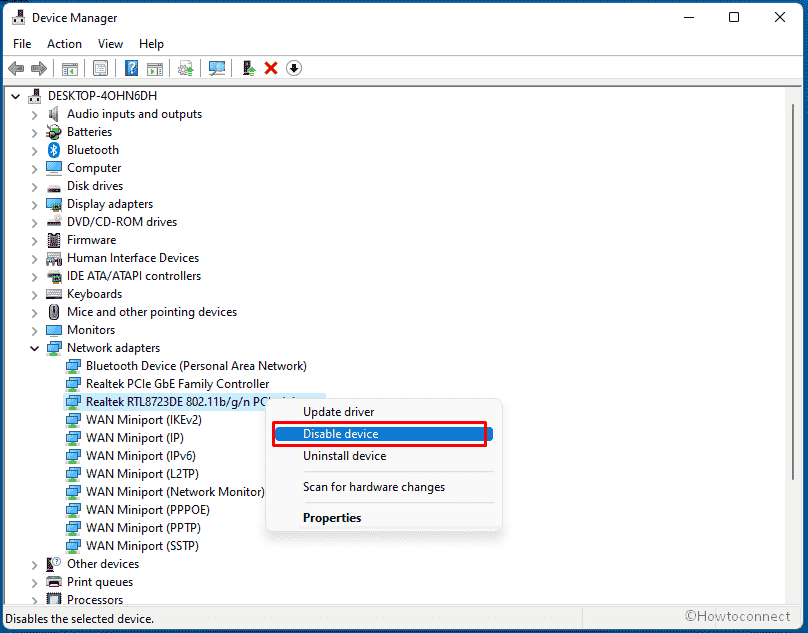
- Similarly, disable all drivers available here.
- Lastly, reboot the PC and retry the installation process.
Way-6: Repair corrupted system files
Due to some accidental changes in settings or registry, system components can go missing or become corrupted. If the system fails to access any of the required files while performing a specific task like installing an update, the process will not be finished moreover throw error codes. To fix such corruption as well as recover the missing elements, go through the below steps –
- Click search icon from the taskbar.
- Type in – cmd.exe.
- Press – Ctrl + Shift + Enter.
- If a User Account Control prompts, click – Yes to give consent.
- In the black pane, insert – dism /Online /Cleanup-image /Restorehealth
- Hit – Enter.
- After the completion of DISM scan, execute sfc /scannow command in the same pane.
- Once the process hits 100%, the corruption should get fixed. If not, a report will show up describing the issue.
See – How to Repair Corrupted System Files on Windows 10, 8.1.
Way-7: Try upgrading in clean boot
Oftentimes, third-party applications and services conflict with the built-in ones and cause unexpected issues in the system. To avoid such circumstances, start Windows in clean boot. Doing so will allow the system to start with basic components and make an environment where you can continue the installation process error-free.
- Press – Windows key.
- Type – msconfig.exe.
- Hit – Enter to open System Configuration.
- Select the radio button set before Selective startup.
- Uncheck – Load startup items.
- Jump into Services tab.
- Click the checkbox present alongside Hide all Microsoft services.
- Hit – Disable all.
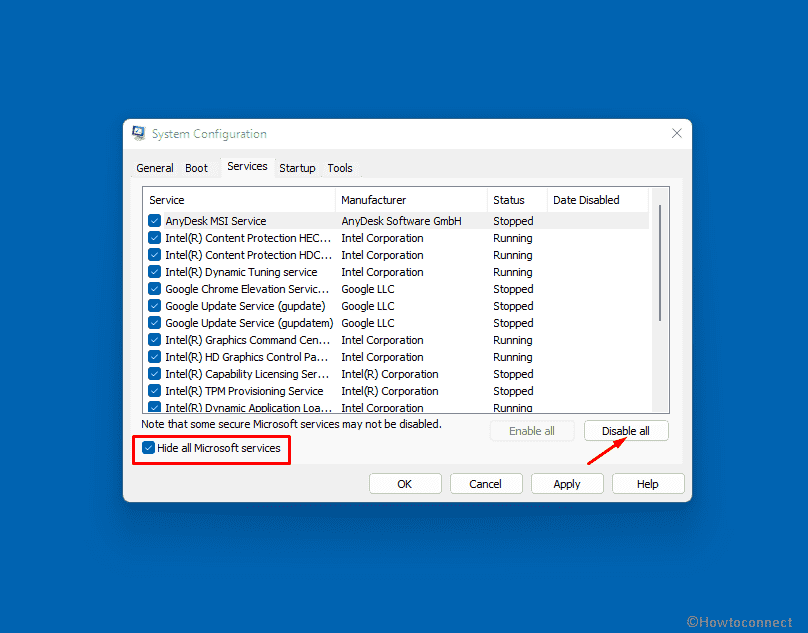
- Move to the Startup tab.
- Click the link – Open Task Manager.
- Once in the dedicated window, right-click on any program listed there and choose – Disable.
- Disable all startup programs similarly.
- Go back to the System Configuration window.
- Click Apply and then OK.
- Reboot Windows.
- When Windows starts in clean boot, try to download and install the update.
Way-8: Clean up disk
If you are trying to install Windows 11 with media creation tool, your device requires at least 20 GB for a 64-bit OS. Therefore, make sure the local disk where you will install the operating system has enough space. If the disk is full, wipe out the junk and other unnecessary files to free up memory. For that –
- Press – Windows + S.
- Type – cleanmgr.
- Hit – Enter.
- When you come across a small pop-up; make sure the system drive (which is C: in most cases) is selected and then click – OK.
- After calculating how much data can be erased from the disk and show a Window. Hit– Clean up system files.
- Again choose the system drive and click – OK.
- From the next wizard, check all the boxes present beneath Files to delete section.
- Click – OK.
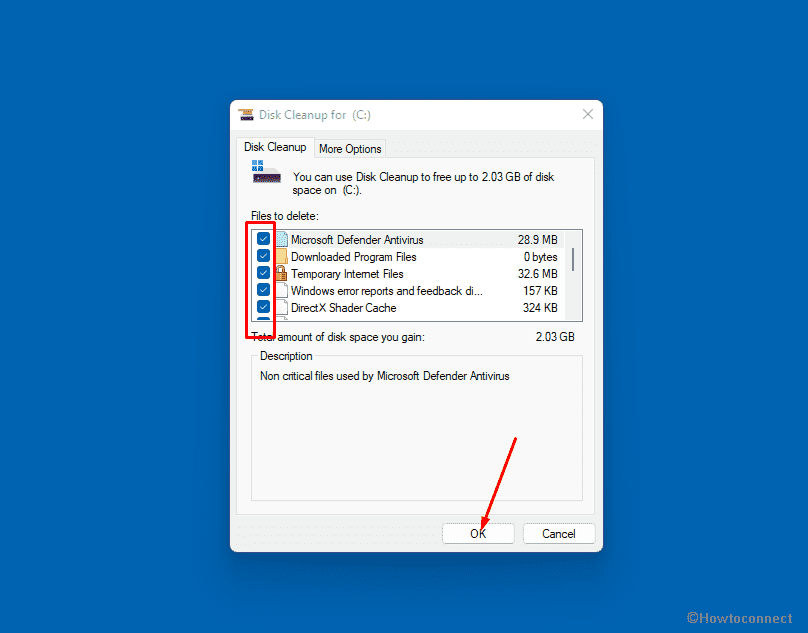
- To confirm the action, click – Delete files.
- After completion of the removal process, reboot the PC.
Way-9: Check disk for error
Logical and specific physical issues on the system drive can bring forth 0xC1900101 Windows 11 Install Error too. In such a case, you can use the CHKDSK command-line utility to repair and diagnose the problem.
- Open Command Prompt as administrator.
- Insert – chkdsk C: /f /r /x
- Hit – Enter.
- When the scanning process ends, reboot Windows.
Way-10: Remove the second SSD if any
Windows devices with dual SSD can cause 0xC1900101 while installing an update or upgrading the OS. If this is the case, removing the second SSD will solve the fatal code immediately.
Way-11: Clear CMOS and update BIOS
By any chance, if the above-mentioned workarounds fail to resolve the 0xC1900101 Windows 11 Install Error, there is still a final way out. Resetting BIOS will do the job for sure, the procedure is a bit easy on the desktops in comparison with laptops. The reason is, the hardware is not enclosed in the desktops like the ones in laptops. However, you have to follow the below guidelines in order to reset the BIOS –
- Disconnect the power supply from the mainline and unplug all the power cords.
- Open up the casing cover and you will see the flat battery on the Motherboard.
- Unplug the battery from there and wait for about 5 minutes.
- Place the battery in its original position and set up the other parts and fix the casing cover as it was before.
- Once done, restart the computer and try to update the operating system.
Methods list:
Way-1: Use Error lookup tool and Setupdiag
Way-2: Unplug external peripherals
Way-3: Uninstall third-party apps
Way-4: Check for faulty drivers
Way-5: Disable Network adapters
Way-6: Repair corrupted system files
Way-7: Try upgrading in clean boot
Way-8: Clean up disk
Way-9: Check disk for error
Way-10: Remove the second SSD if any
Way-11: Clear CMOS and update BIOS
That’s all!!!