Black Screen with Cursor before Login in Windows 10 is the problem multiple users are confronting and complaining about on different forums. During this nagging issue, When they start their system, it boots normally. Unexpectedly subsequent to BIOS screen and Windows logo, they can view just black screen with a mouse pointer in the middle. Even after waiting for 5 to 10 minutes, the login screen doesn’t load.
The main reason for this black screen before Login is the display driver. Addition to that, the corrupted Windows file and battery residue are also the possible cause of this trouble. In this situation, you have to forcefully ‘shut down‘ their PC by squeezing the power button. Even after turning it on after some time, the issue continues to occur. Therefore, instead of restarting the PC so many times, it’s time to check out some solutions.
Black Screen with Cursor before Login in Windows 10 Solutions
Here is how to fix Black Screen with Cursor before Login in Windows 10 –
At first, you must ensure all the external devices and connected attachments are disconnected.
Create A New Explorer.exe Task
Many experienced users are with a viewpoint that creating a new explorer.exe task has helped them solve effectively the black screen in Windows 10. Therefore, you can try this one to fix this particular error by following steps.
Step 1: First of all, turn on your Windows device normally. When the black screen and cursor will show up, jointly press the hotkeys “Ctrl + Shift + Esc” to open Task Manager.
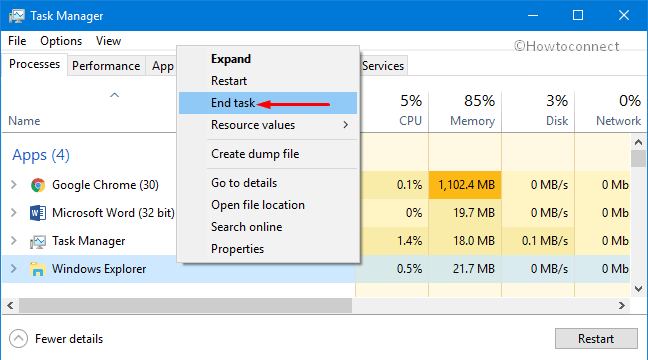
Step 2: In the Processes tab, find and right-click Windows Explorer or Explorer.exe. When the menu displays, choose End Task. Instead, you can also select the item and click the End Task button on the bottom.
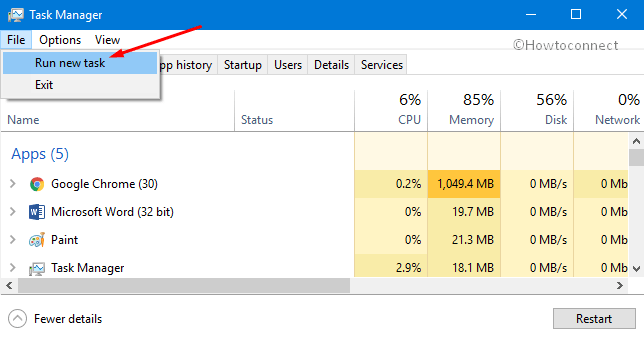
Step 3: Next, on the menu bar of the Task Manager, click on File. Now, choose Run new task as shown in the picture below.
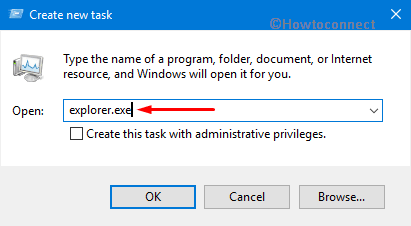
Step 4: When the small window appears, type Explorer.exe in the provided text field and click OK.
Step 5: Finally, restart Windows 10 PC and check how it works.
If the trouble continues to occur, give an attempt to the following workarounds to solve the black screen with cursor before login in to Windows 10.
Take out the Battery and Insert It Again
Take out the laptop battery and all other accessories, such as USB, mouse, or power cord if it’s a computer.
Now, insert the battery, power cord, USB, mouse, and other peripherals and keep hold the power button for 10 seconds.
When everything is done, recharge the battery again and start your PC to check whether this fixes the black screen or not.
Automatic Repair or Run Startup Repair
Unlike the two above methods, you need to have a Recovery Disc or Window 10 DVD in this option. If you have it, start resolving the black screen with cursor before login in to Windows 10 with these guidelines.
To start the process, insert a Windows 10 Bootable installation DVD or Recovery Disc.
Now, reboot your computer. When the black screen shows up with a small text “Press Any Key To Boot From CD or DVD”, press any key to continue the process.
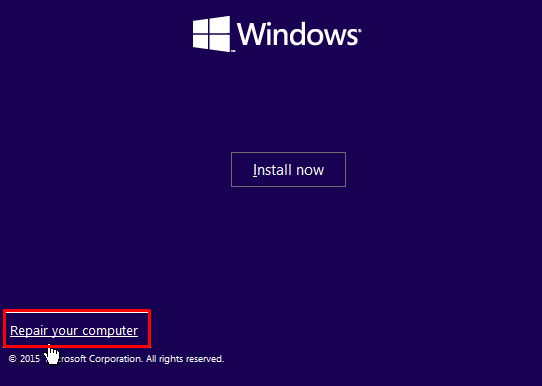
Moving ahead, select your language preferences and click on Next. In the following screen, navigate the mouse to the bottom left and choose the option Repair Your Computer.
When the blue screen displays, click on Troubleshoot and then Advanced Options. To continue, select Automatic Repair or Startup Repair.
Finally, wait for the process to finish and restart the PC to know if the problem is solved or not.
Run System Restore
Similar to the previous workaround, you need to insert “Recovery Drive/System Repair Disc” or Windows Installation Media. After that, pick up your Language Preferences and then click Next.
In the next screen, take your mouse to the bottom left and click the option Repair Your Computer to open the blue window.
Now, simply click on Troubleshoot and then Advanced Options. In this screen, go ahead with “System Restore” and follow onscreen instructions to finish the procedure.
Finally, reboot the PC and check for the occurrence of the black screen issue.
Run SFC and CHKDSK
Once again, insert the Recovery Drive/System Repair Disc or “Windows Installation Media”. On the following screen, pick up your Language preference and click Next. Proceeding ahead, choose the option Repair Your Computer.
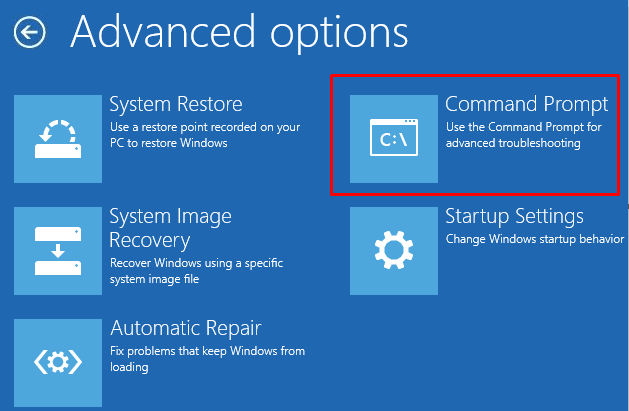
When the blue window displays, you are going to click on Troubleshoot and choose Advanced Options. Then, simply choose Command Prompt to start the process.
Now, copy/paste or type the below command and then press Enter after each one.
Sfc / scannow /offbootdir=c:\ /ofwindir=c:\windows
Chkdsk C: /f /r /x
When the scan finishes, exit from the Command Prompt window and restart your PC.
Also, read SFC /Scannow, DISM.Exe, CHKDSK Windows 10.
Run DISM
In this solution, you need to insert the disc in the same way as you did in option 4 or 5. Then, follow the above information and navigate to the Advanced Options => Command Prompt.
When the window shows up, type or copy-paste the following command and hit Enter.
Dism /Online /Cleanup-Image /CheckHealth
Dism/Online /Cleanup-Image /ScanHealth
Dism/Online/Cleanup-Image/RestoreHealth
Now, wait for the scan to complete entirely. In case, these commands do not work, use the below commands and hit Enter after inserting them one by one.
Dism/ Image:C\offline /Cleanup-Image /RestoreHealth/Source: c :\test\mount\windows
Dism/Online / Cleanup-Image /RestoreHealth /Source : c :\test\mount\windows / LimitAccess
Finally, reboot your computer to save the changes.
In the above commands, ensure to replace C:\RepairSource\Windows with the actual location of the Recovery Disc (repair source).
Enable Low-Resolution Video
Before starting this solution, you must take out all the attachments and then reboot your computer.
Next, configure your PC to boot from DVD or CD. Now, insert the Windows 10 bootable installation DVD then again restart the computer.
When the prompt displays, hit any key to continue the procedure.
Proceeding forward, decide your Language Preferences and click Next. Click ‘Repair Your Computer‘.
On the blue screen of Choose An Option, simply hit Troubleshoot => Advanced Options => Command Prompt.
In the Command Prompt, you need to type in C: and hit Enter. Then, continue the process by typing the below command.
BCDEDIT /SET {DEFAULT} BOOTMENUPOLICY LEGACY
Now, press Enter key to initiate the solution. When it finishes, close the window and back to Choose an option screen and restart your PC.
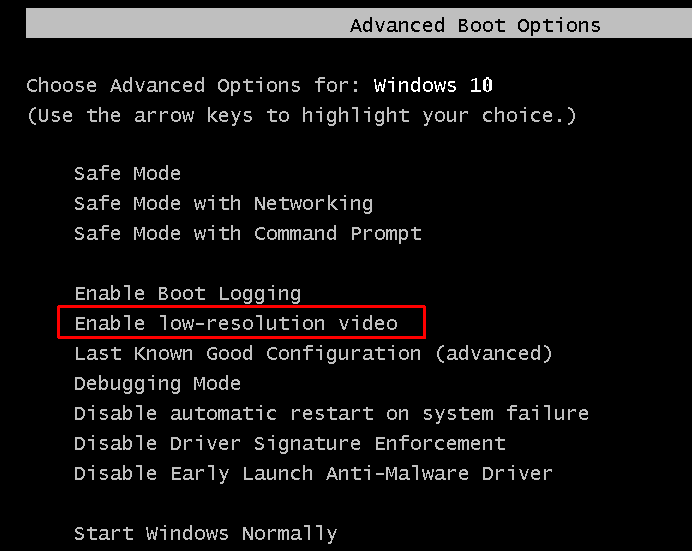
Finally, you need to reject the DVD to get Boot Options and Advanced Boot Options screen. When the screen appears, simply use the arrow keys to highlight “Enable Low – Resolution Video“(640 x 480) then hit Enter key. When the process is over, reboot your device to make the changes effective.
Try Safe Mode To Uninstall Display Driver
Another promising workaround to bypass Black screen with cursor before login in to Windows 10 is to uninstall the display driver through Safe Mode. For those who do not know how to do, you can observe this instruction.
Read How to Boot into Safe Mode from Login Screen in Windows 10.
Firstly, you need to follow the above steps to go to the “Advanced Boot Options” window. On that screen, you are going to choose the Safe Mode to start the process.
While you are in the “Safe Mode”, press Windows Key + R to open Run dialog box. Type “devmgmt.msc” then hit Enter to open Device Manager.
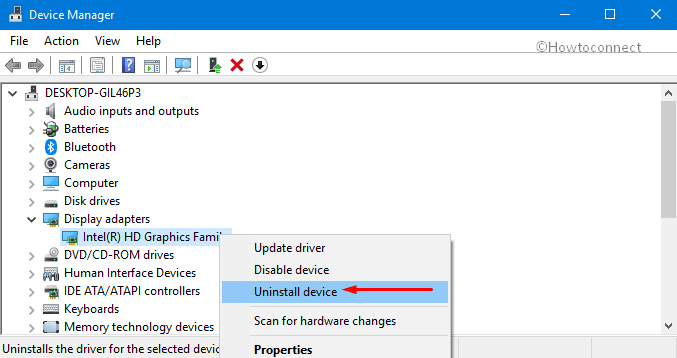
Now, find and expand the Display Adapters. When the list shows, move your mouse to ‘Intel(R) HD Graphics/Integrated Display Adapter’ and right-click to choose Uninstall Device.
Next, you need to check does your computer have a dedicated ‘Graphics Card’ or not. If yes, navigate your mouse and right click on it to ‘Disable Device‘.
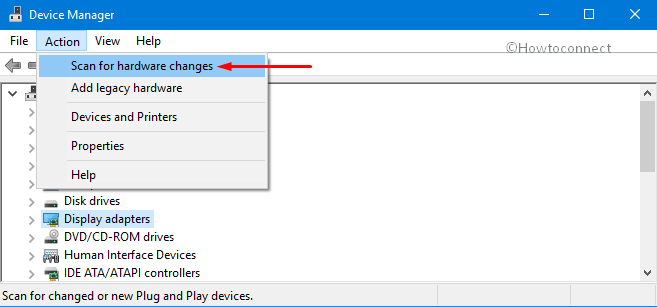
Finally, select Action on the menu bar and then choose Scan for hardware changes. Once you are over with the steps, check for the issue.
Fix Permission Issues
Follow step 1 in option 5 or 6 to open Command Prompt window.
To start this process, you need to type the below commands to the screen and then hit Enter after each one.
path %path%;C:\Windows\System32
cacls C:\Windows\System32 /E /T /C /G everyone:F
Note – In case, your main drive is not C, you can change it to D or E depending on your System drive letter.
Now, wait for the procedure to complete. Then, reboot your PC to check black screen with cursor before login Windows 10. If it was caused by inappropriate permission, Windows should run normally.
Next, simply hit ‘Win + X’ hotkeys and choose “Command Prompt (Admin)“, then type the following command and press Enter after each one.
Cacls C:\:Windows\System32 /E /T /C /G System: F Administrators :R
Cacls C:\Windows\System32 /E /T/ C /G everyone :R
Lastly, reboot the device and check if the issue continues to occur or not.
That’s all.
Hopefully, after applying the above-mentioned workarounds, you may not confront black screen with cursor before login in Windows 10. However, if you are aware of some more solutions that can help you in getting rid of this specific issue, do share them with us.