Set up Chrome Browser Kiosk Mode on Windows 10. – If someone else uses your computer. Kiosk mode assists in creating a second user profile on Google Chrome. The second user guest will have full-screen Chrome browser without any of your personal data. Read a related article on How to Change Proxy Settings in Chrome Web Browser.
Kiosk Mode is a characteristic notion in Chrome that lets the computer to be used in a single window. It works on a simple technique of blocking the access to the other parts of the device. Kiosk Mode is not exclusive only for Google Chrome. The kiosk also has the ability to modify in order to use a Guest account or a particular URL. Also, follow How to Sync Google Chrome Tabs on Multiple Computers. It is useful if in case any person uses the PC wherein you’d rather favor they work on with a single web browser. With this kiosk mode, you can administer that. Stick on to our guide to know the steps for setting up this mode.
How to Set up Chrome Browser Kiosk Mode in Windows 10
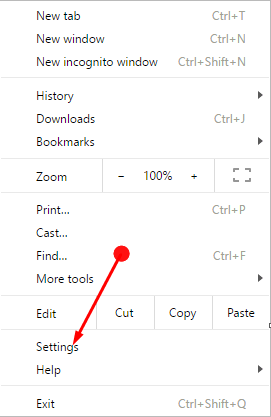
Step 1 – Open Google Chrome and head towards the three dot (hamburger) icon for handling the Chrome Settings.
Step 2 – Here reach out to the Settings from the list of options and click the same. This will lead you to a page related to Chrome Settings.
Follow our related guide to Use chrome://settings/content to Directly Open Content Settings.
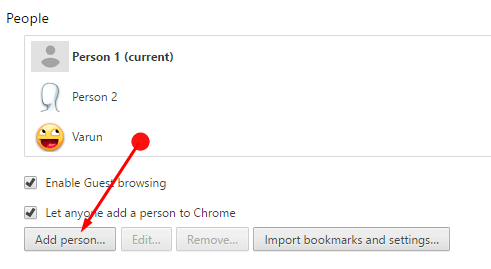
Step 3 – Then move towards the heading People and select the Add Person button.
Step 4 – Now write the name of the New person (Account User) and pick an icon for the account. Make sure to click the Add button to complete the whole process.
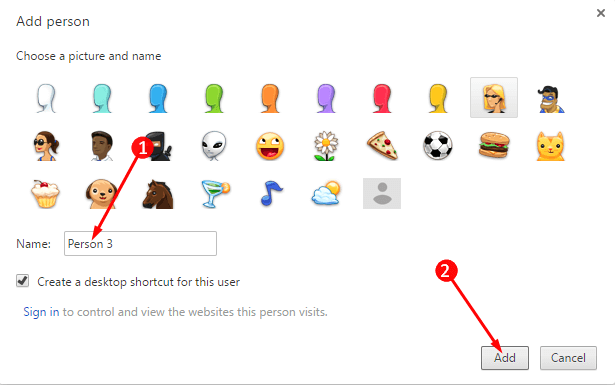
Note – See that the check mark is there on the box reading Create a desktop shortcut for this user. This will add a new account of Google Chrome to your desktop. Now the desktop will contain two accounts of Chrome – the first one and the new one.
You may also like to know How to Add Chrome With Icon to Desktop Context Menu in Windows 10.
Step 5 – Then close all the accounts of Google Chrome available on the desktop.
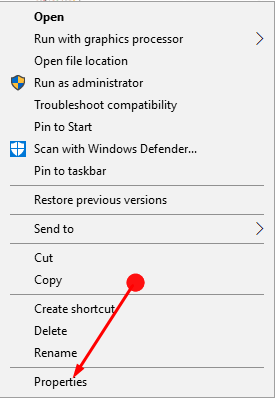
Step 6 – Now perform a right click on the new Google Chrome icon that you have created in the above step. A list of options will come into view, click Properties.
Step 7 – Click on the Shortcut tab and go to the box adjacent to the option Target. Paste –kiosk just at the end of the given target and click Apply after then Ok.
In case, this does not work then copy and paste the below command here replacing the original target and test one after another.
–chrome-frame –kiosk “http://www.google.com”–kiosk
If this command does not work then try either of these commands
–chrome-frame –kiosk “http://www.google.com”
OR
–kiosk “http://www.google.com”
Step 8 – Now click the Apply and then the OK button to completely Set up Chrome Browser Kiosk Mode.
This will open the Google Chrome in kiosk mode.
Well, you may find another related guide to be helpful – How to Export Import Edge Favorites As HTML File with Chrome, Firefox, IE.
Concluding Words
You all know that Chrome is the most widely used browser people tend to use it time and again. In this case, for the sake of your privacy and to save your personal folder from the intrusion of others, kiosk is the best option. Hence, Set up Chrome Browser Kiosk Mode in Windows 10 and if you have more tips on settings up this, kindly write them to us.
This is a great solution but this allows users to minimize the browser. How can we stop users from minimizing the browser and remain in the site opened in full screen mode only.