Sony WH-1000XM5 is an admired Bluetooth headphone but several users face trouble when trying to use it. The microphone of this headset does not hear the sound from them when used on Windows 11 or 10. However, the device is connected through Bluetooth you may encounter this problem after installing a Windows update. So, this post will provide solutions to Sony WH-1000XM5 Mic not working.
We have previously covered How to fix Windows 11 Microphone not working (Solved!) which can help you fix basic problems of the mic. The current issue might occur because of outdated or corrupted drivers, incorrect Settings in the Device Bluetooth Services, and problems with pairing. There are solutions that can help you in this case such as enabling Handsfree Telephony Gateway, running Audio Troubleshoot, and installing the latest driver.
Table of Contents
Sony WH-1000XM5 Mic not working
Here is how to fix Sony WH-1000XM5 Mic not working in Windows:
Disable and Enable handsfree Telephony Gateway
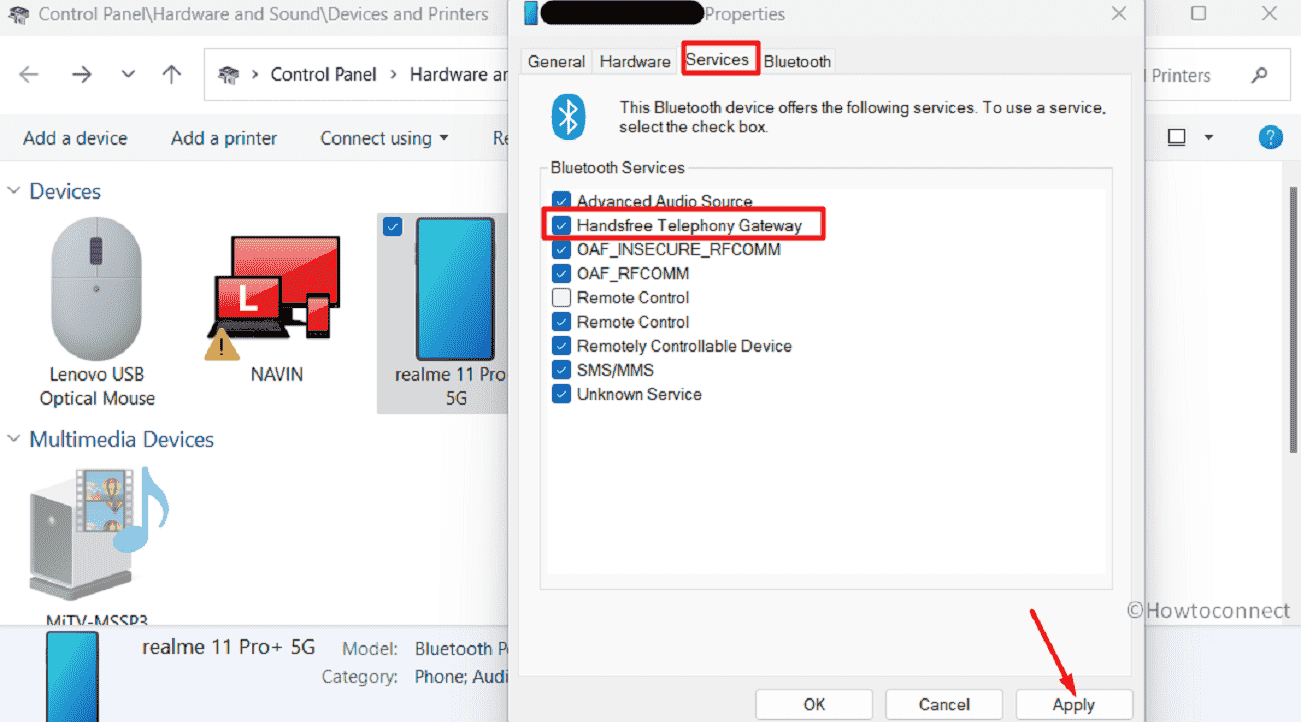
Devices and Printer for a headphone includes service settings to turn on and off Handsfree Telephony Gateway. Use this to fix your issue:
- Press Windows and I.
- Select Bluetooth & devices from the left menus.
- Choose “Devices” in the right panel.
- Scroll down and click on More devices and printer settings.
- On the window that appears, find the Sony WH-1000XM5 headphone and right-click on it.
- Select Properties.
- On the Properties window, go to Services tab.
- Uncheck the option Handsfree Telephony Gateway and click on Apply.
- Again check the same option and click on “Apply”.

- Click on Ok.
- Check if headphone mic is working perfectly.
Install the latest driver from the manufacturer’s website
Manufacturer of a device updates audio driver regularly and if any issue is found you can see an updated version of the driver. Install the software after downloading the setup file from the maker website as follows:
- Go to the Manufacturer’s website of your laptop or desktop.
- If asked, enter the model number and reach Software download page.
- Here, find the audio driver and download its latest version.
- Run the Setup (.exe) and install using onscreen instructions.
- If the manufacturer provides assistant software then install the driver using that.
Update the Sony audio driver from Device Manager
In case, the above solutions fail to fix Sony WH-1000XM5 Mic not working issue then Device Manager provides you to update, uninstall, and roll back a driver. You can use this Windows tool and see if the error is resolved:
- Right-click on the Start button and select Device Manager.
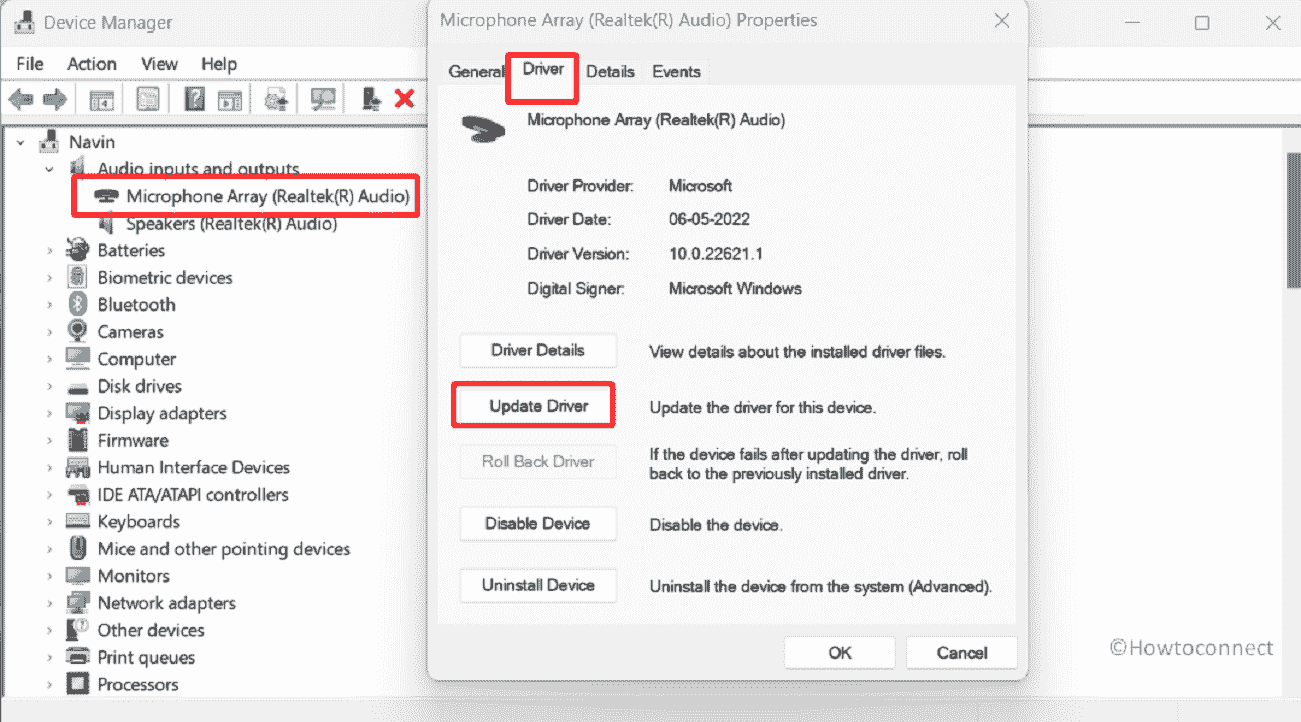
- Once the tool appears, expand the category Audio inputs and outputs.
- Then, right click on the Microphone and select Properties.
- Go to the Drivers tab.
- First of all, click on Update driver.

- Now select Search automatically for drivers.
- Reboot the system and check if the Mic is working now.
- In case, the issue still persists, then again open Device Manager and right click the Microphone, and select Uninstall device.
- On the warning popup, choose “Uninstall”.
- Restart the computer and see the issue.
- Still, if you are not getting rid of then right click on the “Microphone” from Device Manager and choose “Update driver”.
- Select Browse my computer for drivers.
- From the next screen, click on “Let me pick from a list of available drivers on my computer”.
- You will see a list of Models in the Compatible hardware section.
- We will recommend selecting each of them sequentially followed by clicking on Next.
- Don’t forget to restart the system after every selection.
Read: How to update drivers in Windows 11 (Best ways)
Run Audio Troubleshooter
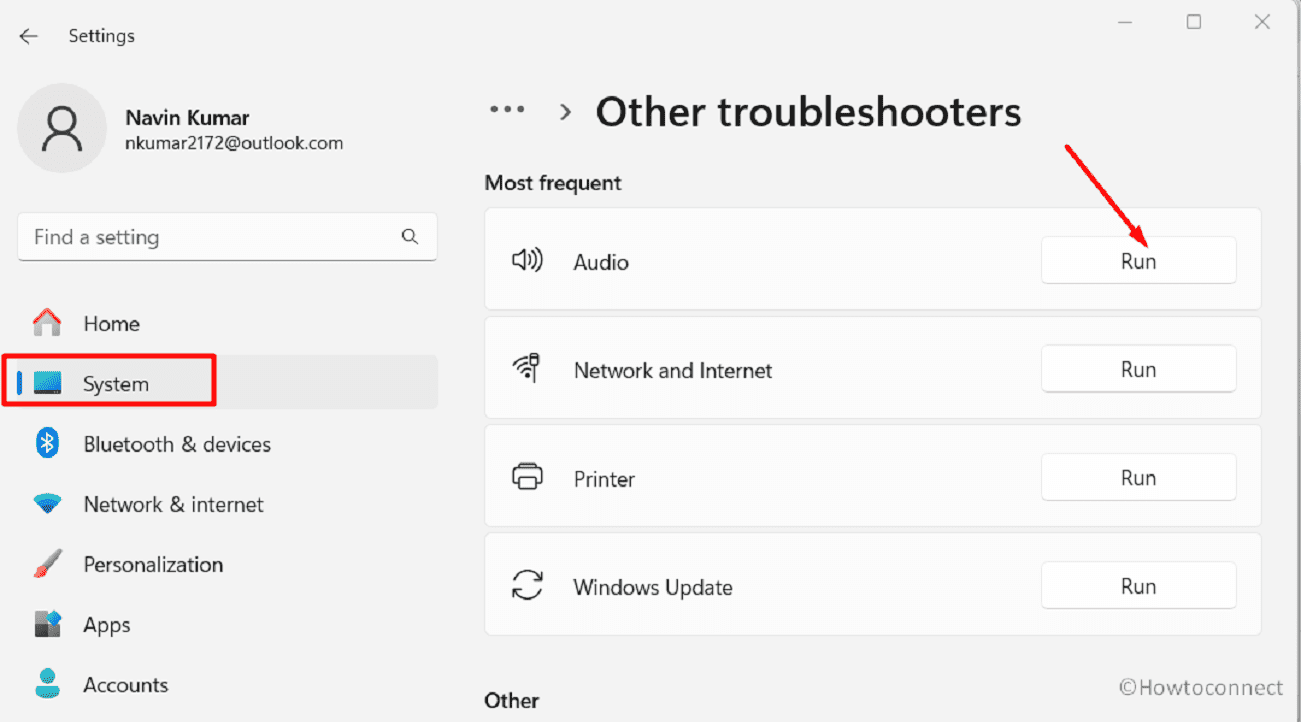
Windows offers a troubleshooting tool in System Settings to deal with mic problems. You can use this single click fixit tool to solve Sony WH-1000XM5 Mic not working issue. Follow the guide:
- Press Win + I and select System.
- Navigate to the right pane and click on Troubleshoot.
- From the next page, select Other troubleshooters.
- Click on Run for Audio located at the top.

- On the Get Help page, click on Yes for the question “Do we have your consent to run automated diagnostics to try solving your audio problem?”
- The system will run a diagnostic. You may hear a beep. When you are asked, “Did you hear the sound (beep) that played during the scan?” then click on Yes otherwise select No if you do not hear.
- If you select No then again run the diagnostic by giving your consent and clicking on Yes.
- The tool will execute tracing DAF. Check the microphone if it works.
- If not then click on Continue.
Remove headphone from Bluetooth connected devices and pair it again
Re-pairing Sony WH-1000XM5 using Bluetooth Settings may solve the mic issue in the device. Bluetooth & and devices settings provide you these functions so move forward with the steps:
- Open Settings (Winkey +I).
- Select Bluetooth & devices in the left menus.
- You can see grids for devices that are connected using Bluetooth.
- Click on three dots icon and select Remove device for your Sony WH-1000XM5 headphone.
- Now click on empty grid showing + sign.
- On Add a device window select Bluetooth.
- You will see a list of devices including the Sony headset.
- Click on Sony WH-1000XM5 to connect it.
- Then, check if the issue is fixed.
Disable and Enable Bluetooth on computer
Sometimes little thing does wonder so simply disabling and enabling Bluetooth from Settings app may help you to rescue the problem. You just need to follow a few steps for this:
- Right click on Start and select “Settings”.
- Choose “Bluetooth and devices” from the left-hand side.
- Using toggle switch on the next page turn off, and then turn Bluetooth on.
Install pending Windows Update
Windows 11 and 10 install the latest version of OEM devices driver through Windows Update, therefore, receive them using below method:
- Go to Settings > Windows Update > Check for updates. After downloading is completed, click on Restart now.
- Remember that sometimes, mic glitches are likely to occur after installing Windows Update. So, if you have recently received one, uninstall it via “Settings > Windows Update > Update history > Uninstall updates”
Methods:
Disable and Enable handsfree Telephony Gateway
Install the latest driver from the manufacturer’s website
Update the Sony audio driver from Device Manager
Run Audio Troubleshooter
Remove headphone from Bluetooth connected devices and pair it again
Disable and Enable Bluetooth on computer
Install pending Windows Update
That’s all!!
