Methods and Steps to Fix VPN 800 Error Code on Windows 10. – Are you facing Error code 800 Virtual Private Network. Attempted VPN Tunnel failed on Windows 10 or Error code 800 problem indicates that server is probably unreachable. Security parameters configuration may also a reason for this problem. This is one of the most common Virtual Private Network issues and found while Users are connecting. But, Few ways and a little carefulness deliver results very effectively to fix VPN 800 Error Code on Windows 10.
Error 800 Virtual Private Network issue may occur in two situations – Either router VPN configuration is incorrect or corrupt programs of a router. This is a very common issue and users often complain about this whether they are taking service from any provider.
Table of Contents
VPN 800 Error Code on Windows 10
Check For Username, Password, and Server Type
Step 1 – Click Win+I, Open, select Network & Internet.
Step 2 – Find VPN in the left pane of Network & Internet and click it for making all the options visible in the right side. The right pane will show you entire Virtual Private Network options.
Step 3 – Click the Add a VPN Connection (including to plus icon) which will launch a pop up.
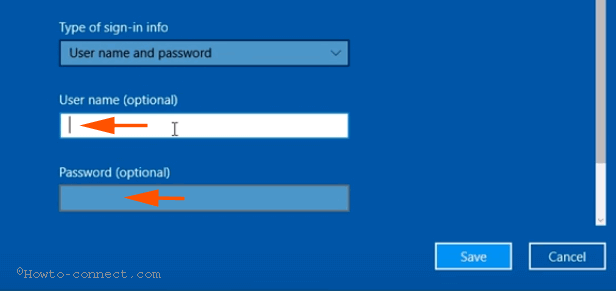
Step 4 – Check IP address, username, and password if these are correct. If you find incorrect then modify and try once more.
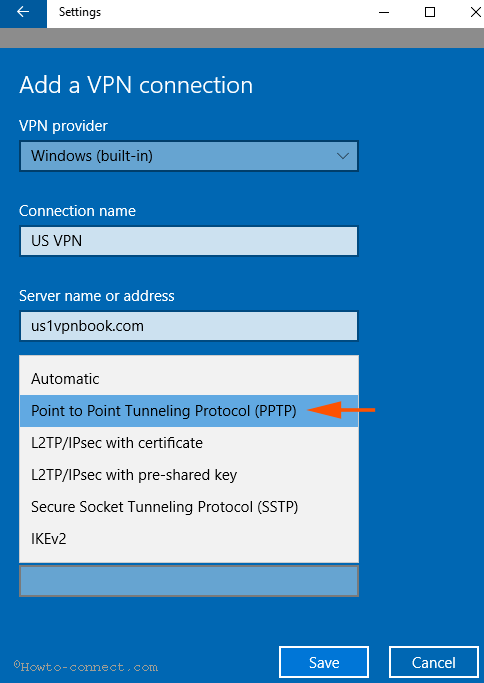
Step 5 – Here, carefully Select “Point to Point Tunneling Protocol (PPTP)” in VPN type drop-down in the 4th option on the pop up.
Step 6 – Ensure, Server name or address does not include “http: //” and “/”. If you place either of the symbols in the 3rd box, this will start showing the error.
Configure Windows Firewall and Router Properly
Step 1 – Allow app communication in Windows firewall for PPTP and the definitive virtual private network connection you are running. Configuring firewall rule becomes essential if you fail after following the above steps.
Step 2 – In addition, Allow the router for your Virtual private network and PPTP.
Step 3 – To avoid the issue, select PPTP and TCP Port 1723 and Protocol 47.
One more trick which could help you –
Customize Firewall Properties to Fix VPN 800 Error Code on Windows 10
Step 1 – Click the shortcut combination Win+X, select Control panel, click Windows Firewall link.
Step 2 – On the just launched Firewall window, Click Advanced Settings link. This link is placed in the left pane of Firewall.
Step 3 – Click “Action” menu followed by “Properties” in drop-down on the open window.
Step 4 – By default, it opens in Domain Profile tab. But, you need to switch to IPsec Settings here.
Step 5 – Click Customize option located in the first block IPsec Defaults.
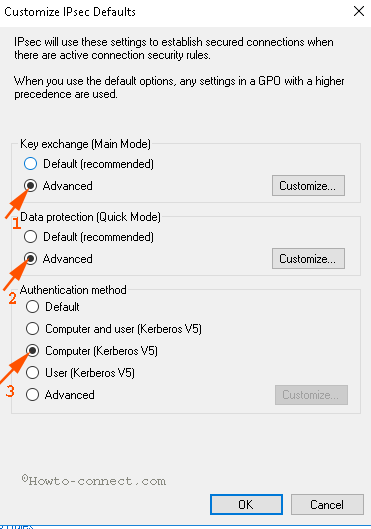
Step 6 – On the coming Wizard, configure the options carefully such as below –
1. “Key exchange (Main Mode)” – Advanced
2. “Data Protection (Quick Mode)” – Advanced
3. “Authentication method” – Computer Kerberos (V5).
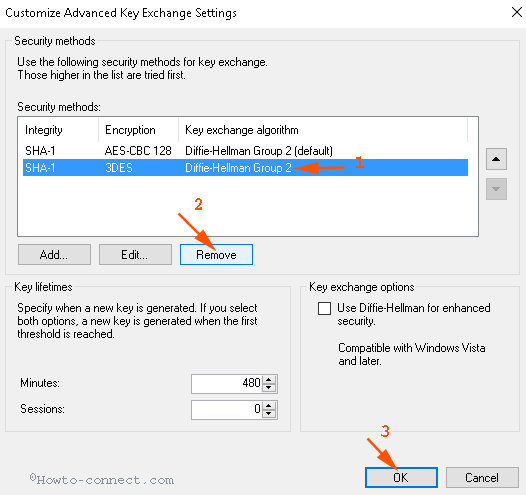
Step 6 – Customize button in the Key Exchange (Main Mode). See in the above screenshot to locate Customize.
Step 7 – Now Select 3DES in Encryption column below Security methods and click Remove. Click Ok to close Customize Advanced key Settings window.
Step 8 – In a similar way, click Customize option on Data Protection (Quick Mode).
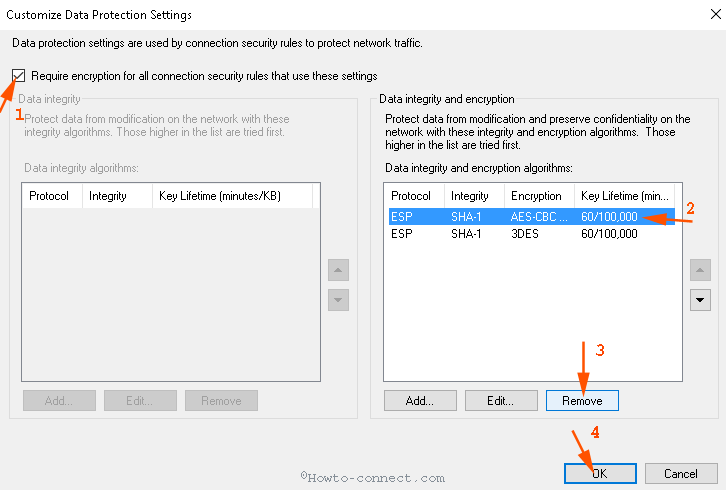
Step 9 – Click the Checkbox before “Require Encryption for all connection.Security rules that use these settings”. This will open “Customize Data Protection Settings” window.
Step 10 – Click AES-CBC.. in Encryption column and select Remove then close the dialog box.
Finally, check your connection whether it is running properly.
Conclusion
These are the processes and steps to fix VPN 800 Error Code on Windows 10 perturbing while users attempt to configure the settings. Prior to all the efforts, you must have a quality router to avoid these kinds of issues. Basic settings for this connection require carefulness. So Focus while typing server name and address.