Xbox Error 0x89231906 refers to the party chat and is common on both Xbox One and Xbox App in Windows 10. This code does not allow you to join the party chat and also disconnects you from the same. Chatting functionality is completely disabled all by itself but lets you play games online. Find a fix for another Xbox Error Code 801540a4 in Windows 10.
So, in this tutorial, you find a few solutions that can help you to get rid of this Xbox Error 0x89231906. Before heading towards the solutions, ensure that you haven’t changed anything in your router or wired connection. In this concern, you may like to read How to Fix Xbox Networking Problems in Windows 10. Hook to the tutorial and let’s explore the solutions.
Fix Xbox Error 0x89231906 in Windows 10
Solution 1 – Restart the Console
Most of the Xbox problems or errors are resolved by restarting the console.
Step 1 – Long hold the Xbox button and wait until everything shuts down completely. Once you see everything is closed, again long hold the same button to turn it On.
If the Xbox Error 0x89231906 still persists to occur, you may try out the following workarounds.
Solution 2 – Reset MAC Address
Step 1 – On the Home screen of Xbox One, move to the left to open the Guide. Out of various icons, select Settings.
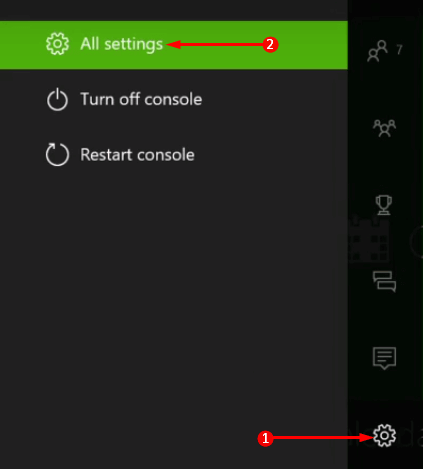
Step 2 – The Settings pane displays several options, click All Settings on the top as shown in the given screenshot.
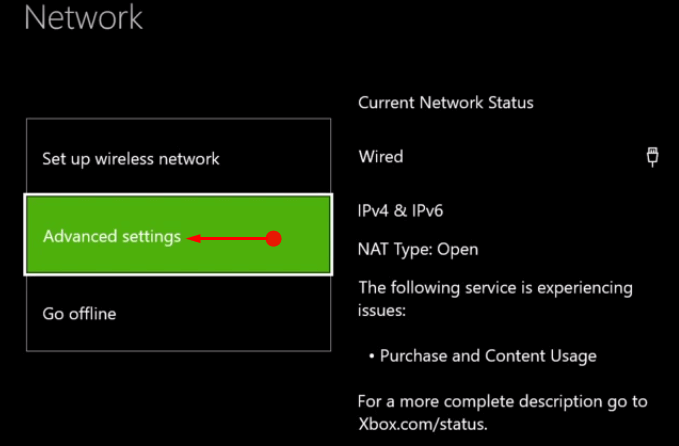
Step 3 – Moving ahead, choose Network Settings. Here, few sections are visible, go to Advanced Settings.
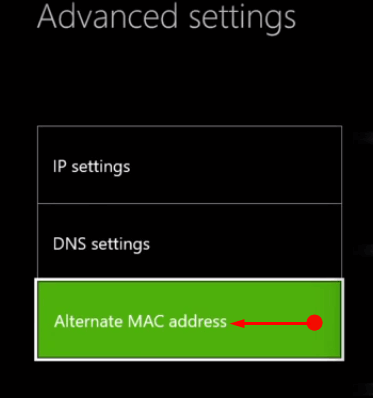
Step 4 – Click Alternative MAC address on the next screen.
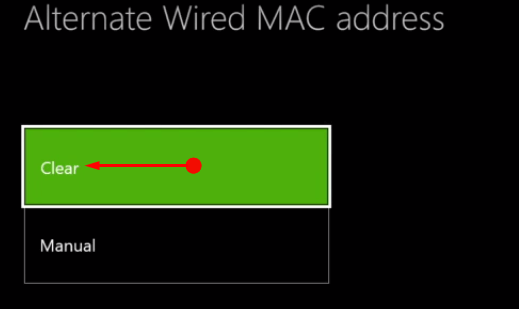
Step 5 – To reset the MAC address, click the Clear button. The following screen asks you to restart the console, click Restart.
Step 6 – Finally, do a party chat and check if you still confront Xbox Error 0x89231906.
For reference, you can Check Network Status of Xbox App Windows 10.
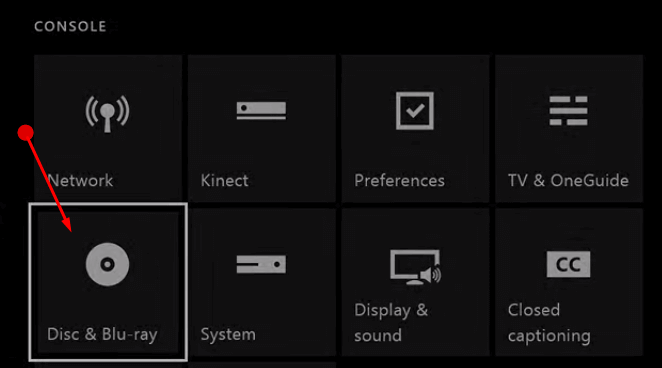
Solution 3 – Clear Blu-Ray Persistent Storage
Step 1 – Open Xbox One Settings to resolve Xbox Error 0x89231906 and select Disc & Blu-ray.
Step 2 – Here, you notice several options. Click on the option namely Persistent Storage.

Step 3 – Next, click the button Clear Persistent Storage.
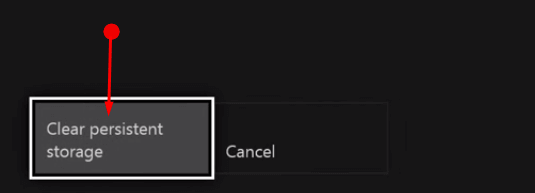
Note – You have to to do this clearing three times. After clearing it out, give a shot to the party chat to verify the occurrence of Xbox Error 0x89231906.
Solution 4 – Restart IP Helper Service
As mentioned above, this Xbox Error 0x89231906 also happens to occur in the Xbox app. Here also, it occurs during the party chat and automatically disables the chatting functionality.
The Xbox app communicates over the network through a particular service, IP Helper. When something is not correct with IP Helper, you may likely to receive errors while trying to make party chats. So, restarting this service in Windows 10 may help you to fix up the Xbox Error 0x89231906.
Step 1 – Type services on Cortana text field. Click Services that shows up as the Best match on Cortana.
Step 2 – Locate IP Helper on the Services window.
Step 3 – By default, IP Helper runs automatically but to get rid of Xbox Error 0x89231906, you need to restart it. So, execute a right-click on it and out of few options, click Restart.
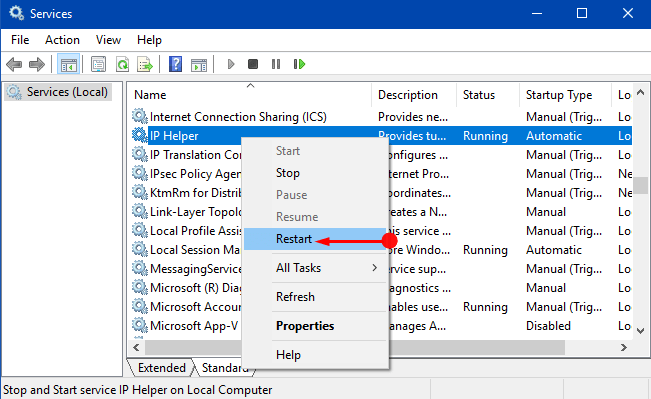
Note – Make sure that IP Helper is set to Automatic.
Step 4 – Lastly, Restart the PC and this should resolve the party chat error in Windows 10.
Explore 5 Ways to Manage Services in Windows 10.
Conclusion
Hence, you see that there are various solutions that can pretty much easily bypass the Xbox Error 0x89231906. So, give a shot to the workarounds and let us know which one worked for you. Also, if you have a few more solutions to this error, please do write to us.