DNS aka Domain Name System acts as the catalog of Networks on a computer which is used to determine the IP address of a website you visit. You can change DNS Server Address in Windows 11 keeping advantage of speed, privacy, and security of PC in your mind.
Thanks to Windows 11 as it lets you modify Preferred and alternate DNS Server Addresses at any time and altering this is relatively easy & quick. There are multiple methods to change the value such as via CMD command, Cmdlet, Control panel, and Settings.
Table of Contents
Change DNS Server Address in Windows 11
Here is how to change DNS server address in Windows 11 –
Way-1: Via Network Connections Window
To change DNS Server IP Address in Windows 11 from Control Panel, follow the below guidelines –
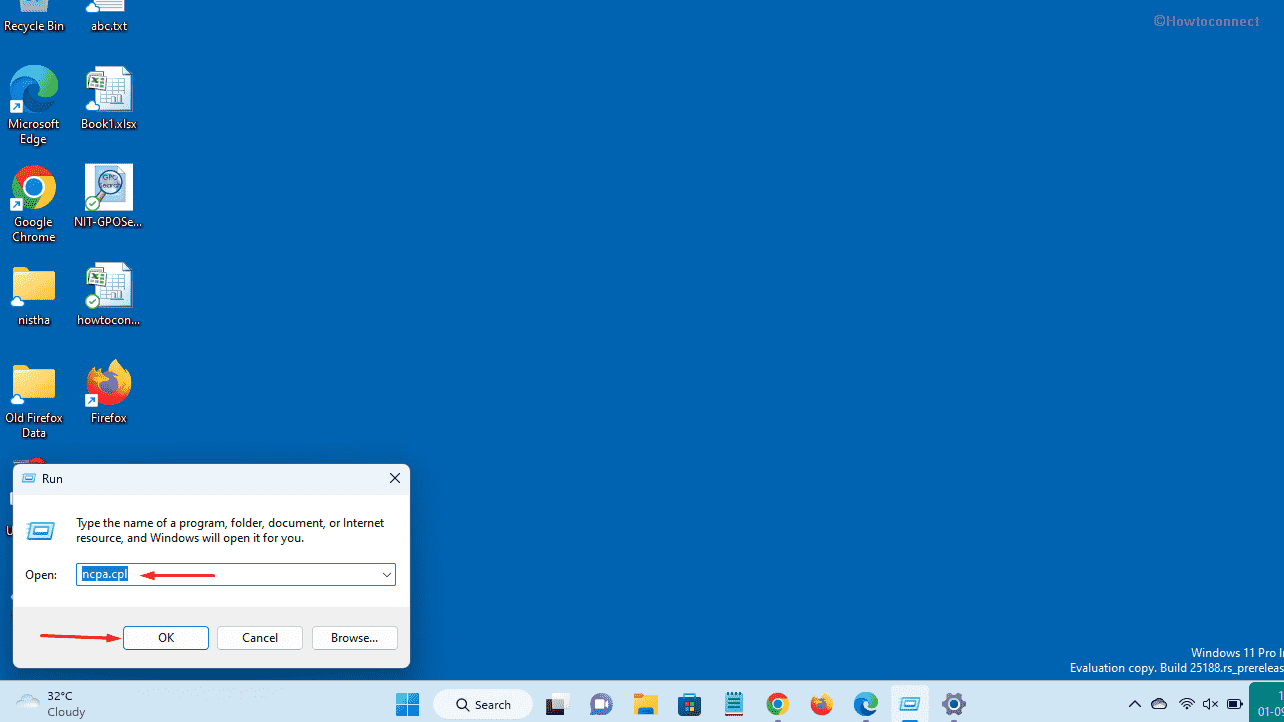
- Press Winkey+R.
- Type – ncpa.cpl.
- Hit – Enter.
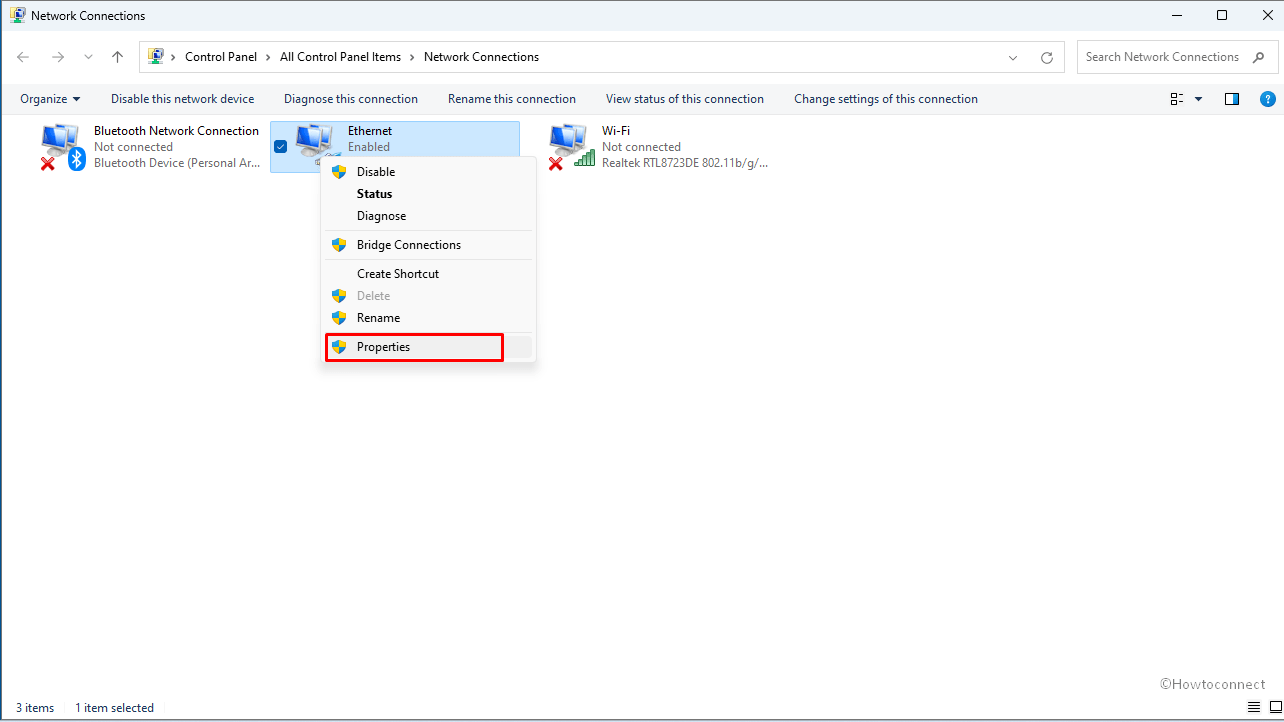
- Right click on Network connection name and select – Properties.
- Highlight Internet Protocol Version 4 (TCP/IPv4) by clicking on it.
- Click on – Properties.
- Check the option – Use the following DNS server addresses.
- Enter Preferred DNS server. This may be the server address of Cloudflare, Google, OpenDNS, or another service.
- Also, enter the Alternate DNS server address that your device will use when it can’t reach the preferred server address.
| Provider | Preferred DNS Server | Alternate DNS Server |
| 8.8.8.8 | 8.8.4.4 | |
| Cloudflare | 1.1.1.1 | 1.0.0.1 |
| OpenDNS | 208.67.222.222 | 208.67.220.220 |
| Alternate DNS | 76.76.19.19 | 76.223.122.150 |
| Quad9 | 9.9.9.9 | 149.112.112.112 |
| Control D | 76.76.2.0 | 76.76.10.0 |
| CleanBrowsing | 185.228.168.9 | 185.228.169.9 |
| AdGuard DNS | 94.140.14.14 | 94.140.15.15 |
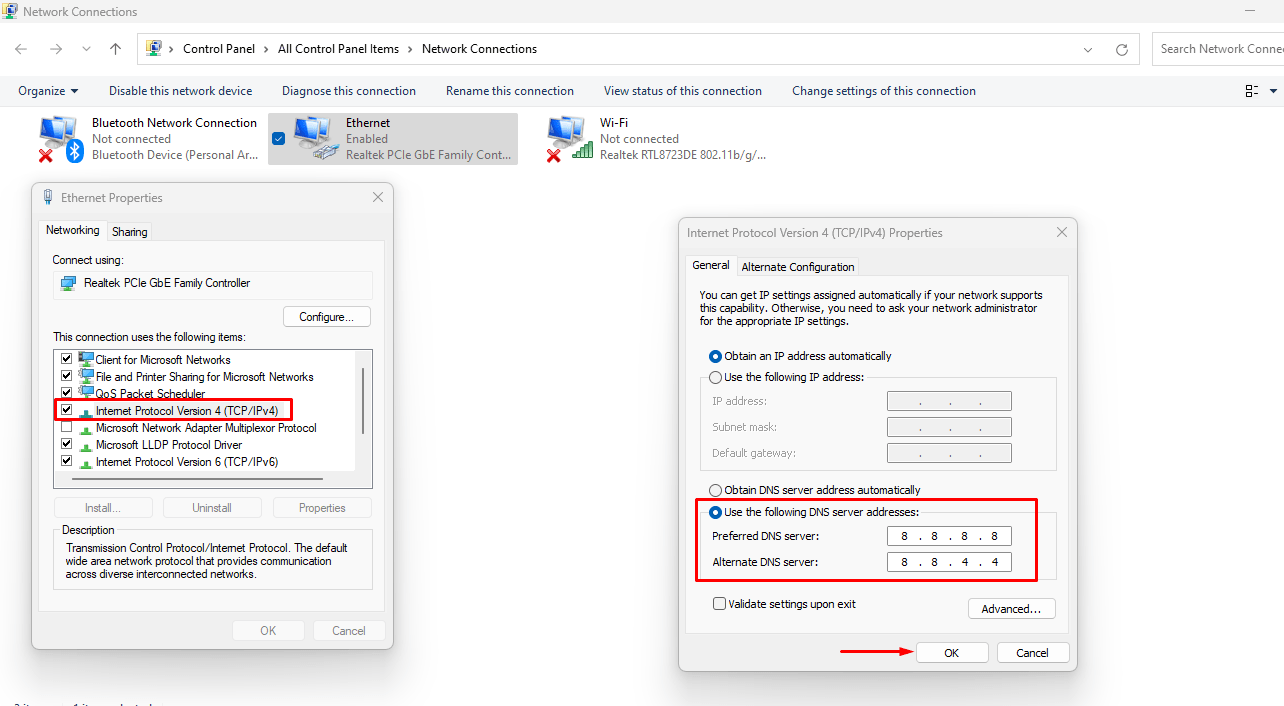
- Click – OK and then close the open windows.
See – How to Use Google DNS Servers in Windows 11 or 10.
Way-2: Through CMD Command
Via command prompt is the easiest method to the DNS so follow the steps –
- Click on Start from the taskbar.
- Type – cmd.
- Select – Run as Administrator.
- Select Yes on Confirmation prompt.
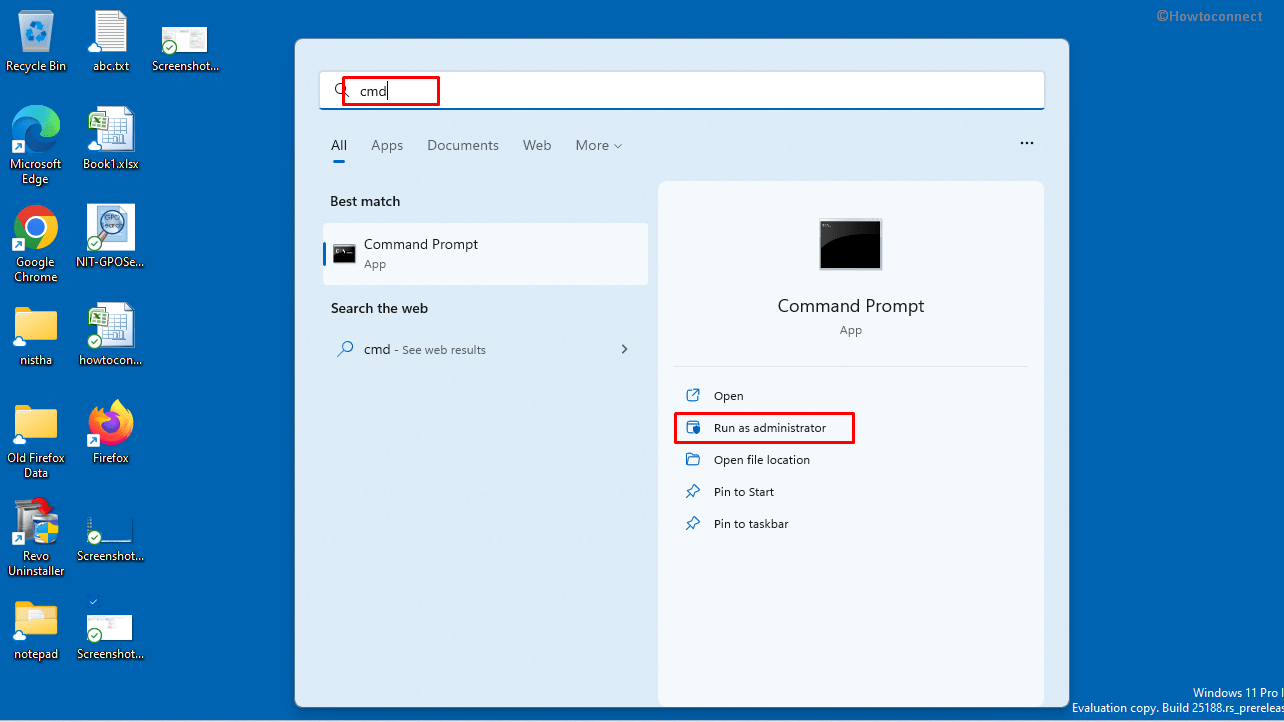
- To see your current networking configuration, copy-paste the following command –
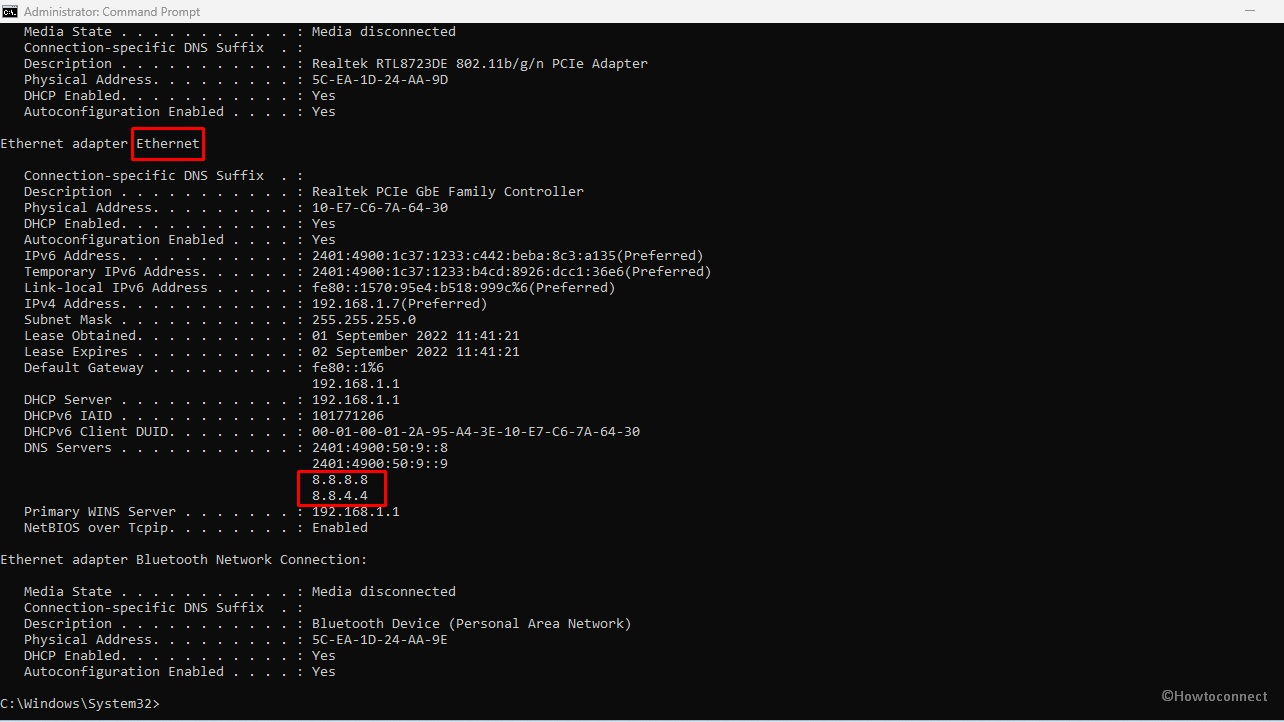
ipconfig /all
- Hit Enter.
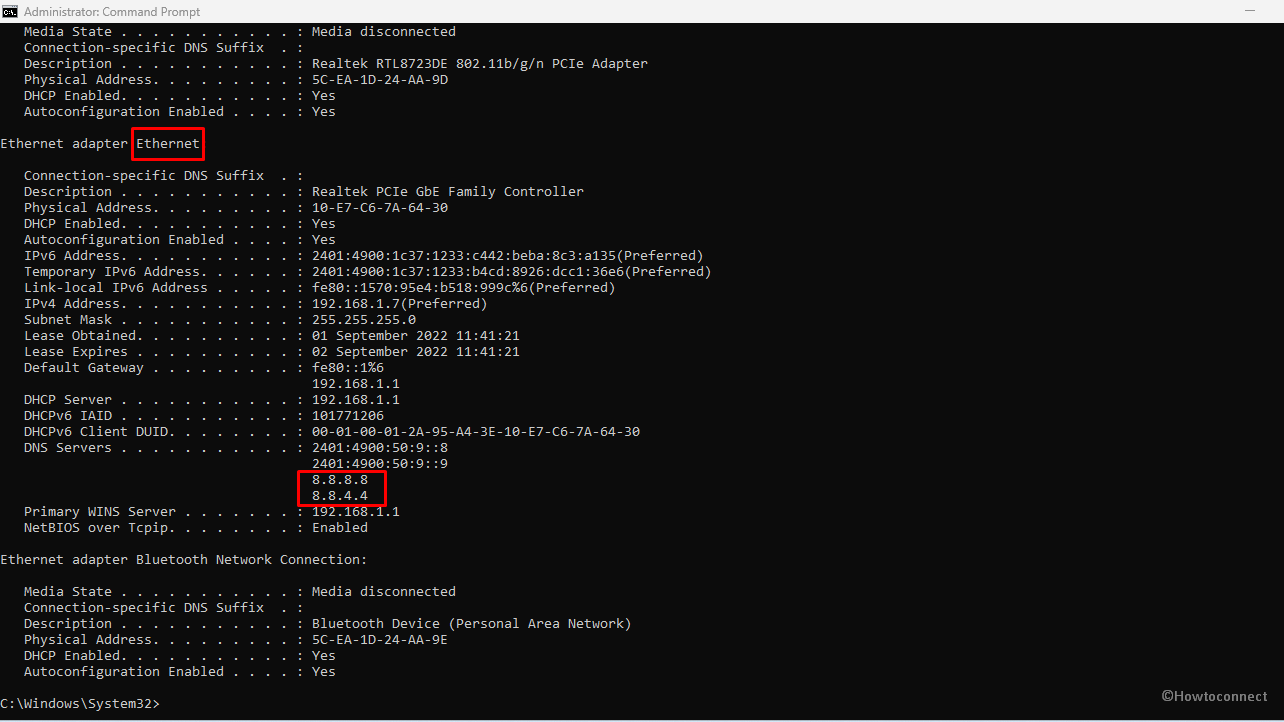
- Within the field of network adapter, see the adapter’s name and these fields:
- Network name, and
- DNS Servers.
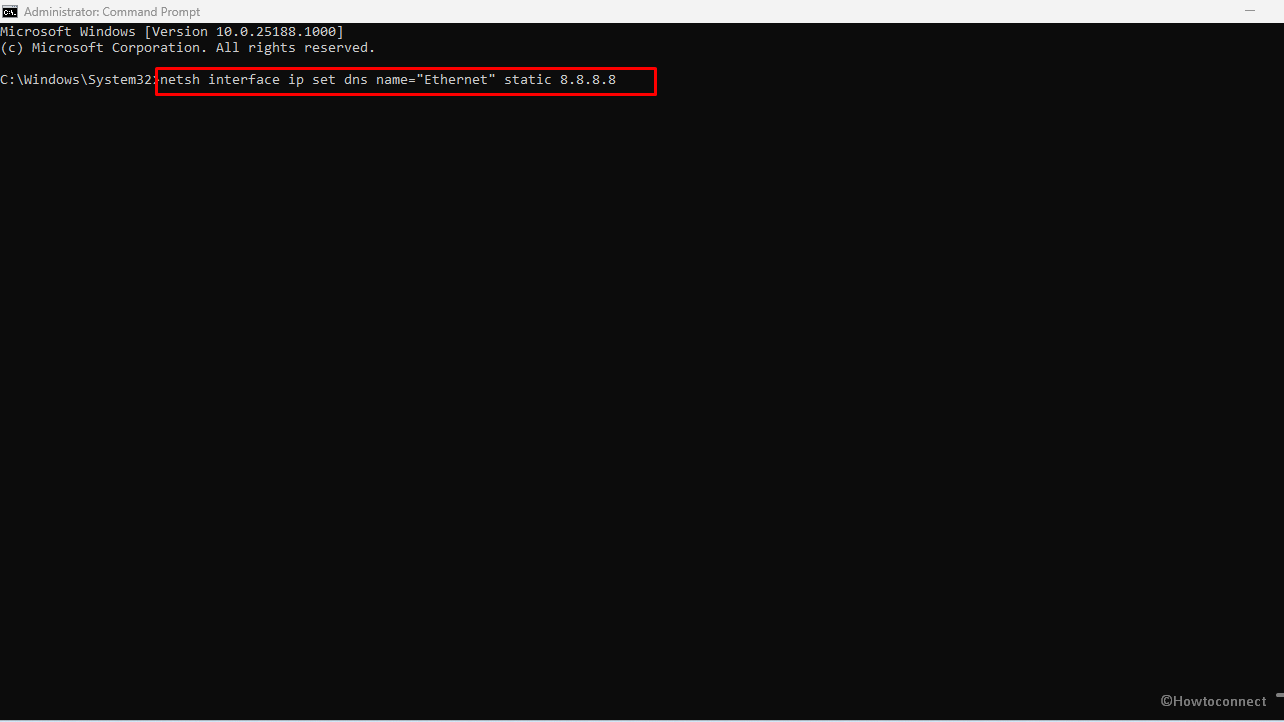
- In order to assign the Preferred DNS server address in Windows 11 to a new one, type the following command:
netsh interface ip set dns name="Ethernet" static 8.8.8.8Don’t forget to replace Ethernet with the name of your adapter and the 1.1.1.1 with the DNS server IP address for the service you want to use. Press Enter.
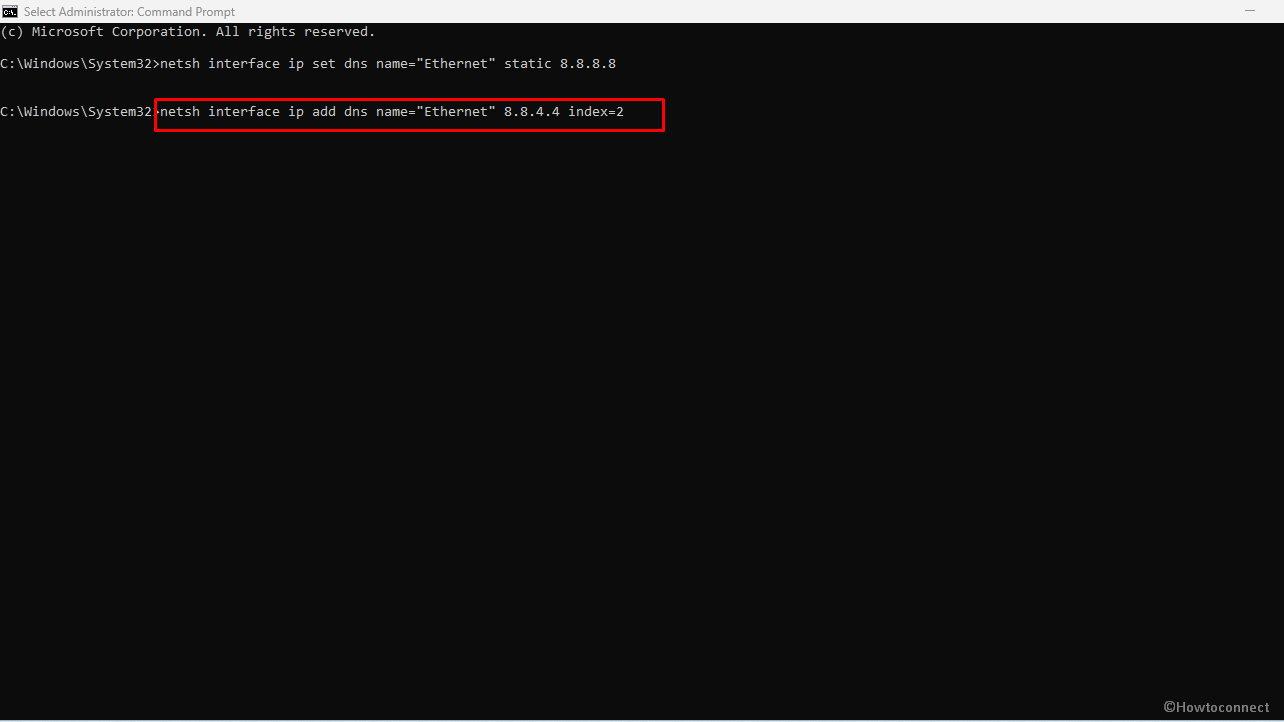
- Type the below command to change Alternate DNS server address address and press Enter –
netsh interface ip add dns name="Ethernet" 8.8.4.4 index=2Replace Ethernet with the name of your adapter and 1.0.0.1 with the alternate DNS server address of your choice.
- Finally, to confirm the changes, run –
ipconfig / allonce more.
Way-3: Using Windows PowerShell Cmdlet
You can change DNS Server IP Address using PowerShell through the following steps –
- Click on Start.
- Type – PowerShell.
- When it appears, select the – Run as administrator
- To get your current network configuration, copy-paste the following command –
Get-NetIPConfiguration- Press – Enter.
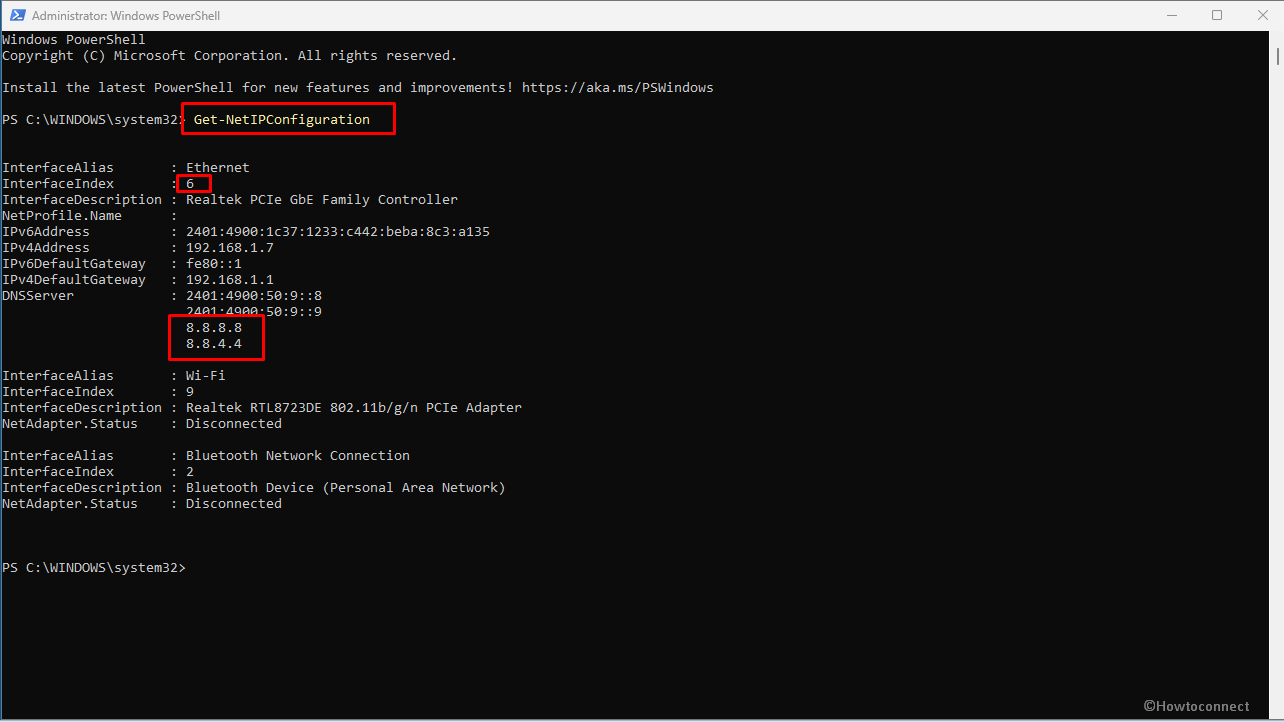
After running the command, note the following information:
InterfaceIndex
DNSServer
- Type the following command to assign a primary DNS server address and press Enter (replacing InterfaceIndex 6 with the value):
Set-DnsClientServerAddress -InterfaceIndex 6 -ServerAddresses 8.8.8.8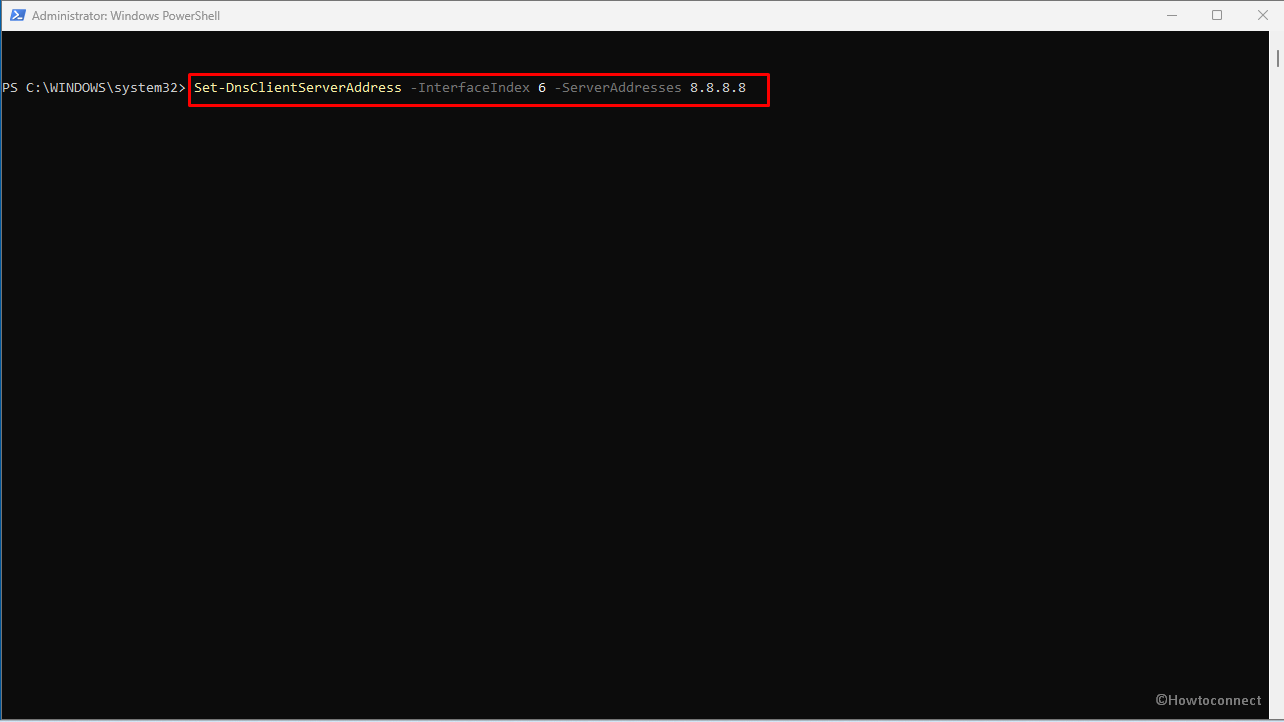
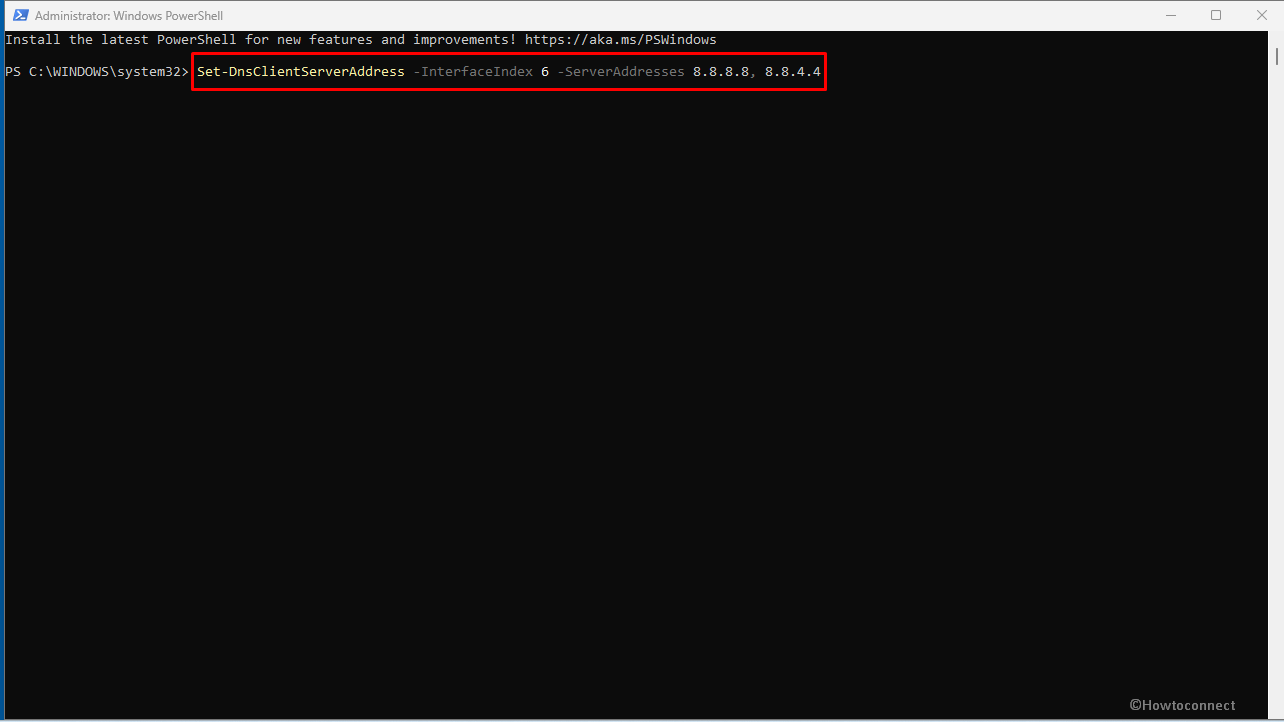
If applicable to you, set a secondary DNS server IP address, you can use the same command, by using a comma and an alternative address:
Set-DnsClientServerAddress -InterfaceIndex 6 -ServerAddresses 8.8.8.8, 8.8.4.4You might be noticing that InterfaceIndex number will be replaced with the one respective with your network adapter, and ServerAddresses with the DNS address.
Way-4: Via Settings
One of the top methods to change DNS Server IP Address in Windows 11, you should use the Settings app. Therefore follow the steps –
- Press – Windows + I.
- When the Settings app appears, click on – Network & Internet.
- Choose – Ethernet.
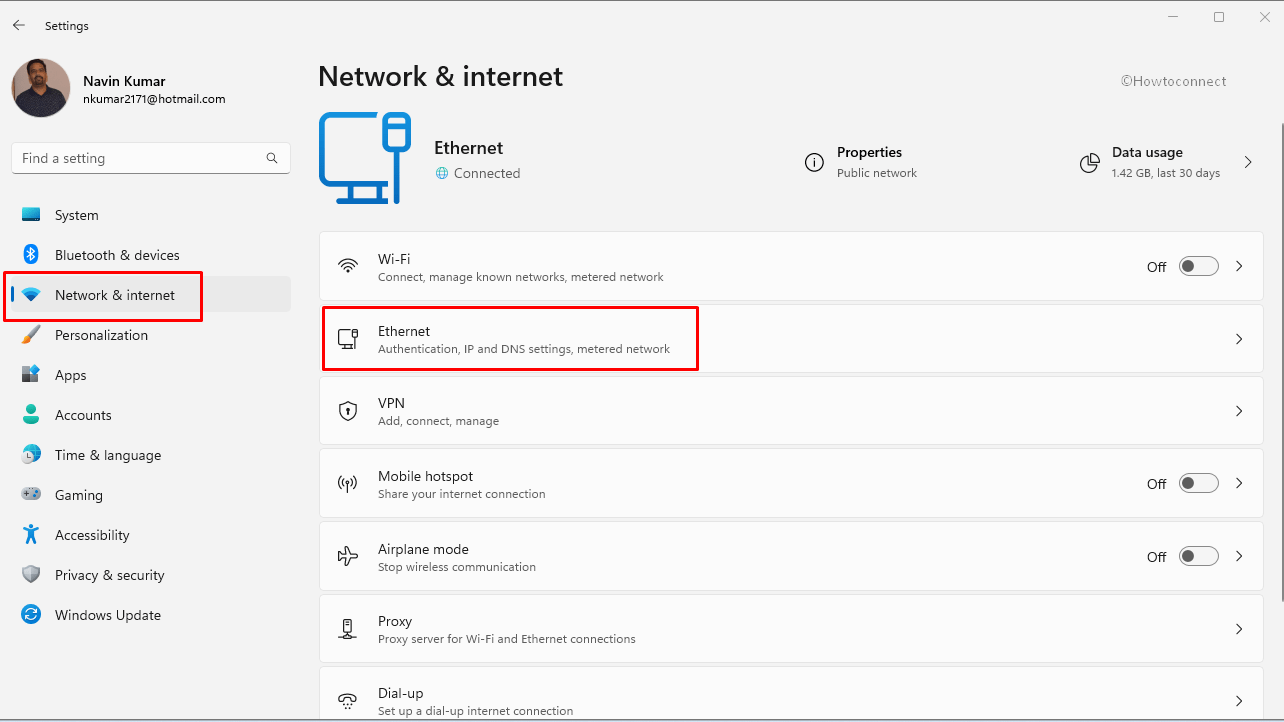
- From “DNS server assignment” section, click – Edit.
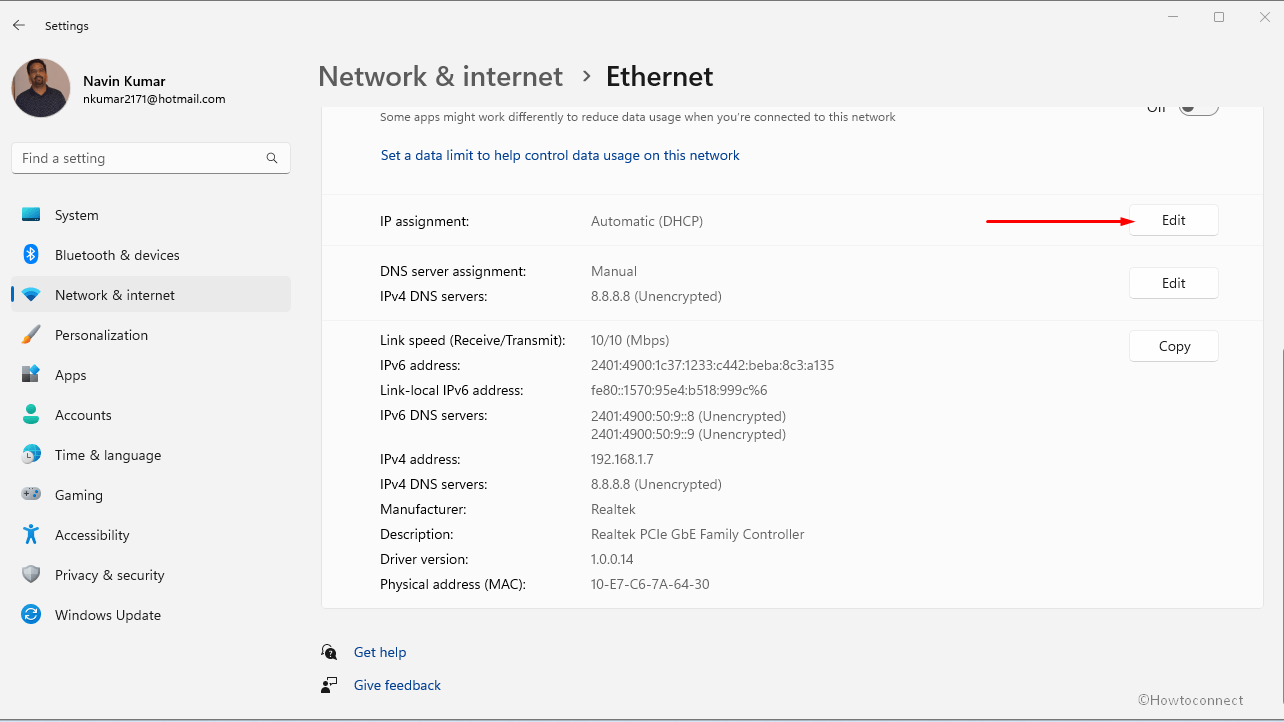
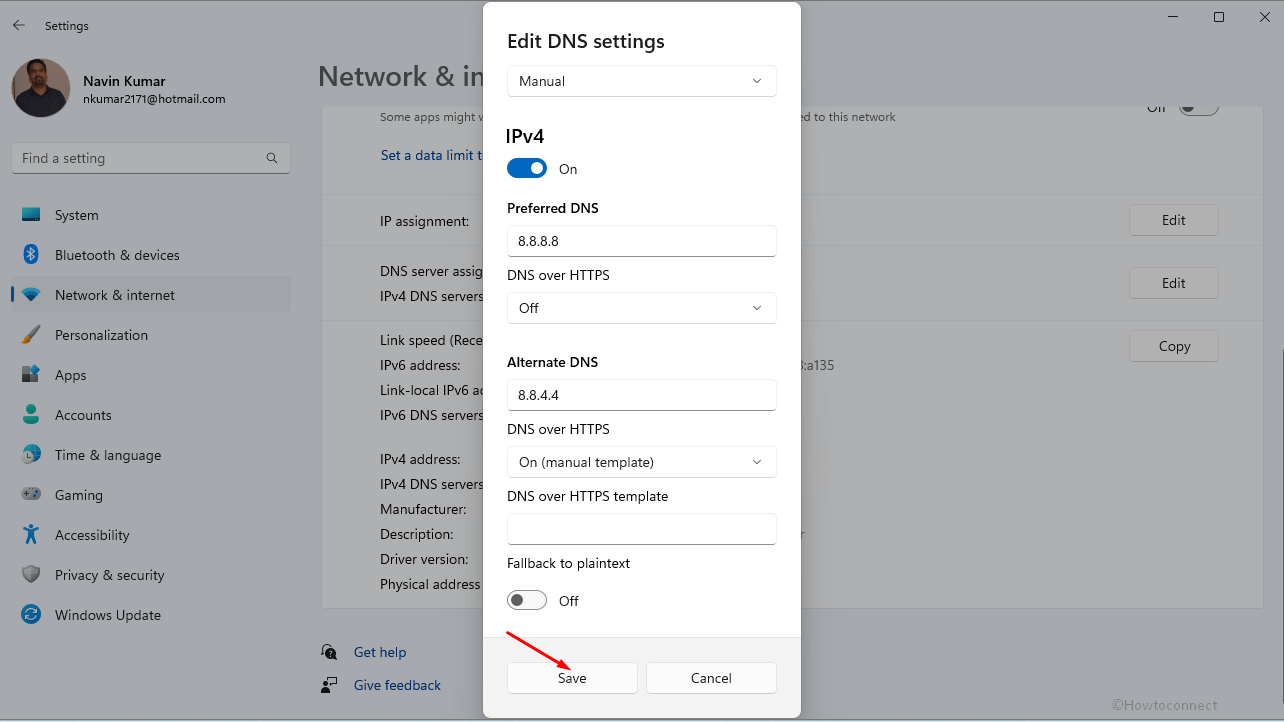
- Select – Manual option using the drop-down menu.
- Turn on the IPv4 toggle button.
- Under the “Preferred DNS” section, specify the IP address of the DNS server for Cloudflare, Google, OpenDNS, or another service.
- If you want to enable DNS encryption then select the Encrypted only (DNS over HTTPS) under the “Preferred DNS encryption” field.
- Enter IP address of the secondary DNS address in the “Alternate DNS” field.
- (Optional) Under the “Alternative DNS encryption” section, select the Encrypted only (DNS over HTTPS) option to enable encryption for the secondary server.
- Click on – Save.
Methods list:
Way-1: Via Network Connections window
Way-2: Through CMD Command
Way-3: Using PowerShell Cmdlet
Way-4: Via Settings app
That’s all!!
