Sometimes, you might find error 0xc1900201 with a message “We couldn’t update system reserved partition”. This issue commonly occurs when trying to upgrade the Windows 11 or 10 and System Reserved Partition is either full or written by a 3rd party antimalware app.
The error code might appear with update or upgrade failure in Windows 10 20H2, 2004, 21H1, and some of the Windows 11 versions. However, you can repair this System reserve aka SRP problem very easily.
Error code 0xc1900201 We couldn’t update system reserved partition
Here is how to fix error code 0xc1900201 We couldn’t update system reserved partition in Windows 11/10 –
The main factor for this problem is the filled System partition, therefore, freeing the space will help you resolve it. You need to delete at least 15 MB from the partition so that the upgradation might end up successfully. Fonts folder existing in the Boot folder is greater than 15 MB and removing this will work in this case. This method includes 3 steps – 1. Determine the SRP partition type (MBR or GPT), 2. Delete in MBR and 3. Delete in GPT. make sure that you are aware of executing the command
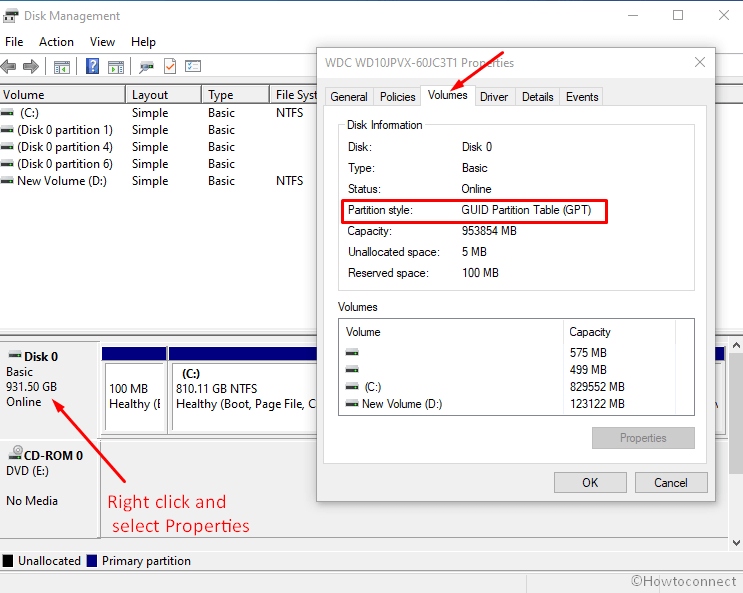
a) Determine whether the system reserve partition is MBR OR GPT –
- Press – Winkey.
- Type – diskmgmt.msc.
- Press – Enter.
- Right click on – Disk 0.
- Select – Properties.
- Click the tab saying – Volumes.
- Now, you can see – The Partition Style: GUID Partition Table (GPT) or Master Boot Record (MBR).
If the partition is GPT
- Click the – Start.
- Type in – cmd.
- From the right of the result flyout, select – Run as administrator.
- Choose – Yes on the User account control prompt.
- Copy mountvol y: /s from here, paste into the command prompt (you can use right-click).
- Press – Enter.
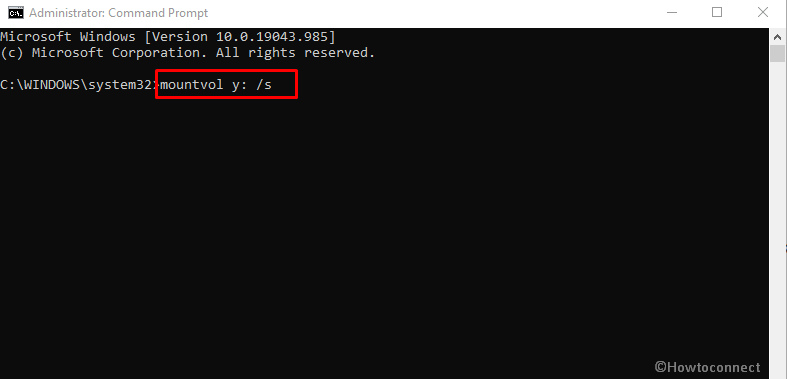
- As a result, this command-line will add the “Y: drive letter” to access the Partition.
- Type Y: and hit Enter in order to switch to the Y drive.
- Paste cd EFI\Microsoft\Boot\Fonts and press “Enter”.
- Type del *.* to delete font files. The system may ask if you are sure to continue, press Y and then Enter. This will fix error code 0xc1900201 We couldn’t update system reserved partition in Windows 11 and 10.
To fix error 0xc1900201 If the partition is MBR
- Open run dialog box by hitting Windows key and R together.
- Write – diskmgmt.msc.
- Press the – Enter.
- Right-click on the partition showing a System Reserve.
- Choose – Change Drive Letter and Paths.
- Click – Add.
- Type Y for the drive letter.
- Click the – OK.
- Open Command Prompt as Administrator as said in the above method.
- Type – Y:
- Hit the – enter.
- Next, type – cd Boot\Fonts and hit – ‘enter’.
- Now, Type takeown /d y /r /f and press Enter. Important – For the command to work correctly put space and period after the “f”.
- In order to back up the permission to the drive run the following command –
icacls Y:\* /save %systemdrive%\NTFSp.txt /c /t
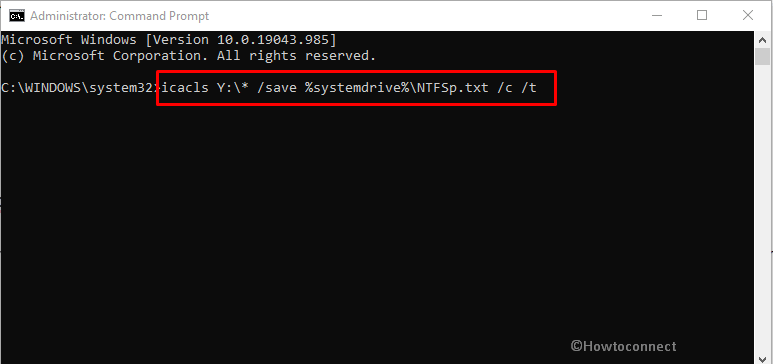
Important: Make sure that you can see ‘successful’ for all files and none is showing failed.
- Copy whoami paste in the prompt and press Enter.
- Note down the user name.
- Run the following command –
icacls . /grant <username you got from whoami>:F /t
Important: This time, don’t put a space between the username and “:F”, or the command won’t work.
- Ensure that you are still in Fonts location (Y:\Boot\Fonts).
- Type del *.*.
- You may be asked – Are you sure to continue, press Y, and then enter.
- To bring back the permissions type the following command and hit Enter –
icacls Y:\ /restore %systemdrive%\NTFSp.txt /c /t
- You may notice a message hinting that some files failed while processing. This is normal as these files have been deleted subsequent to backing them up.
- If the amount of successful files is none, then the command was executed incorrectly; you must have some files successfully processed before continuing.
- Adjust the ACL back to System by copying-pasting the following and pressing Enter:
icacls . /grant system:f /t
- Set the owner of the drive back to System by typing the underneath command and hitting Enter:
icacls Y: /setowner “SYSTEM” /t /c
- Go back to Disk Management and select Action -> Refresh
- Ensure that the percentage of free space in the System reserved partition (SRP) is more.
- Now, Right-click the System Reserved Partition.
- Click the – Change Drive Letter and Paths.
- Select the – Y: drive.
- Click – Remove.
- Choose – OK to solve error code 0xc1900201.
That’s all!!
Amazing, that saved me a drive to the office.
Thank you! This worked perfectly!