KB5029351, the Preview update, introduces enhancements to system performance on Windows 11 22H2. Regrettably, a subset of users encounters difficulties during the installation process. The installation of the patch is unsuccessful, accompanied by specific error codes like 0x800f0991, 0x0070002, 0x800f0922, or other. In certain scenarios, the cumulative update downloads without issue; however, upon restarting, the process becomes stuck at the “Undoing changes made to your computer” stage. Eventually, the system reverts to the previous version. Below, we present solutions for addressing the issue of KB5029351 failed to install on Windows 11 22H2.
The KB5029351 not installing error can be attributed to various factors. These include issues like a corrupted Windows update cache, clashes with third-party applications, and impaired system files. Additionally, the presence of malware, incorrect service configurations, and disruptions in DNS server IP addresses could contribute to the emergence of this problem. It’s important to note that at times, inadequate disk space can also act as a barrier, hindering the download and installation of the patch. This aspect deserves careful consideration as well. The earlier patch installation was unsuccessful in some cases which were solved with – Fix KB5029244 Failed to install with Error in Windows 10 22H2.
Table of Contents
KB5029351 failed to install in Windows 11 21H2
Here is How to Fix KB5029351 Failed to Install with Error in Windows 11 21H2 –
Use the alternative method Microsoft update catalog
In cases where update failures persist, the Microsoft Update Catalog stands as an alternative solution, offering all patches in the form of standalone packages. Additionally, this website serves as a repository for drivers, hotfixes, and various other resources.
Hence, consider attempting the installation of KB5029351 from the Microsoft Update Catalog.
- Navigate to this link.
- In Title column, find the file incompatible with processor of your computer (x64 or ARM64).
- Click on Download.
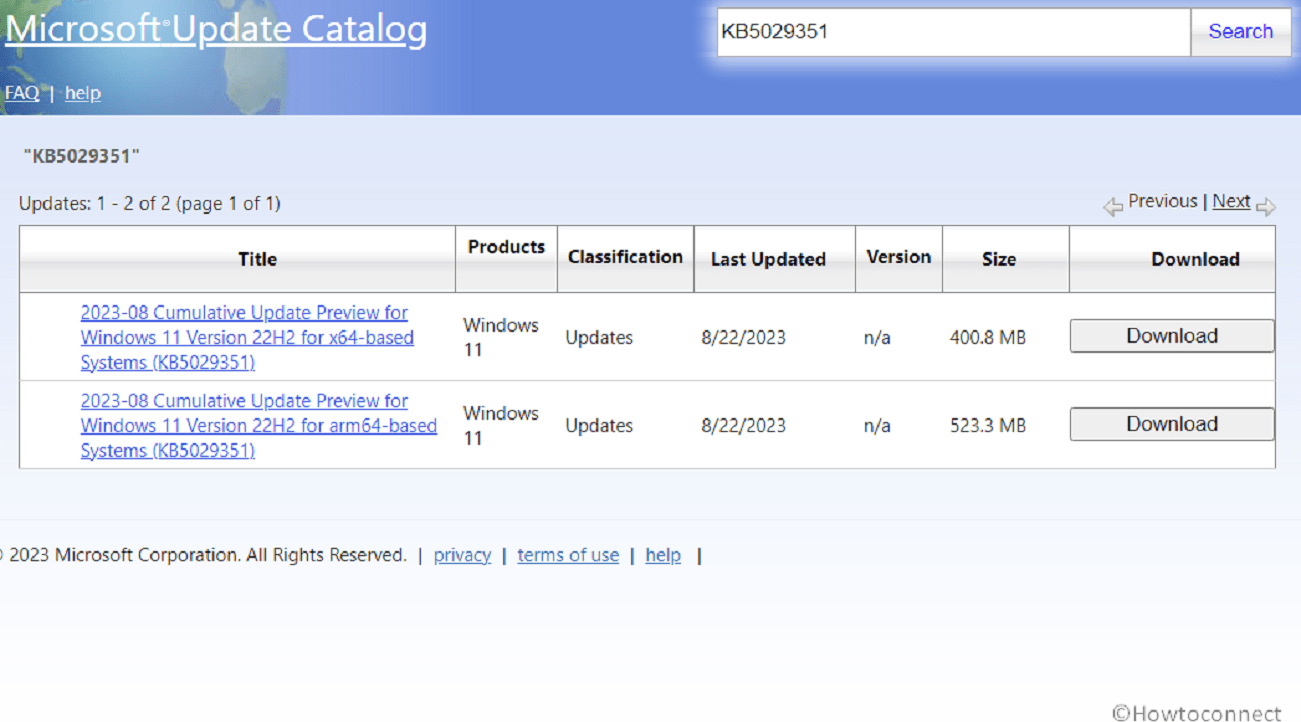
- A separate page will be out on the screen; click on the link there.
- Press Windows + E keys and go to the Downloads folder in File Explorer.
- Either of the following files is downloaded; double-click on the one you have:
windows11.0-kb5029351-x64_fafa3fd62c6973e337a31ff771d2233357ecb7c2.msu
or,
windows11.0-kb5029351-arm64_7905520f5892878306392fee6d7c40559f510d74.msu
- If a verification popup appears, click on Yes.
Follow: How to Download and Install Update from Microsoft update catalog on Windows 11/10
Run the default Troubleshooter
The Windows Update Troubleshooter functions as a rescuer, proficient in automatically identifying and resolving typical issues that could potentially obstruct your computer from receiving crucial updates. Utilizing a methodical checklist, the troubleshooter strives to pinpoint the underlying factors responsible for the current issue.
If KB5029351 is not installing till now and triggering errors 0x0070002, 0x800f0922, and 0x800f0991 then Windows Update Troubleshooter may help you.
- Click on Start and type “troubleshoot”.
- Press Enter.
- Once a Settings page appears, go to the right side and click on Other troubleshooters.
- All the troubleshooters will be shown now, find Windows Update and click on Run.
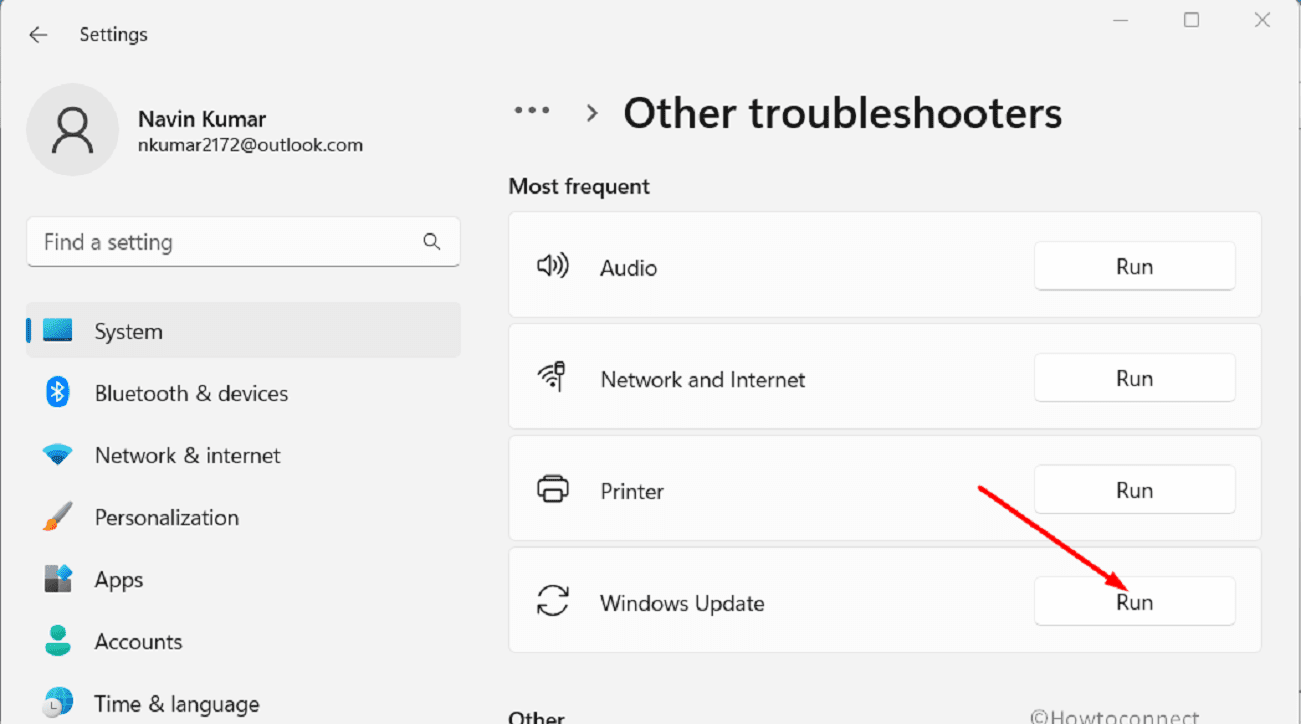
- Give some time to the troubleshooter to complete its operations and if you get any instructions follow this.
Clear and Reset the Windows Update cache
Windows Update cache reset ensures decluttering the storage area designated for updates, ensuring that everything is arranged neatly and primed for the arrival of new downloads. This approach is advisable when seeking solutions for errors like KB5029351 0x800f0991, 0x0070002, 0x800f0922, and similar issues, as it also entails the restarting of essential services.
- Press Windows key and R type the term cmd.exe.
- Hit Ctrl+Shift+Enter.
- When User Account Control appears, select Yes.
- Copy-paste the following command lines, one at a time, and press the Enter:
net stop wuauserv
net stop cryptSvc
net stop bits
net stop msiserver
net stop AppReadiness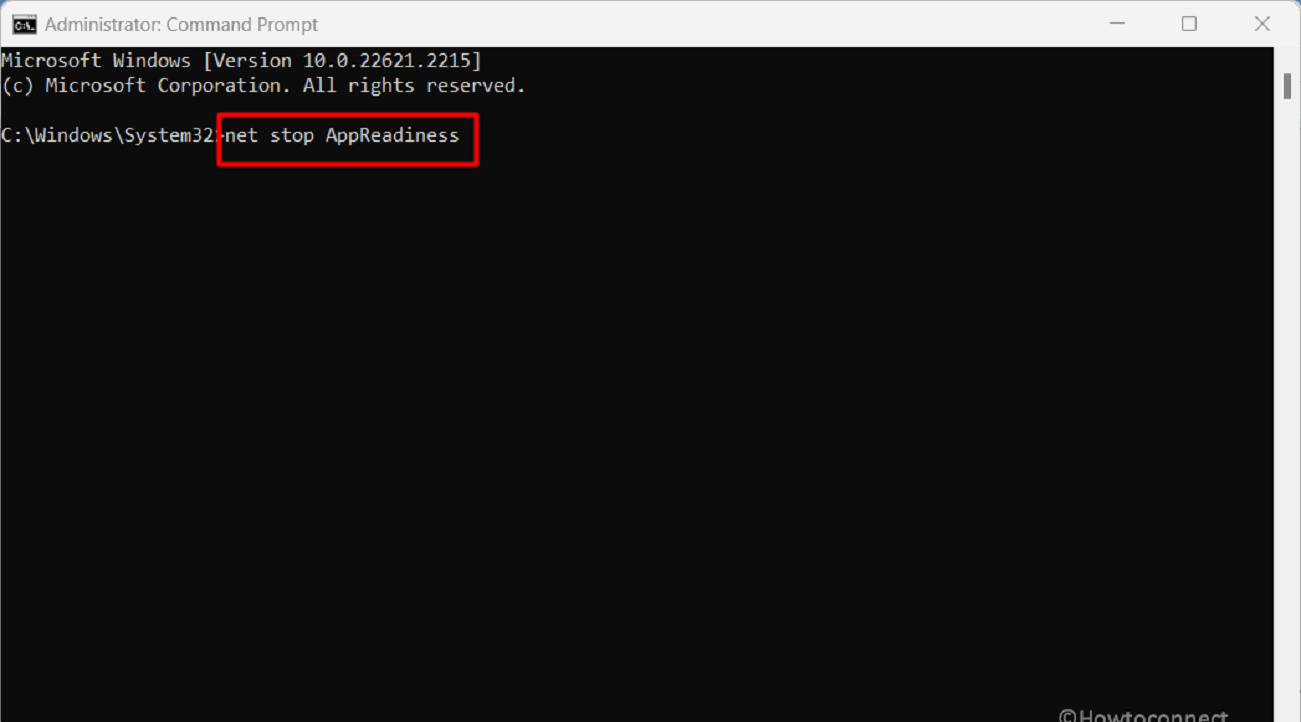
- After you have Stopped the Windows update associated services now you need to rename the SoftwareDistribution folder so run the following command:
del %windir%\SoftwareDistribution - Then, reset the Background Intelligent Transfer Service by entering:
bitsadmin /reset /allusers - At last, to again start all these services copy-paste the below written commands:
net start wuauserv
net start cryptSvc
net start bits
net start msiserver
net start AppReadiness- Exit the Command Prompt and reboot your computer.
As an easier method, you can fix KB5029351 error directly by running “WURest.bat” as administrator located in Reset_Windows_11_update.zip.
Change the Startup type and Running status of Services associated with Windows update
Windows update-related services play a crucial role in defining the trajectory of update installations. If these services are improperly configured, they can give rise to issues culminating in specific errors. Hence, when encountering problems such as the KB5029351 failed to install, one of the viable solutions is to adjust the configuration of Windows services.
- Click on Search type services.msc.
- Press Enter to launch the “Services” windows.
- Find Background Intelligent service from the list. Right-click on this and select Edit.
- From the Startup type field, click on the dropdown and set it to Automatic.
- Go to the “Service status” and click on Start.
- In the end, click Apply then OK to save the modifications.
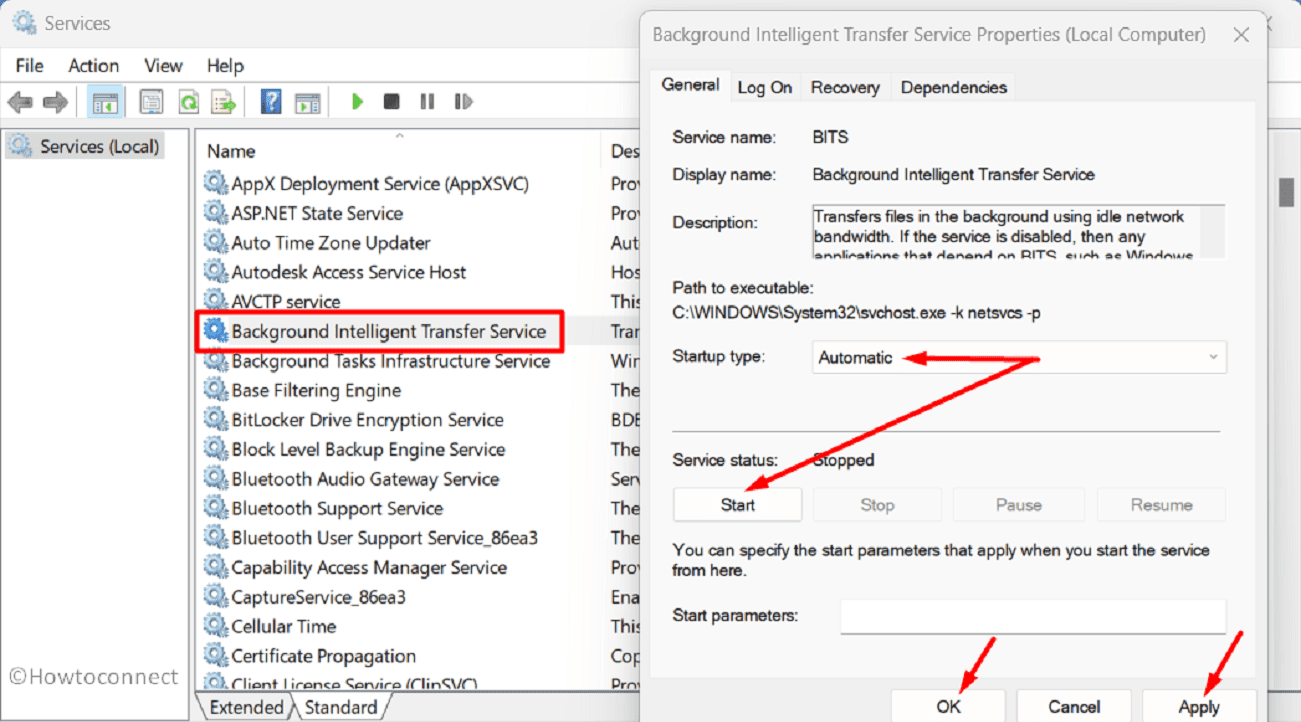
- Duplicate the same with Windows update and Cryptographic Services.
Fix Fortnite Blue Screen Error in Windows 11 or 10
Turn off Third-Party Antivirus
While an antivirus tool is a crucial component of Windows, safeguarding the computer against threats and attacks, it can inadvertently contribute to the KB5029351 failed to install with errors on Windows 11 22H2. Consequently, it’s advisable to temporarily disable any third-party antivirus software you might have installed:
- Click on Up arrow from the right side of Taskbar.
- System tray will unfurl.
- Locate the antivirus icon and right-click on it.
- Select the option that will disable the software.
- If any dialog appears, choose the option that will confirm the process.
- Then try to install KB5029351.
Use Google’s Alternate and Preferred DNS server addresses
On occasion, the DNS server addresses provided by your Internet Service Provider (ISP) can impede the installation of a new Windows update, resulting in error messages. Consequently, switching to domain name servers from providers like Google or Cloudflare could potentially resolve the issue and facilitate the successful installation of the patch.
- Click on Start and type ncpa.cpl.
- Hit Enter to open Control Panel\All Control Panel Items\Network Connections window.
- Find your adapter and right-click on it.
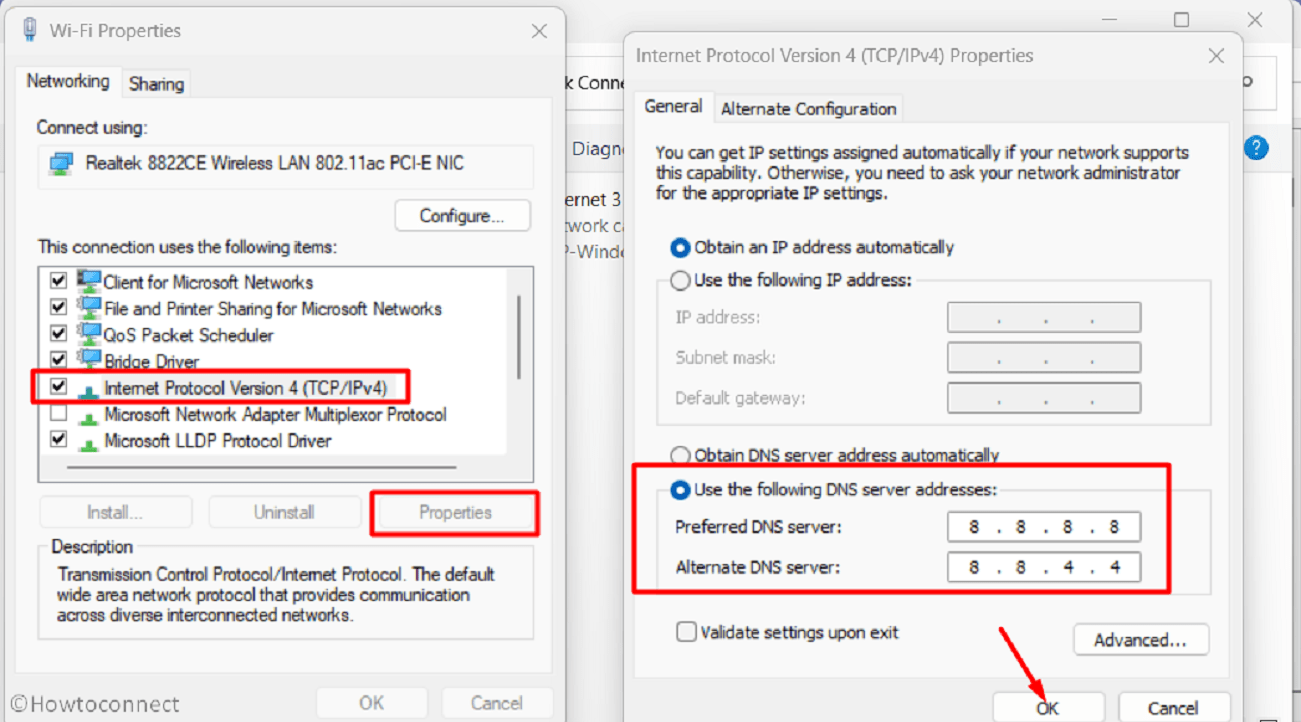
- Choose Properties.
- Highlight the option “Internet Protocol version 4 (TCP/IPv4)” by clicking on it.
- Select – “Use the following DNS server addresses“.
- Type the below given IP addresses:
Preferred DNS server - 8.8.8.8
Alternate DNS server - 8.8.4.4- Select OK and close the window.
- Restart the computer, and try installing KB5029351.
Read: How to Change DNS Server Address in Windows 11 (4 Methods)
Repair corrupted system file and installation data
Unblemished system files are imperative for the installation of KB5029351, the preview patch from August 2023. In the event of corruption, built-in tools such as SFC and DISM can be employed to rectify the issue and facilitate a successful update installation. Corruption typically arises due to outdated drivers and clashes between incompatible software and Windows files.
SFC conducts scans of vital files on your computer to identify any instances of damage or absence, ensuring the integrity of these files and enabling seamless upgrades. In addition, DISM is capable of rectifying problems with files like .wim, virtual hard disk .vhd, or .vhdx.
- Open Command Prompt as administrator.
- Type
sfc /scannowand hit enter. - Once the tool checks the components and files and repairs them, restart your computer.
- Try installing KB5029263 and see what happens now.
- If the issue still persists, launch the Administrator: Command Prompt once more.
- Run the following commands sequentially:
DISM /Online /Cleanup-Image /CheckHealth
DISM /Online /Cleanup-Image /ScanHealth
DISM /Online /Cleanup-Image /RestoreHealth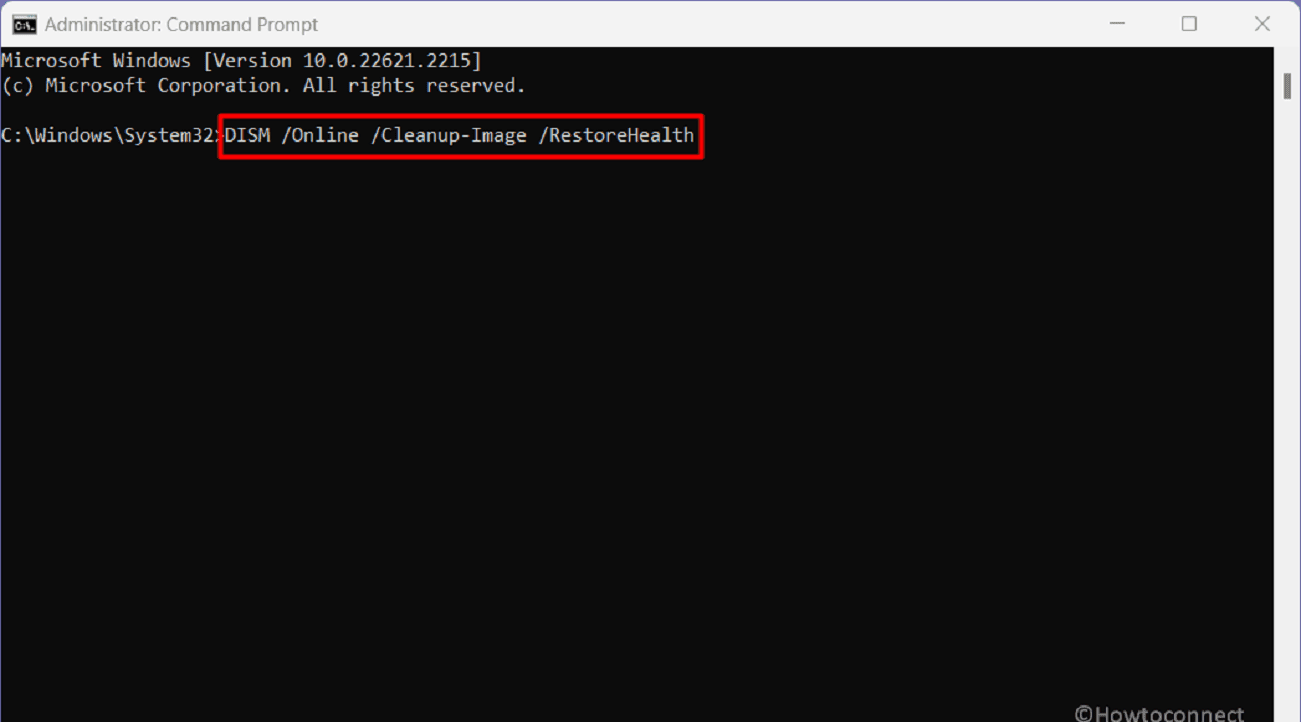
- Finally, reboot the device and install the update.
Install the patch in Clean Boot
Performing a Clean Boot involves temporarily deactivating all the additional programs that typically initiate when your computer starts up. If your system functions without issues during the Clean Boot, it indicates that one of the programs you disabled could be responsible for the problem, potentially resolving the KB5029351 failed to install.
- Type MSconfig in the search and press “Enter”.
- When System Configuration window fully opens, switch to the Services tab.
- Mark the option Hide all Microsoft services.
- Then, click Disable All button.
- Click on the Startup tab.
- Then, click the link – “Open Task Manager“.
- Right-click on each of the programs, and select the option Disable.
- Close the Task Manager and back to System Configuration to click on Apply and OK.
- A popup will prompt; select Restart.
- In the Clean Startup mode, install the update.
Also, read Windows 11 Build 22621.2213 KB5029351 Update is available for 22H2.
Perform In-place upgrade
An in-place upgrade provides a method to update your computer’s operating system to a more recent version, while aiming to retain your existing data. This approach can effectively address the KB5029351 failed to install error and facilitate the successful receipt of the new LCU.
- Navigate to the website where ISO file is found.
- Scroll down and reach the heading Download Windows 11 Disk Image (ISO).
- A dropdown would have been being shown; click Select Download.
- Select “Windows 11 (multi-edition ISO for x64 devices)”.
- Then click on Download now.
- After the page reloads, choose product languages.
- Click Confirm and select 64-bit Download.
- After the ISO image is downloaded, launch File Explorer (Win+E) and go to the Downloads folder.
- Right-click on “.iso” and select Mount.
- Choose Open.
- From the new folder, right-click on Setup.exe and select Yes on the warning popup.
- “Install Windows 11” window will appear; click on Next.
- On the “Applicable notices and license term” window, select the button that says Accept.
We hope with these 9 ways you will able to fix KB5029351 Failed to Install in your Windows 11 21H2.
Methods:
Use the alternative method Microsoft update catalog
Run the default Troubleshooter
Clear and Reset the Windows Update cache
Change the Startup type and Running status of Services associated with Windows update
Turn off Third-Party Antivirus
Use Google’s Alternate and Preferred DNS server addresses
Repair corrupted system file and installation data
Install the patch in Clean Boot
Perform In-place upgrade
That’s all!!
